

Accessing Labels
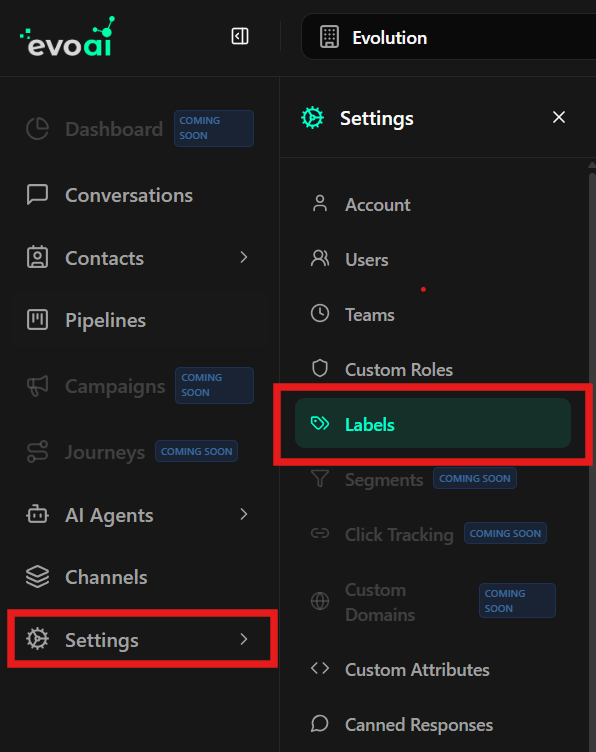
To access the labels management area:- In the left sidebar menu, click Settings.
- In the settings options list, select Labels.
Viewing the Labels List
The main labels screen displays:- Title: “Labels” at the top left in large bold font
- Counter: The total number of created labels just below the title (e.g., “0 labels in total” or “1 label in total”)
- Search Bar: Field to filter labels by name, located below the title and counter
- Create Button: Green/turquoise ”+ New Label” button in the top right corner of the screen
- Labels Table: Lists all labels with their information when there are labels created
Searching Labels
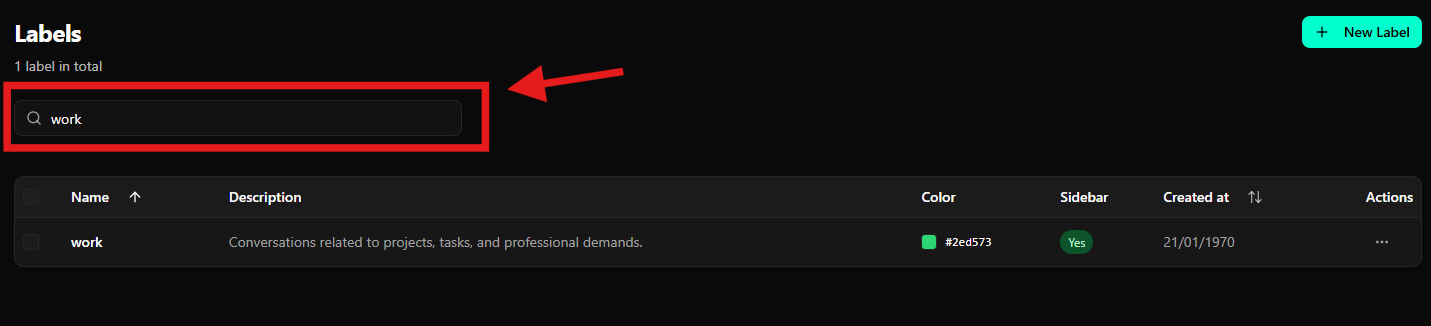
The search bar allows you to quickly locate labels by name.How to search
- At the top of the screen, locate the “Search labels…” field with the search icon
- Type the name or part of the name of the desired label
- The labels table will be automatically updated as you type, showing only labels that match the search
Creating a New Label
There are two ways to start creating a new label: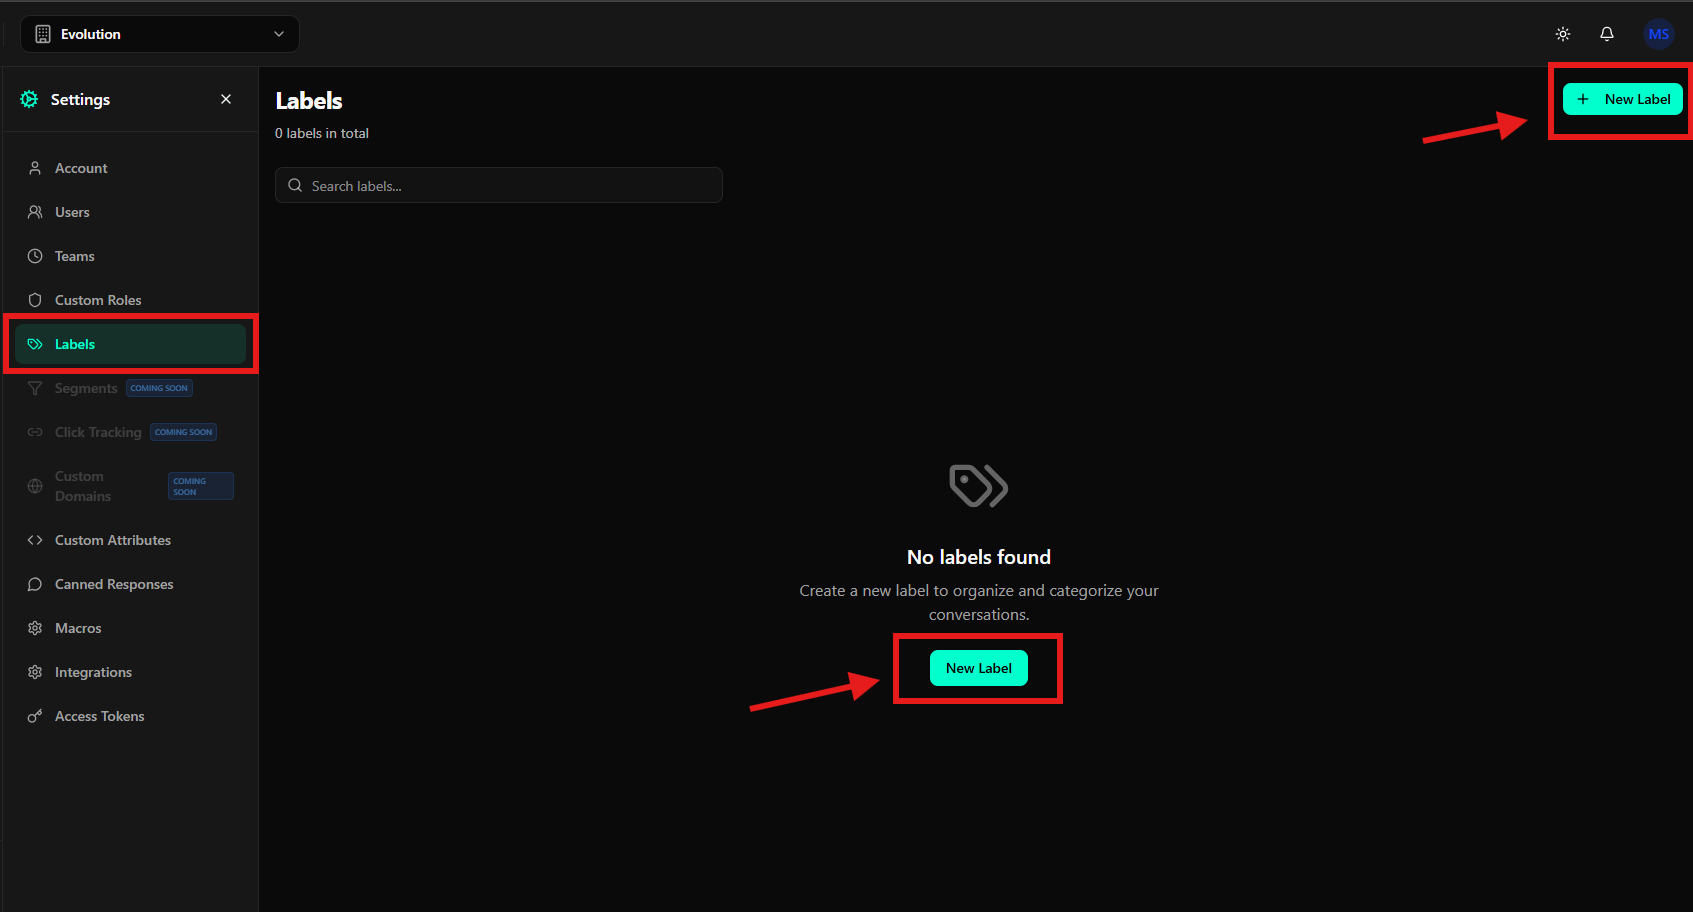
Option 1: Header Button
- Click the green ”+ New Label” button located in the top right corner of the screen
Option 2: Empty State Button
When there are no labels created, click the green “New Label” button in the center of the screen.Filling Out the Creation Form
After clicking any of the buttons, a modal will be displayed with a dark background containing: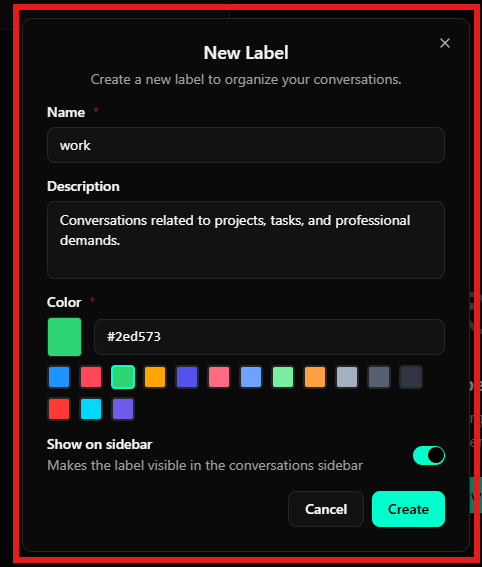
- Title: “New Label” at the top of the modal
- Description: “Create a new label to organize your conversations.” just below the title
- Close Button: An “X” icon in the top right corner to close the modal without saving
1. Name (Required)
- Field: Name (marked with red asterisk
*indicating required field) - Type: Simple text field
- Description: Identifier name of the label
- Example: “work”, “urgent”, “follow-up”
- Recommendation: Use short and descriptive names
- Location: First field of the form
2. Description (Optional)
- Field: Description (no asterisk, indicating optional field)
- Type: Text area (textarea) larger than the name field
- Description: Explanatory text about the label’s purpose
- Example: “Conversations related to projects, tasks, and professional demands.”
- Usage: Helps other team members understand when to use this label
- Location: Second field of the form, below the Name field
3. Color (Required)
- Field: Color (marked with red asterisk
*indicating required field) - Description: Visual color that identifies the label
- Color Selection:
- Preview: A solid colored square on the left shows the currently selected color
- Hexadecimal Code: An input field next to the square allows directly entering a color code (e.g.,
#2ed573for vibrant green) - Color Palette: A grid of predefined colors is available below the hexadecimal code field, allowing quick selection
- Selected Color: The color chosen in the palette is highlighted
- Available Colors: The palette includes various options such as blue, red, pink, orange, purple, light green, dark green, gray, black, among others
- Location: Third field of the form, below the Description field
4. Show on Sidebar
- Field: Show on sidebar
- Type: Toggle switch
- Description: Explanatory text below the title: “Makes the label visible in the conversations sidebar”
- Visual State:
- When Activated: The toggle is in the “on” position with green/turquoise background
- When Deactivated: The toggle is in the “off” position with gray background
- Behavior:
- When Activated: The label will appear in the conversations sidebar for quick access
- When Deactivated: The label will exist but will not be displayed in the sidebar
- Location: Fourth field of the form, below color selection
Finalizing Creation
At the bottom of the modal, there are two action buttons:- Cancel: Dark gray button with white text, located on the left
- Create: Bright green/turquoise button with white text, located on the right (color corresponds to the selected color for the label)
- Review the entered information
- Click the green “Create” button to create the label
- Or click “Cancel” to close the modal without saving
- Alternatively, click the “X” icon in the top right corner to close without saving
Viewing Labels in the Table
After creating labels, they will be displayed in a table with the following columns:Table Columns
- Checkbox: Individual or bulk selection of labels
- Name: Label name (sortable)
- Description: Label description
- Color: Label color with hexadecimal code
- Sidebar: Indicates if the label is visible in the sidebar (Yes/No)
- Created at: Label creation date (sortable)
- Actions: Action menu to manage the label
Table Features
- Multiple Selection: Use checkboxes to select multiple labels and perform bulk actions
- Sorting: Click on the “Name” or “Created at” column headers to sort the table
- Integrated Search: The search bar above the table filters results in real-time
Editing a Label
To modify an existing label:- In the labels table, locate the label you want to edit
- In the Actions column, click the three dots icon (
...) corresponding to the label - A dropdown menu will be displayed with available options
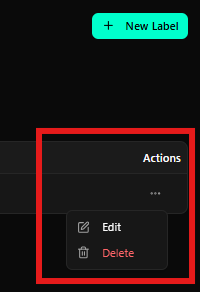
- In the dropdown menu, click Edit (accompanied by a pencil icon)
- A modal similar to the creation one will open, but with the title “Edit Label” and fields already filled with the label’s current values
- Modify the desired fields:
- Name
- Description
- Color (select a new color in the palette or enter a new hexadecimal code)
- Sidebar visibility (Show on sidebar toggle)
- Review the changes
- Click the green “Update” or “Save” button to save the changes
- Or click “Cancel” to discard the changes
Deleting a Label
To remove a label:- In the labels table, locate the label you want to delete
- In the Actions column, click the three dots icon (
...) corresponding to the label - In the dropdown menu that appears, click Delete (accompanied by a trash icon, displayed in red text to indicate a destructive action)
- A confirmation dialog will be displayed
- Confirm the deletion in the dialog that appears
Final Considerations
- Organization: Use labels consistently to facilitate conversation organization and search
- Colors: Choose distinct colors for different types of labels, facilitating quick visual identification
- Sidebar: Activate “Show on sidebar” only for frequently used labels, keeping the sidebar organized
- Nomenclature: Use clear and descriptive names so all team members understand the purpose of each label
- Descriptions: Fill in label descriptions to document when and how to use them