

Accessing Access Tokens
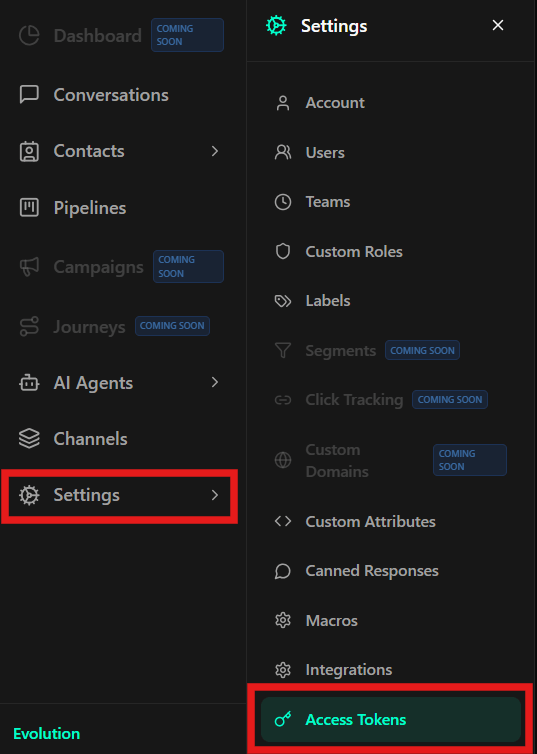
To access the access token management area:- In the left sidebar menu, click Settings.
- In the settings options list, select Access Tokens.
Searching Access Tokens
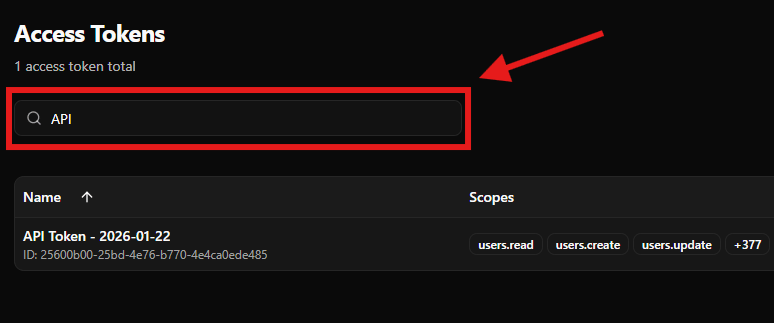
The search bar allows you to quickly locate tokens by name.How to search
- At the top of the screen, locate the “Search access tokens…” field with the search icon
- Type the name or part of the name of the desired token
- The tokens table will be automatically updated as you type, showing only tokens that match the search
Creating a New Access Token
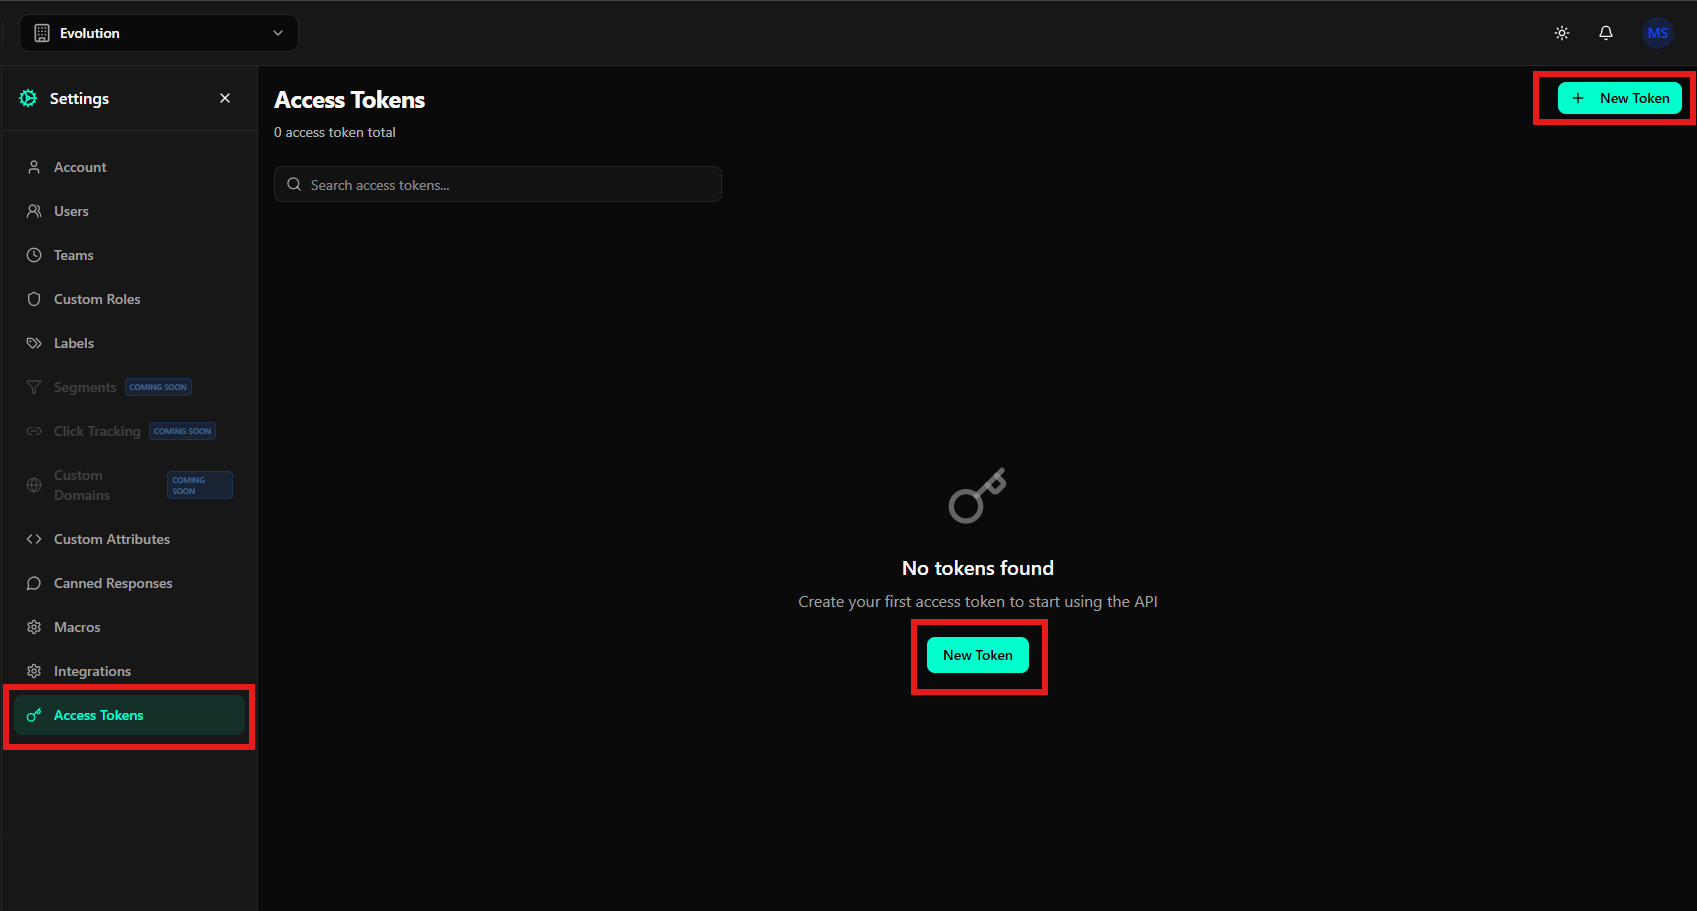
There are two ways to start creating a new access token:Option 1: Header Button
- Click the green ”+ New Token” button located in the top right corner of the screen
Option 2: Empty State Button
When there are no tokens created, click the green “New Token” button in the center of the screen.Filling Out the Creation Form
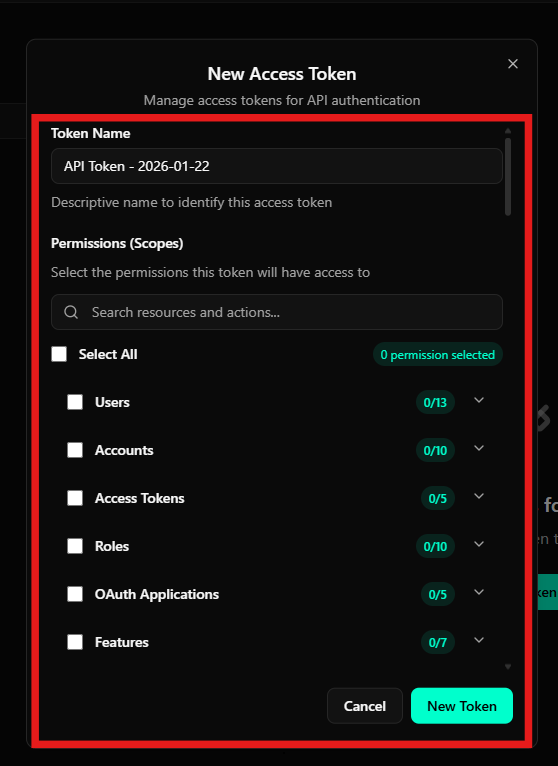
After clicking any of the buttons, a modal will be displayed with a dark background containing:- Title: “New Access Token” at the top of the modal
- Description: “Manage access tokens for API authentication.” just below the title
- Close Button: An “X” icon in the top right corner to close the modal without saving
1. Token Name (Required)
- Field: Token Name
- Type: Simple text field
- Description: Descriptive name to identify this access token
- Help Text: “Descriptive name to identify this access token” below the field
- Default Value: The field may come pre-filled with a default name like “API Token - 2026-01-22” (including the current date)
- Example: “API Token - 2026-01-22”, “WhatsApp Integration”, “Report Automation”
- Recommendation: Use descriptive names that indicate the token’s purpose and when it was created
- Location: First field of the form
2. Permissions (Scopes)
The Permissions (Scopes) section allows you to define which resources and actions the token can access in the API. Permissions are organized into main categories:Permissions Overview
- Explanatory Text: “Select the permissions this token will have access to”
- Search Bar: Field with search icon and placeholder “Search resources and actions…” to quickly locate specific permissions
- Selection Counter: Displays “0 permission selected” or “X permission selected” indicating how many permissions have been selected in total
- Select All Button: Checkbox at the top to select all available permissions at once
Available Permission Categories
Permissions are organized into categories, each with a counter showing how many permissions have been selected out of the total available:-
Users (0/13)
- Description: Permissions related to user management
- Example scopes:
users.read,users.create,users.update - Total: 13 available permissions
-
Accounts (0/10)
- Description: Permissions related to account management
- Total: 10 available permissions
-
Access Tokens (0/5)
- Description: Permissions related to access token management
- Total: 5 available permissions
-
Roles (0/10)
- Description: Permissions related to role and function management
- Total: 10 available permissions
-
OAuth Applications (0/5)
- Description: Permissions related to OAuth application management
- Total: 5 available permissions
-
Features (0/7)
- Description: Permissions related to feature management
- Total: 7 available permissions
How to Select Permissions
- Permission Search: Use the “Search resources and actions…” search bar to quickly locate specific permissions
- Individual Selection: Click individual checkboxes in each category to grant all permissions in that category
- Total Selection: Click the “Select All” checkbox at the top of the section to select all available permissions
- Selection View: The “X permission selected” counter is updated in real-time as you select or remove permissions
Finalizing Creation
At the bottom of the modal, there are two action buttons:- Cancel: Dark button with white text, located on the left
- New Token: Bright green/turquoise button with white text, located on the right
- Review the entered information, especially the name and selected permissions
- Click the green “New Token” button to create the access token
- Or click “Cancel” to close the modal without saving
- Alternatively, click the “X” icon in the top right corner to close without saving
Viewing Access Tokens in the Table
After creating access tokens, they will be displayed in a table with the following columns:Table Columns
- Name: Token name (sortable - indicated by up/down arrow)
- Displays the descriptive name of the token (e.g., “API Token - 2026-01-22”)
- Below the name, displays the unique token ID in the format “ID: 25600b00-25bd-4e76-b770-4e4ca0ede485”
- Scopes: Permissions (scopes) assigned to the token
- Displays tags with scope names (e.g., “users.read”, “users.create”, “users.update”)
- When there are many scopes, displays the first ones and a “+X” indicator showing how many additional scopes exist (e.g., “+377”)
- Owner: Token owner
- Displays a badge indicating whether the token belongs to “Account” or a specific user
- Created At: Token creation date (sortable - indicated by up/down arrow)
- Displays the date in “DD/MM/YYYY” format (e.g., “22/01/2026”)
- Actions: Action menu to manage the token
- Three vertical dots icon (
...) that opens a dropdown menu with options
- Three vertical dots icon (
Table Features
- Sorting: Click on the “Name” or “Created At” column headers to sort the table in ascending or descending order
- Integrated Search: The search bar above the table filters results in real-time
- Scope View: Scopes are displayed as tags, making it easy to quickly view token permissions
Viewing a Token
To view the complete details of a token:- In the access tokens table, locate the token you want to view
- In the Actions column, click the three dots icon (
...) corresponding to the token - A dropdown menu will be displayed with available options
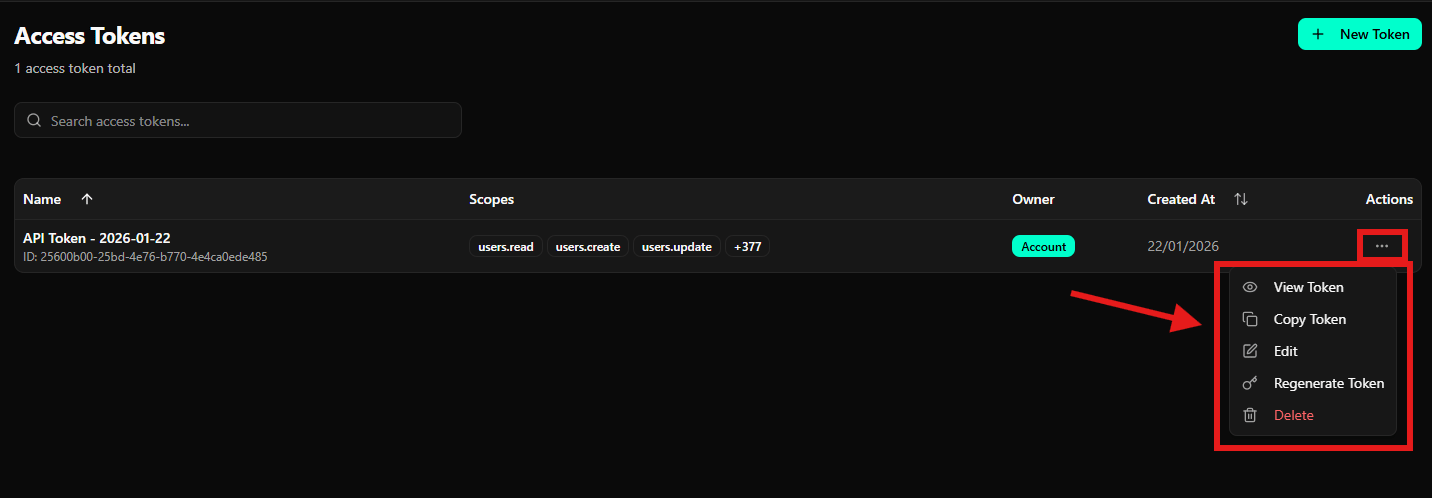
- In the dropdown menu, click View Token (accompanied by an eye icon)
Copying a Token
To copy a token value to the clipboard:- In the access tokens table, locate the token you want to copy
- In the Actions column, click the three dots icon (
...) corresponding to the token - A dropdown menu will be displayed with available options
- In the dropdown menu, click Copy Token (accompanied by a copy icon)
Editing an Access Token
To modify an existing access token:- In the access tokens table, locate the token you want to edit
- In the Actions column, click the three dots icon (
...) corresponding to the token - A dropdown menu will be displayed with available options
- In the dropdown menu, click Edit (accompanied by a pencil icon)
- A modal similar to the creation one will open, but with the title “Edit Access Token” and fields already filled with the token’s current values
- Modify the desired fields:
- Token name
- Permissions (scopes) - add or remove permissions as needed
- Review the changes
- Click the green “Update Token” or “Save” button to save the changes
- Or click “Cancel” to discard the changes
Regenerating an Access Token
To generate a new value for an existing token (keeping the same ID and metadata):- In the access tokens table, locate the token you want to regenerate
- In the Actions column, click the three dots icon (
...) corresponding to the token - A dropdown menu will be displayed with available options
- In the dropdown menu, click Regenerate Token (accompanied by a key icon)
- A confirmation dialog will be displayed
- Confirm the regeneration in the dialog that appears
- Regeneration will create a new value for the token, invalidating the previous value
- The token ID will remain the same, but the token value will be completely new
- Make sure to update all applications and integrations that use this token with the new value
- The old token value will stop working immediately after regeneration
- The new token value will be displayed only once after regeneration - make sure to copy it and store it in a secure location
Deleting an Access Token
To remove an access token:- In the access tokens table, locate the token you want to delete
- In the Actions column, click the three dots icon (
...) corresponding to the token - A dropdown menu will be displayed with available options
- In the dropdown menu, click Delete (accompanied by a trash icon, displayed in red text to indicate a destructive action)
- A confirmation dialog will be displayed
- Confirm the deletion in the dialog that appears
- Deleting an access token is permanent and cannot be undone
- All applications and integrations using this token will lose access immediately after deletion
- Verify that there are no critical systems depending on this token before deleting it
- It is recommended to regenerate the token instead of deleting it if you suspect it has been compromised, but still need to keep the integration working
Final Considerations
- Principle of Least Privilege: Grant only the permissions necessary for each token to perform its specific function, avoiding excessive access
- Clear Nomenclature: Use descriptive and clear names so all team members understand the purpose of each token
- Secure Storage: Store access tokens in secure locations, such as password managers or encrypted environment variables. Never commit tokens to code repositories
- Regular Rotation: Consider regenerating tokens periodically as part of a security strategy
- Audit: Periodically review existing tokens to ensure they are all still in use and have appropriate permissions
- Granular Permissions: Use granular permissions to create specific tokens that meet exactly the needs of each integration or application
- Monitoring: Monitor token usage to identify suspicious or unauthorized activities
- Documentation: Document the purpose and use of each token to facilitate maintenance and management