

Accessing Canned Responses
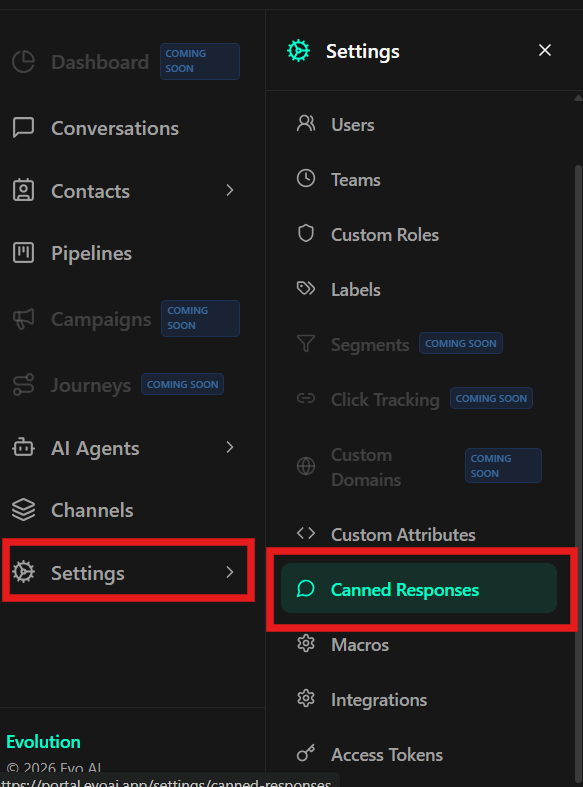
To access the canned responses management area:- In the left sidebar menu, click Settings.
- In the settings options list, select Canned Responses.
Searching Canned Responses
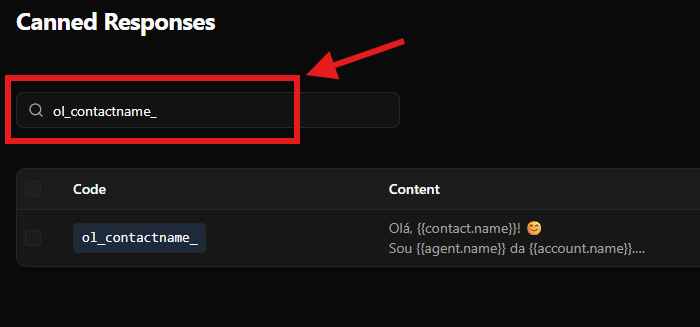
The search bar allows you to quickly locate canned responses by code or content.How to search
- At the top of the screen, locate the “Search by code or content…” field with the search icon
- Type the code or part of the response content you want
- The responses table will be automatically updated as you type, showing only responses that match the search
Creating a New Canned Response
There are two ways to start creating a new canned response:Option 1: Header Button
- Click the green ”+ New Response” button located in the top right corner of the screen
Option 2: Empty State Button
When there are no canned responses created, click the green “New Response” button in the center of the screen.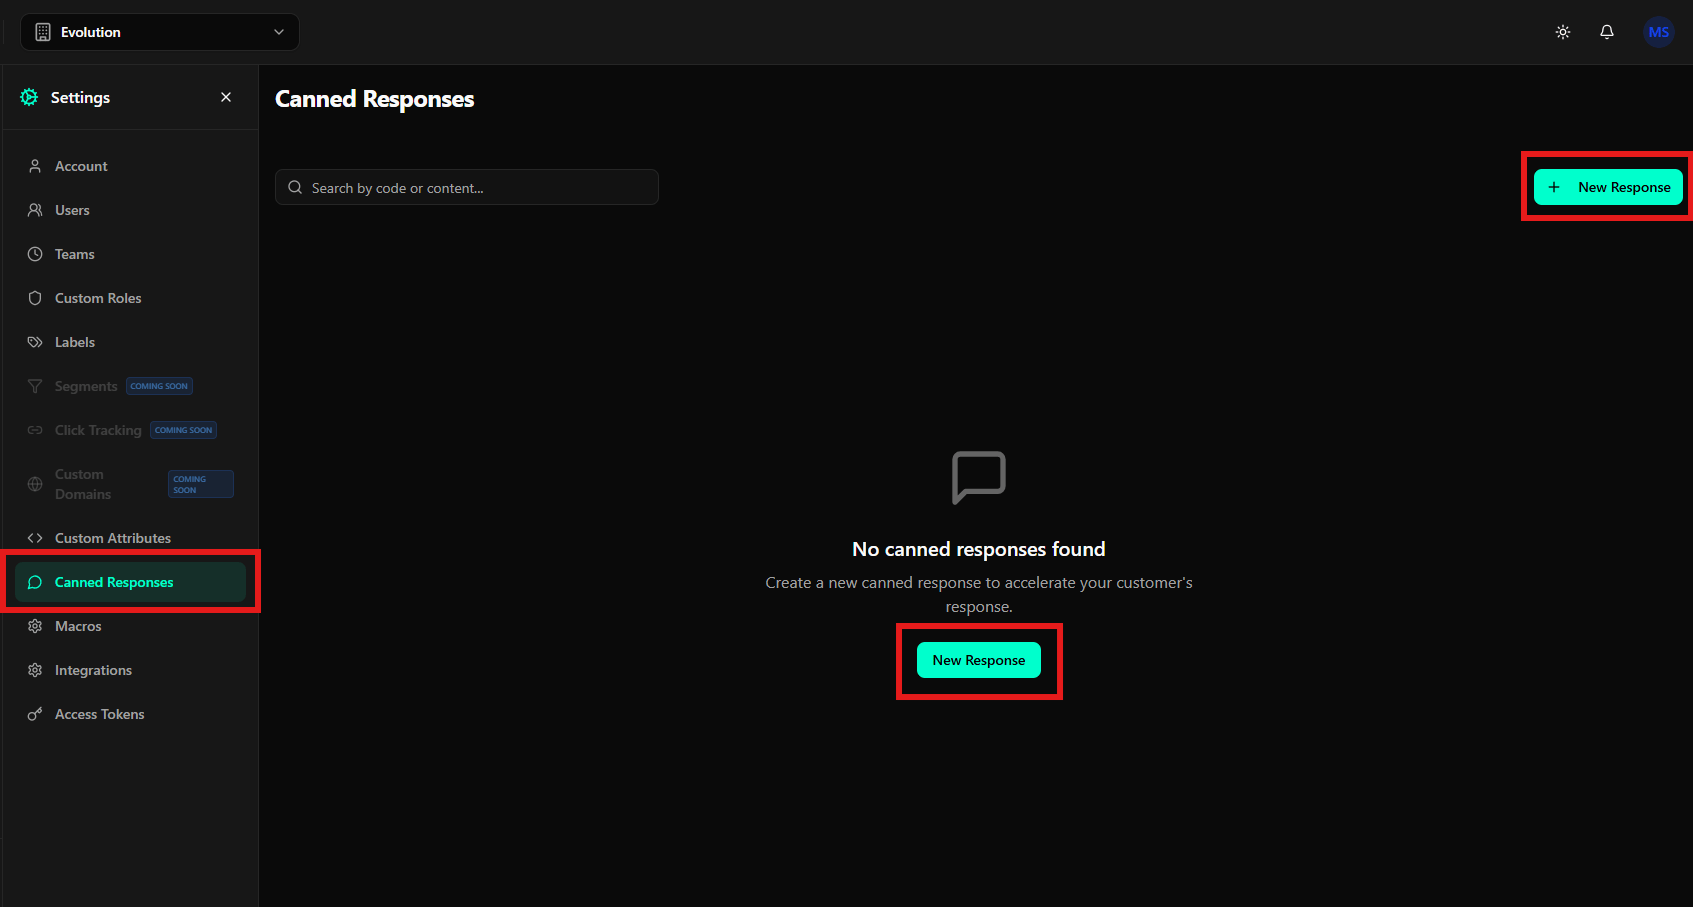
Filling Out the Creation Form
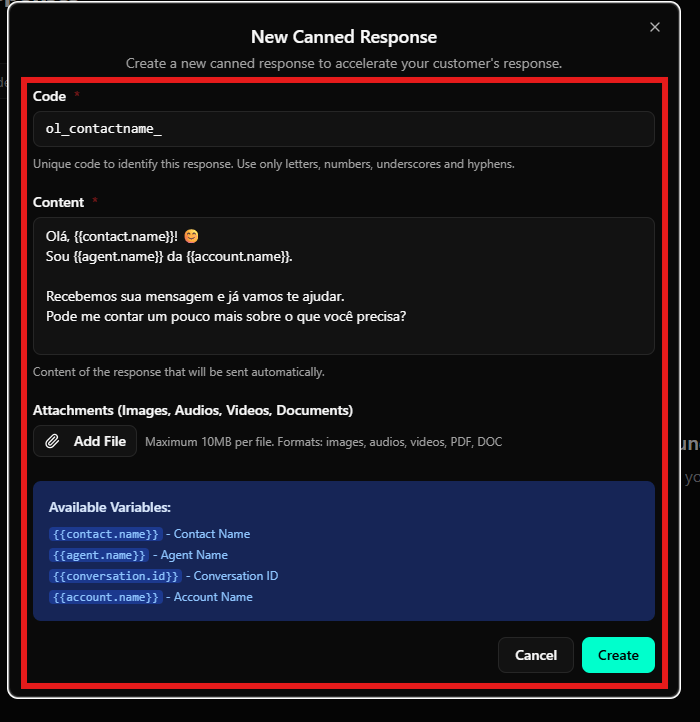
After clicking any of the buttons, a modal will be displayed with a dark background containing:- Title: “New Canned Response” at the top of the modal
- Description: “Create a new canned response to accelerate your customer’s response.” just below the title
- Close Button: An “X” icon in the top right corner to close the modal without saving
1. Code (Required)
- Field: Code (marked with asterisk
*indicating required field) - Type: Simple text field
- Description: Unique code to identify this response
- Help Text: “Unique code to identify this response. Use only letters, numbers, underscores and hyphens.”
- Rules: Use only letters, numbers, underscores, and hyphens
- Example:
ol_contactname_,greeting_message,follow-up-response - Recommendation: Use descriptive and short codes that facilitate quick response identification
- Location: First field of the form
2. Content (Required)
- Field: Content (marked with asterisk
*indicating required field) - Type: Large text area (textarea)
- Description: Content of the response that will be sent automatically
- Help Text: “Content of the response that will be sent automatically.”
- Dynamic Variables: You can use variables between double braces
{{ }}that will be automatically replaced:{{contact.name}}- Contact name{{agent.name}}- Agent name{{account.name}}- Account name{{conversation.id}}- Conversation ID
- Example:
- Emojis: You can include emojis in the response content
- Location: Second field of the form, below the Code field
3. Attachments (Optional)
- Field: Attachments (Images, Audios, Videos, Documents)
- Type: File upload
- Description: Allows adding files to the canned response
- Button: “Add File” with paperclip icon
- Limitations:
- Maximum 10MB per file
- Accepted formats: images, audios, videos, PDF, DOC
- Usage: Add files that complement the response, such as explanatory images, documents, or audios
- Location: Third field of the form, below the Content field
4. Available Variables
- Section: “Available Variables:”
- Type: Information box with variable list
- Description: Lists all variables that can be used in the Content field
- Available Variables:
{{contact.name}}- Contact Name{{agent.name}}- Agent Name{{conversation.id}}- Conversation ID{{account.name}}- Account Name
- Usage: Click or type the variables directly in the Content field to personalize the response
- Location: Fourth section of the form, below the Attachments field
Finalizing Creation
At the bottom of the modal, there are two action buttons:- Cancel: Dark gray button with white text, located on the left
- Create: Bright green/turquoise button with white text, located on the right
- Review the entered information, especially the code and content
- Verify that the variables are correctly written (with double braces
{{ }}) - If necessary, add attachments to the response
- Click the green “Create” button to create the canned response
- Or click “Cancel” to close the modal without saving
- Alternatively, click the “X” icon in the top right corner to close without saving
Viewing Canned Responses in the Table
After creating canned responses, they will be displayed in a table with the following columns:Table Columns
- Checkbox: Individual or bulk selection of canned responses
- Code: Unique identifier code of the canned response
- Displays the code defined during creation (e.g.,
ol_contactname_) - The code may be clickable or visually highlighted
- Displays the code defined during creation (e.g.,
- Content: Complete content of the canned response
- Displays the full text of the response, including dynamic variables (e.g.,
Hello, {{contact.name}}!😊 I'm {{agent.name}} from {{account.name}}....) - Variables are displayed as written, with double braces
- Displays the full text of the response, including dynamic variables (e.g.,
- Created at: Canned response creation date
- Displays the date in DD/MM/YYYY format (e.g., “22/01/2026”)
- Actions: Action menu to manage the canned response
- Three horizontal dots icon (
...) that opens a dropdown menu with options
- Three horizontal dots icon (
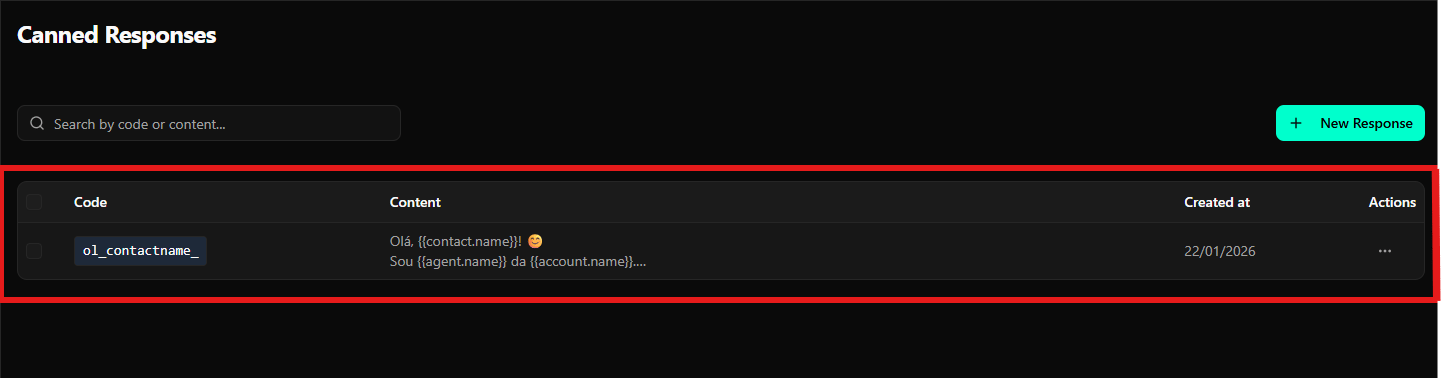
Table Features
- Multiple Selection: Use checkboxes to select multiple canned responses and perform bulk actions
- Integrated Search: The search bar above the table filters results in real-time by code or content
- Complete View: The complete response content is displayed in the table, facilitating quick identification
Editing a Canned Response
To modify an existing canned response:- In the canned responses table, locate the response you want to edit
- In the Actions column, click the three dots icon (
...) corresponding to the response - A dropdown menu will be displayed with available options
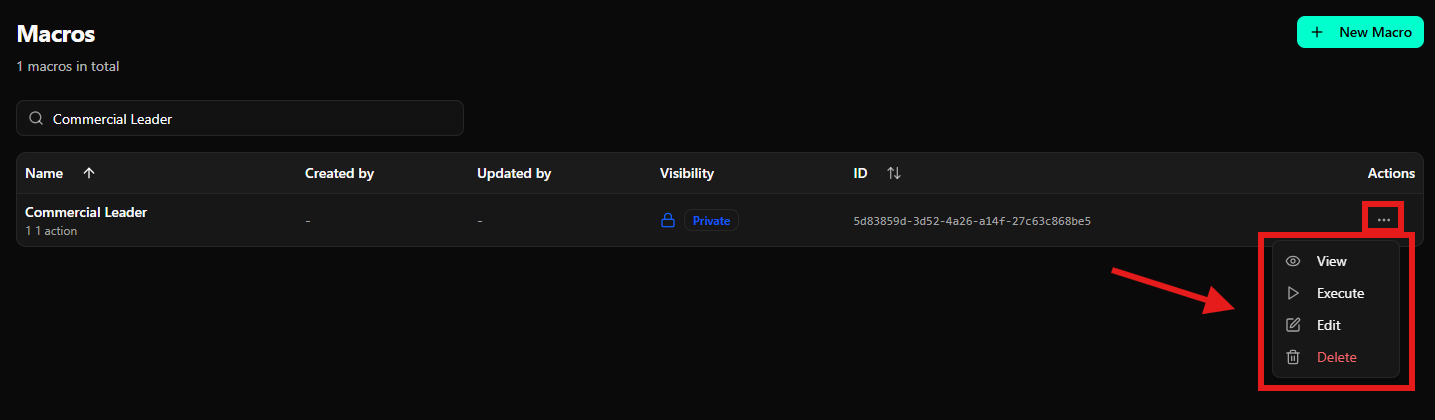
- In the dropdown menu, click Edit (accompanied by a pencil icon)
- A modal similar to the creation one will open, but with the title “Edit Canned Response” and fields already filled with the response’s current values
- Modify the desired fields:
- Code (if necessary)
- Content (including dynamic variables)
- Attachments (add or remove files as needed)
- Review the changes, especially the dynamic variables
- Click the green “Update” or “Save” button to save the changes
- Or click “Cancel” to discard the changes
Deleting a Canned Response
To remove a canned response:- In the canned responses table, locate the response you want to delete
- In the Actions column, click the three dots icon (
...) corresponding to the response - A dropdown menu will be displayed with available options
- In the dropdown menu, click Delete (accompanied by a trash icon, displayed in red text to indicate a destructive action)
- A confirmation dialog will be displayed
- Confirm the deletion in the dialog that appears
- Deleting a canned response is permanent and cannot be undone
- Verify that there are no processes or users depending on this response before deleting it
- Consider editing the response instead of deleting it if there are doubts about its future use
Using Dynamic Variables
Dynamic variables are a powerful feature of canned responses, allowing you to automatically personalize messages with context-specific information.Available Variables
{{contact.name}}- Replaced by the contact’s name in the conversation{{agent.name}}- Replaced by the name of the agent using the response{{account.name}}- Replaced by the account/organization name{{conversation.id}}- Replaced by the unique conversation ID
How to Use Variables
- When creating or editing a canned response, type the variables directly in the Content field
- Use the exact syntax: double braces
{{ }}with the variable name inside - Usage example:
- When the response is used, variables will be automatically replaced by real values
Usage Tips
- Personalization: Use
{{contact.name}}to make messages more personal and friendly - Identification: Use
{{agent.name}}and{{account.name}}to clearly identify who is responding - Tracking: Use
{{conversation.id}}when you need to reference the specific conversation - Combination: Combine multiple variables in the same response for maximum personalization
Final Considerations
- Unique Codes: Make sure to use unique and descriptive codes to facilitate quick response identification
- Dynamic Variables: Take advantage of dynamic variables to personalize responses and improve customer experience
- Clear Content: Write clear and objective content that efficiently conveys the desired message
- Attachments: Use attachments when necessary to complement the response with visual information or documents
- Organization: Keep canned responses organized with consistent and easy-to-remember codes
- Regular Review: Periodically review existing responses to ensure they remain relevant and updated
- Testing: Test dynamic variables before using in production to ensure they are working correctly
- Nomenclature: Use codes that follow a consistent pattern to facilitate search and organization