

Accessing Custom Roles
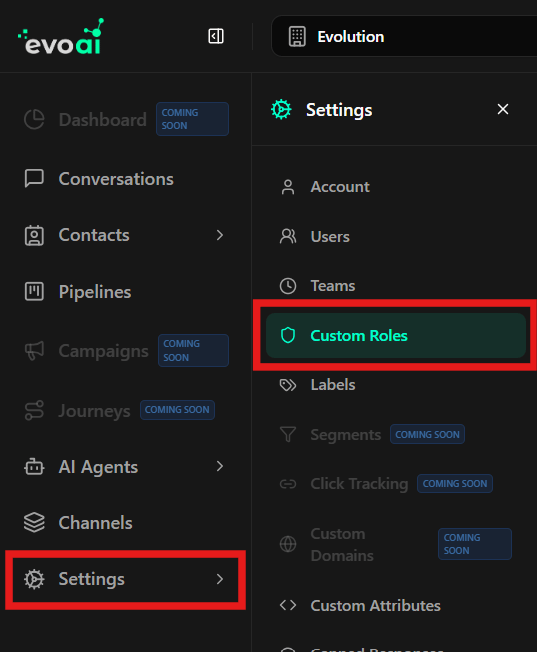
To access the custom roles management area:- In the left sidebar menu, click Settings.
- In the settings options list, select Custom Roles.
Viewing the Custom Roles List
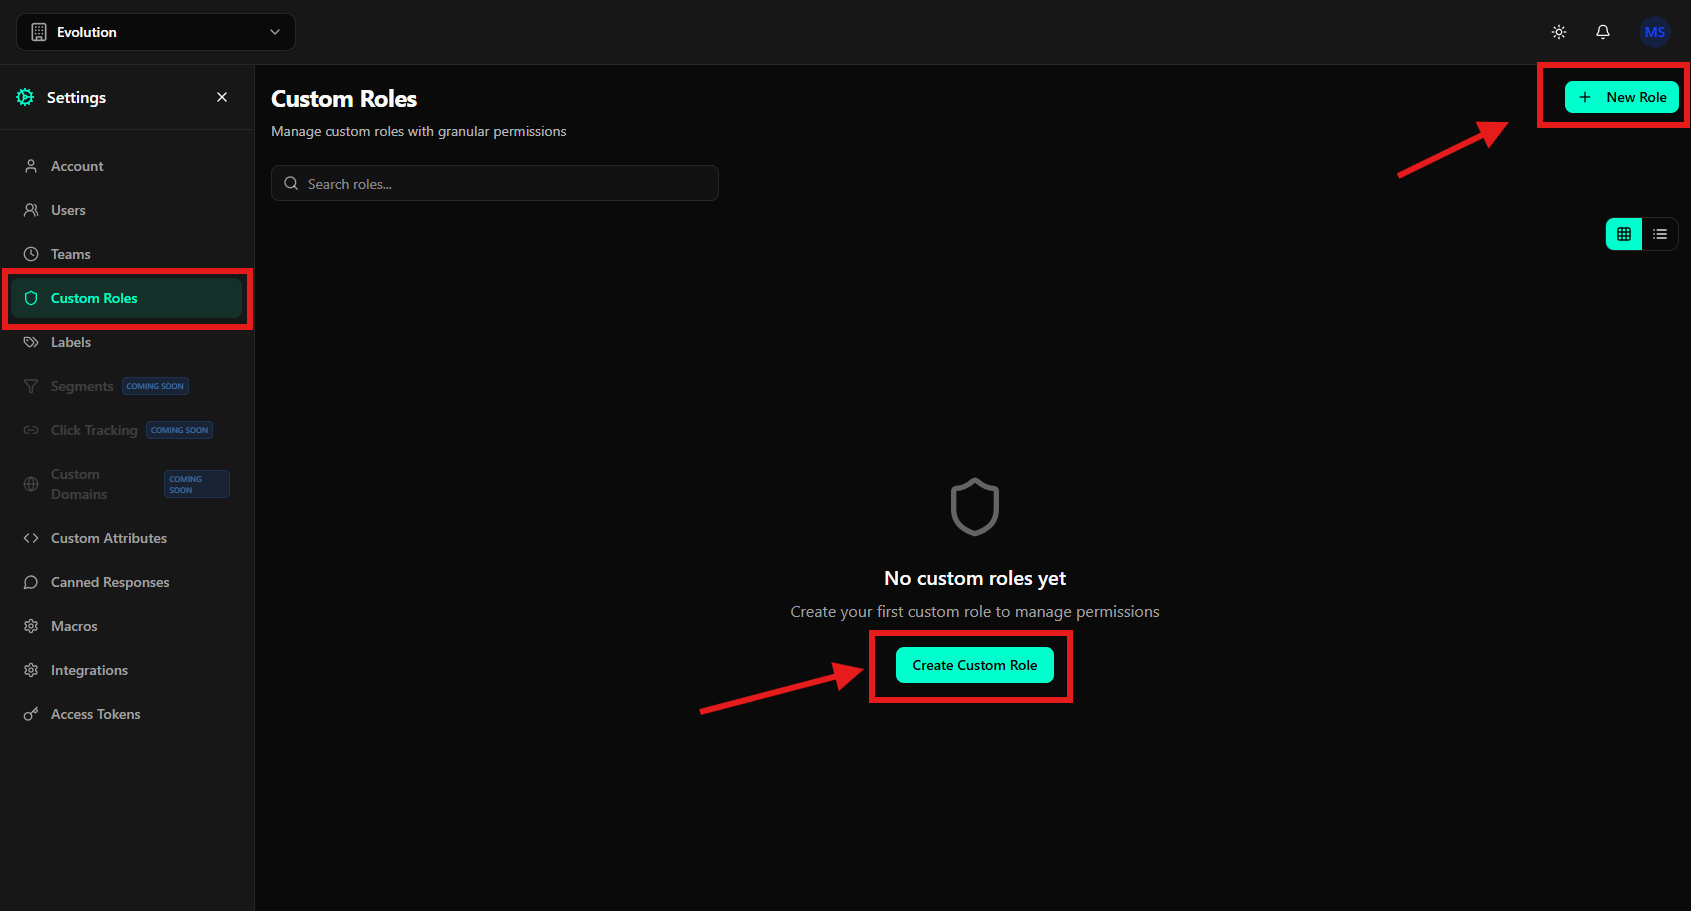
The main custom roles screen displays:- Title: “Custom Roles” at the top left in large bold font
- Subtitle: “Manage custom roles with granular permissions” below the title
- Search Bar: Field to filter roles by name, located below the subtitle with placeholder “Search roles…”
- Create Button: Green ”+ New Role” button in the top right corner of the screen
- View Toggle: Grid and list icons below the ”+ New Role” button to toggle between views
- Empty State: When there are no roles created, a central message “No custom roles yet” with a “Create Custom Role” button
Searching Custom Roles
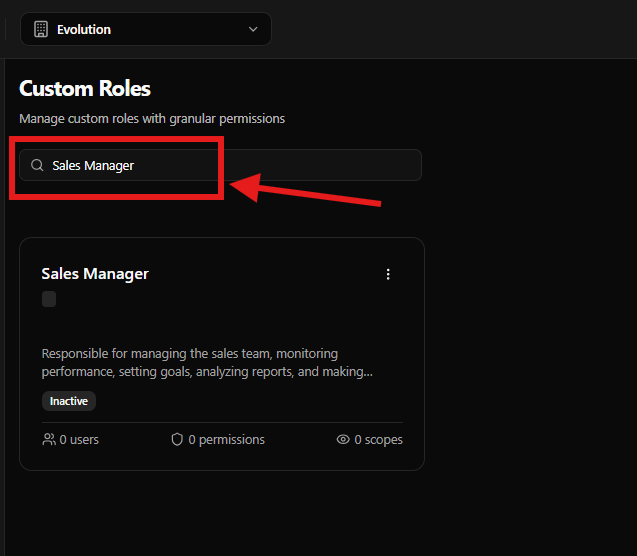
The search bar allows you to quickly locate roles by name.How to search
- At the top of the screen, locate the “Search roles…” field with the search icon
- Type the name or part of the name of the desired role
- The roles list will be automatically updated as you type, showing only roles that match the search
Creating a New Custom Role
There are two ways to start creating a new custom role:Option 1: Header Button
- Click the green ”+ New Role” button located in the top right corner of the screen
Option 2: Empty State Button
When there are no roles created, click the green “Create Custom Role” button in the center of the screen.Filling Out the Creation Form
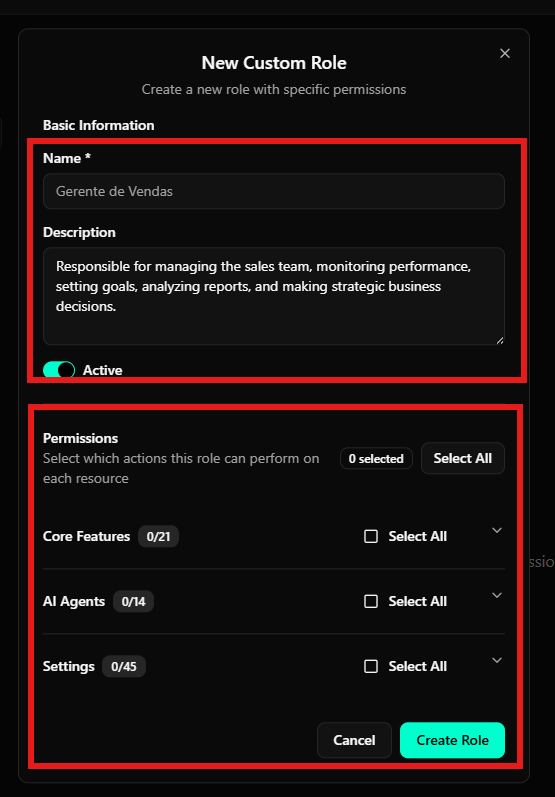
After clicking any of the buttons, a modal will be displayed with a dark background containing:- Title: “New Custom Role” at the top of the modal
- Description: “Create a new role with specific permissions.” just below the title
1. Basic Information
Name (Required)
- Field: Name (marked with red asterisk
*indicating required field) - Type: Simple text field
- Description: Identifier name of the custom role
- Example: “Sales Manager”, “Support Analyst”, “AI Administrator”
- Recommendation: Use clear and descriptive names that indicate the role’s purpose
- Location: First field of the form, in the “Basic Information” section
Description (Optional)
- Field: Description (no asterisk, indicating optional field)
- Type: Text area (textarea) larger than the name field
- Description: Explanatory text about the role’s purpose and responsibilities
- Example: “Responsible for managing the sales team, monitoring performance, setting goals, analyzing reports, and making strategic business decisions.”
- Usage: Helps other team members understand when to assign this role
- Location: Second field of the form, below the Name field
Active Status
- Field: Active
- Type: Toggle switch
- Description: Defines whether the role is active and can be assigned to users
- Visual State:
- When Activated: The toggle is in the “on” position with green/turquoise background
- When Deactivated: The toggle is in the “off” position with gray background
- Behavior:
- When Activated: The role can be assigned to users and is available for use
- When Deactivated: The role exists but cannot be assigned to new users
- Location: Third field of the form, below the Description field
2. Permissions
The Permissions section allows you to define which actions the role can perform on each system resource. Permissions are organized into three main categories:Permissions Overview
- Explanatory Text: “Select which actions this role can perform on each resource”
- Selection Counter: Displays “0 selected” or “X selected” indicating how many permissions have been selected in total
- Select All Button: Allows selecting all available permissions at once
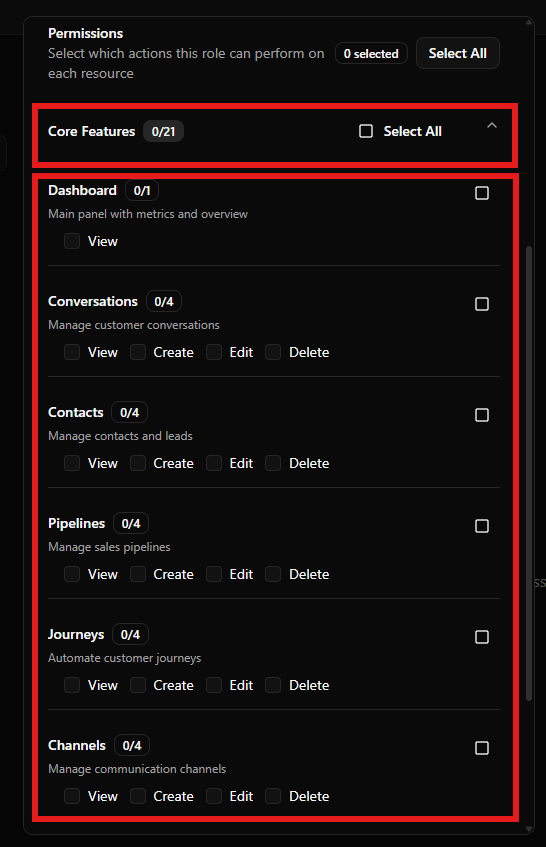
Core Features
This category contains permissions related to the system’s main functionalities:- Counter: Displays “0/21” or “X/21” indicating how many permissions have been selected out of a total of 21
- Select All: Checkbox to select all permissions in this category
- Expand Icon: Arrow to expand/collapse the section
-
Dashboard (0/1)
- Description: “Main panel with metrics and overview”
- Permissions: View
-
Conversations (0/4)
- Description: “Manage customer conversations”
- Permissions: View, Create, Edit, Delete
-
Contacts (0/4)
- Description: “Manage contacts and leads”
- Permissions: View, Create, Edit, Delete
-
Pipelines (0/4)
- Description: “Manage sales pipelines”
- Permissions: View, Create, Edit, Delete
-
Journeys (0/4)
- Description: “Automate customer journeys”
- Permissions: View, Create, Edit, Delete
-
Channels (0/4)
- Description: “Manage communication channels”
- Permissions: View, Create, Edit, Delete
-
Products (0/4) (starting in v1.0.0-rc3)
- Description: “Manage product catalog and variants”
- Permissions: View, Create, Edit, Delete
- By default,
account_ownergets all;agentgets View. See Products.
-
Template Bundles (0/2) (starting in v1.0.0-rc3)
- Description: “Export and import configuration bundles”
- Permissions: View, Manage
- By default only
account_ownergets Manage. Grant to other roles cautiously — Manage allows overwriting critical configuration. See Bundles.
- A main checkbox on the right to select all permissions in the subcategory
- Individual checkboxes for each action (View, Create, Edit, Delete)
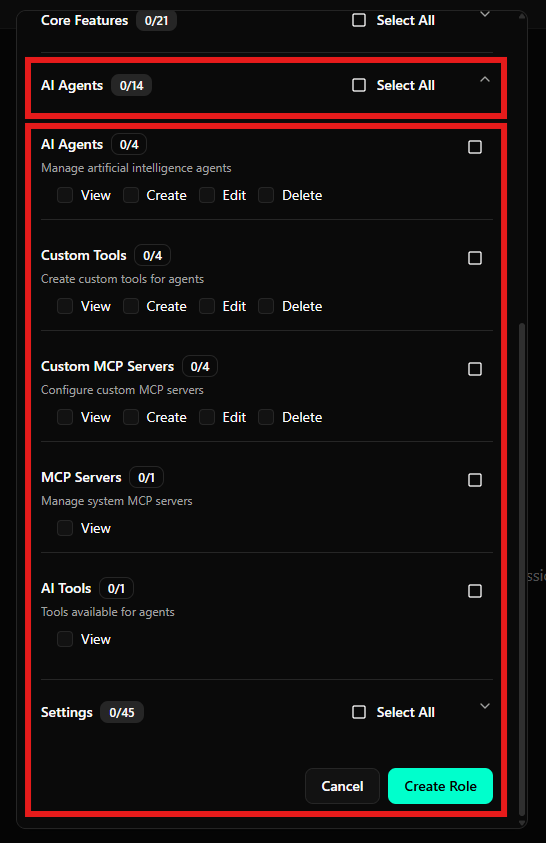
AI Agents
This category contains permissions related to artificial intelligence agent management:- Counter: Displays “0/14” or “X/14” indicating how many permissions have been selected out of a total of 14
- Select All: Checkbox to select all permissions in this category
- Expand Icon: Arrow to expand/collapse the section
-
AI Agents (0/4)
- Description: “Manage artificial intelligence agents”
- Permissions: View, Create, Edit, Delete
-
Custom Tools (0/4)
- Description: “Create custom tools for agents”
- Permissions: View, Create, Edit, Delete
-
Custom MCP Servers (0/4)
- Description: “Configure custom MCP servers”
- Permissions: View, Create, Edit, Delete
-
MCP Servers (0/1)
- Description: “Manage system MCP servers”
- Permissions: View
-
AI Tools (0/1)
- Description: “Tools available for agents”
- Permissions: View
- A main checkbox on the right to select all permissions in the subcategory
- Individual checkboxes for each available action
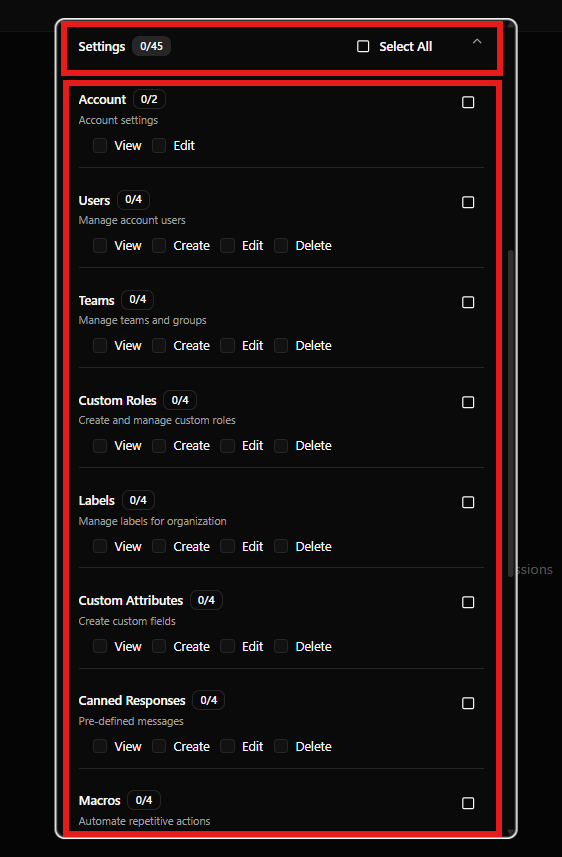
Settings
This category contains permissions related to system settings:- Counter: Displays “0/45” or “X/45” indicating how many permissions have been selected out of a total of 45
- Select All: Checkbox to select all permissions in this category
- Expand Icon: Arrow to expand/collapse the section
-
Account (0/2)
- Description: “Account settings”
- Permissions: View, Edit
-
Users (0/4)
- Description: “Manage account users”
- Permissions: View, Create, Edit, Delete
-
Teams (0/4)
- Description: “Manage teams and groups”
- Permissions: View, Create, Edit, Delete
-
Custom Roles (0/4)
- Description: “Create and manage custom roles”
- Permissions: View, Create, Edit, Delete
-
Labels (0/4)
- Description: “Manage labels for organization”
- Permissions: View, Create, Edit, Delete
-
Custom Attributes (0/4)
- Description: “Create custom fields”
- Permissions: View, Create, Edit, Delete
-
Canned Responses (0/4)
- Description: “Pre-defined messages”
- Permissions: View, Create, Edit, Delete
-
Macros (0/4)
- Description: “Automate repetitive actions”
- Permissions: View, Create, Edit, Delete
- A main checkbox on the right to select all permissions in the subcategory
- Individual checkboxes for each available action
How to Select Permissions
- Individual Selection: Click individual checkboxes for each action (View, Create, Edit, Delete) to grant specific permissions
- Subcategory Selection: Click the main checkbox on the right of each subcategory to select all permissions in that subcategory
- Category Selection: Click the “Select All” checkbox in the header of each category (Core Features, AI Agents, Settings) to select all permissions in the category
- Total Selection: Click the “Select All” button at the top of the permissions section to select all available permissions
Finalizing Creation
At the bottom of the modal, there are two action buttons:- Cancel: Dark gray button with white text, located on the left
- Create Role: Bright green/turquoise button with white text, located on the right
- Review the entered information, especially the selected permissions
- Click the green “Create Role” button to create the custom role
- Or click “Cancel” to close the modal without saving
Viewing Custom Roles in the List
After creating custom roles, they will be displayed in cards with the following information:Card Information
- Role Name: Bold title at the top of the card
- Description: Descriptive text of the role (may be truncated with ”…”)
- Status: Badge indicating whether the role is “Active” or “Inactive”
- Statistics: Three metrics displayed at the bottom of the card:
- Users: Number of users assigned to this role (e.g., “0 users”)
- Permissions: Number of permissions granted to the role (e.g., “0 permissions”)
- Scopes: Number of scopes configured (e.g., “0 scopes”)
- Action Menu: Three dots icon (
...) in the top right corner of the card to access options
List Features
- Integrated Search: The search bar above the list filters results in real-time
- View Toggle: Use grid and list icons to toggle between different views
Editing a Custom Role
To modify an existing custom role:- In the custom roles list, locate the role you want to edit
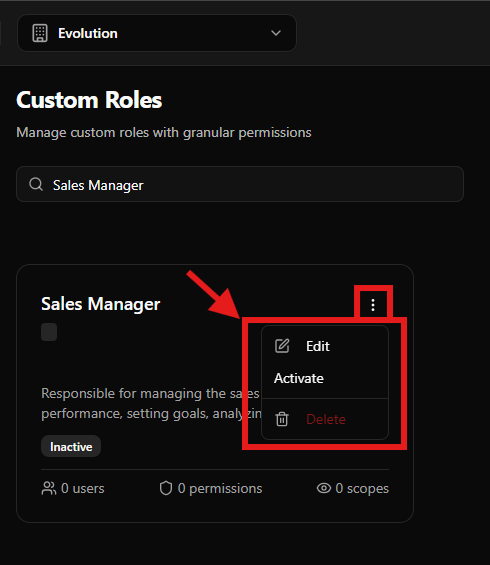
- On the role card, click the three dots icon (
...) in the top right corner - A dropdown menu will be displayed with available options
- In the dropdown menu, click Edit (accompanied by a pencil icon)
- A modal similar to the creation one will open, but with the title “Edit Custom Role” and fields already filled with the role’s current values
- Modify the desired fields:
- Name
- Description
- Active Status (toggle)
- Permissions (add or remove permissions as needed)
- Review the changes
- Click the green “Update Role” or “Save” button to save the changes
- Or click “Cancel” to discard the changes
Activating/Deactivating a Custom Role
To change the status of a custom role:- In the custom roles list, locate the role you want to activate or deactivate
- On the role card, click the three dots icon (
...) in the top right corner - In the dropdown menu that appears:
- If the role is Inactive, click “Activate” to activate it
- If the role is Active, click “Deactivate” to deactivate it
Deleting a Custom Role
To remove a custom role:- In the custom roles list, locate the role you want to delete
- On the role card, click the three dots icon (
...) in the top right corner - In the dropdown menu that appears, click Delete (accompanied by a trash icon, displayed in red text to indicate a destructive action)
- A confirmation dialog will be displayed
- Confirm the deletion in the dialog that appears
Final Considerations
- Principle of Least Privilege: Grant only the permissions necessary for each role to perform its work, avoiding excessive access
- Clear Nomenclature: Use descriptive and clear names so all team members understand the purpose of each role
- Detailed Descriptions: Fill in role descriptions to document responsibilities and when to use them
- Regular Review: Periodically review role permissions to ensure they continue to meet team needs
- Active Status: Keep only active roles that are in use, deactivating obsolete roles instead of deleting them immediately
- Granular Permissions: Use granular permissions to create specific roles that meet exactly the needs of each team or department
- Permission Testing: After creating a role, test by assigning it to a test user to ensure permissions work as expected
Privilege Escalation Guard (starting in v1.0.0-rc3)
Starting inv1.0.0-rc3, the role create/update endpoint enforces a guard against privilege escalation via delegation (EVO-1061):
- An
account_ownercan only delegate permissions they themselves hold. - Attempting to create a role with a permission outside the requester’s set returns
403 Forbiddenwith an explicit reason. - The
super_adminscope (installation_configs.managepermissions) remains exclusive — other roles cannot delegate those permissions.
account_owner from creating a “Super Helper” role that gives a regular agent access to the installation panel. The behavior is strict by design.