

Accessing Conversation Actions
Conversation actions are available through:- Actions menu (three dots): Located in the upper right corner of the conversation header
- Context menu: Right-click on the conversation in the list
- Right side panel: Click on the contact avatar in the conversation header
Conversation Actions Menu
The actions menu is accessed through the three vertical dots icon in the conversation header.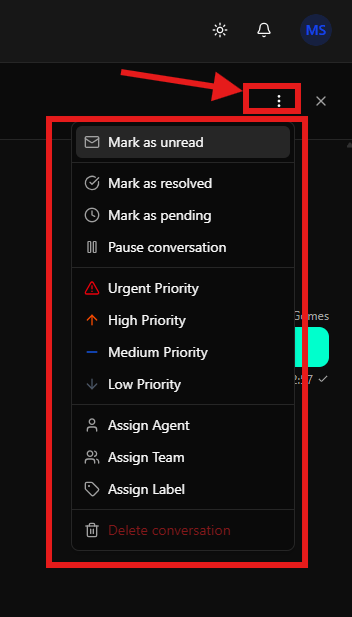
Accessing the Menu
To open the actions menu:- In the conversation header, locate the three vertical dots icon (
:) in the upper right corner - Click the icon
- The dropdown menu will be displayed with all available actions
Menu Structure
The menu presents actions organized in categories:Status Management
These actions allow changing the conversation status:-
Mark as unread:
- Icon: Envelope
- Function: Marks the conversation as unread
- When to use: When you need to review the conversation later
-
Mark as resolved:
- Icon: Checkmark inside a circle
- Function: Marks the conversation as resolved
- When to use: When the problem or issue has been completely resolved
-
Mark as pending:
- Icon: Clock
- Function: Marks the conversation as pending
- When to use: When the conversation needs to wait for a response or action
-
Pause conversation:
- Icon: Two vertical bars
- Function: Temporarily pauses the conversation
- When to use: When you need to temporarily interrupt support
Priority Management
These actions allow setting conversation priority:-
Urgent Priority:
- Style: Red text with red exclamation triangle icon
- Function: Marks the conversation as urgent
- When to use: For critical issues that require immediate attention
-
High Priority:
- Icon: Orange upward arrow
- Function: Sets high priority
- When to use: For important issues that need to be handled quickly
-
Medium Priority:
- Icon: Blue horizontal line
- Function: Sets medium priority
- When to use: For normal issues that follow the standard flow
-
Low Priority:
- Icon: Blue downward arrow
- Function: Sets low priority
- When to use: For issues that can be handled when available
Assignment and Organization
These actions allow assigning responsibilities and organizing conversations:-
Assign Agent:
- Icon: Person
- Function: Assigns the conversation to a specific agent
- When to use: To direct the conversation to a specific agent
-
Assign Team:
- Icon: Two people
- Function: Assigns the conversation to a team
- When to use: To distribute the conversation among team members
-
Assign Label:
- Icon: Tag
- Function: Adds labels to the conversation
- When to use: To categorize and organize conversations by themes or types
Other Actions
- Delete conversation:
- Style: Red text with trash icon
- Function: Permanently removes the conversation
- When to use: Only when necessary to remove irrelevant or duplicate conversations
- Warning: This action is permanent and cannot be undone
Side Panel for Context and Actions
The right side panel provides access to detailed contact information and conversation-related actions.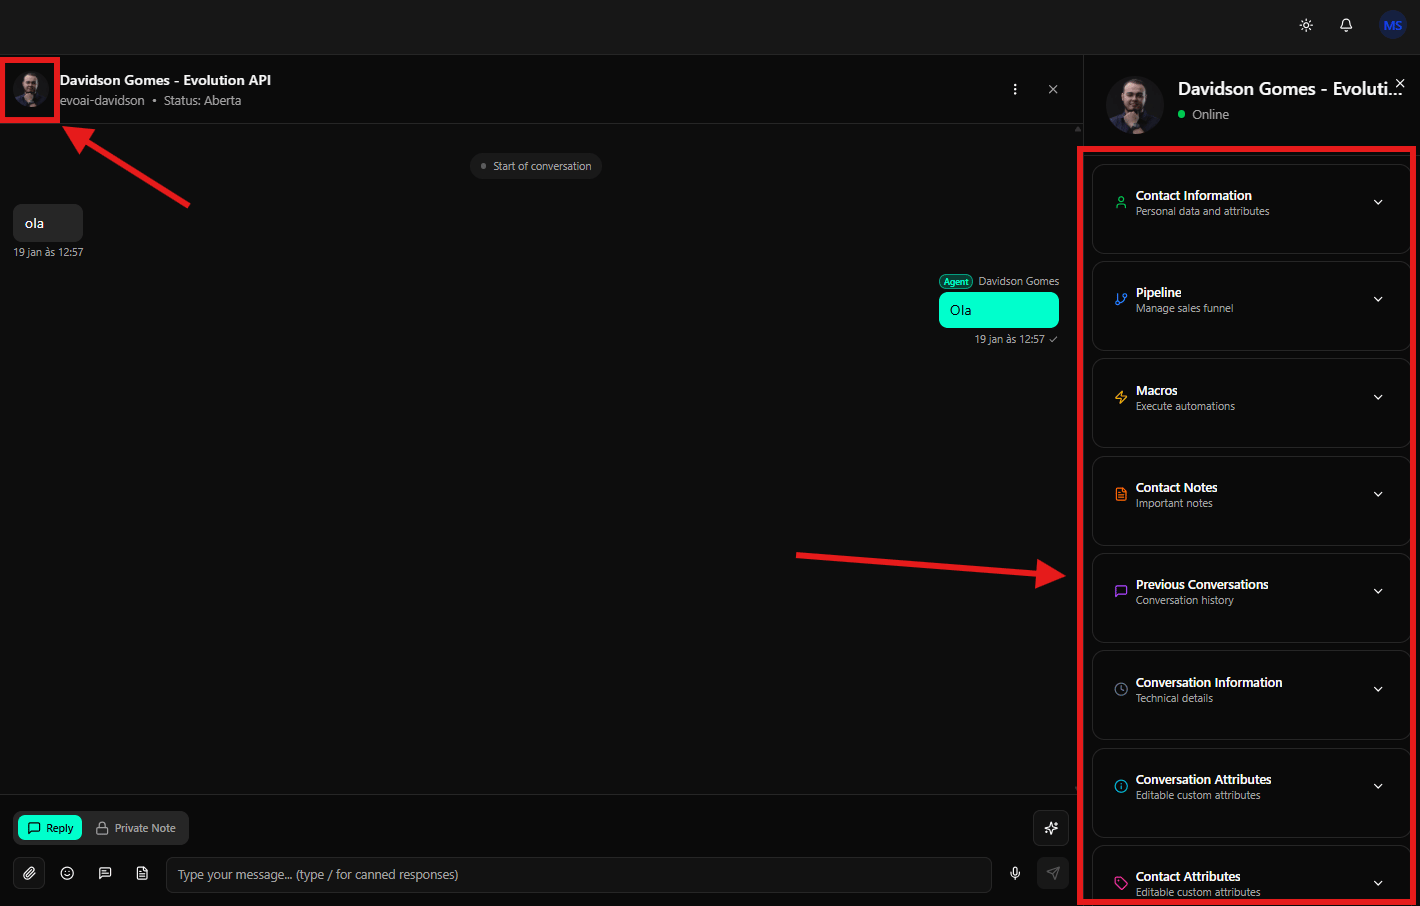
Accessing the Side Panel
To open the side panel:- In the conversation header, click on the contact avatar
- The side panel will be displayed on the right side of the interface
Side Panel Structure
The panel presents expandable sections organized in cards:Panel Header
- Contact Avatar: Larger contact profile photo
- Name and Channel: Contact name followed by channel (e.g., “Davidson Gomes - Evolution API”)
- Online Status: ”• Online” indicator showing if the contact is online
Available Sections
Each section is an expandable card with title, description, icon, and arrow indicating it can be expanded:Contact Information
- Icon: Person
- Description: “Personal data and attributes”
- Content: Displays personal data and contact attributes
- Usage: View and edit contact information
Pipeline
- Icon: Wrench/pipe
- Description: “Manage sales funnel”
- Content: Manages the sales funnel or process
- Usage: Move the contact through different stages of the sales or support process
Macros
- Icon: Lightning bolt
- Description: “Execute automations”
- Content: Executes automated actions
- Usage: Apply pre-configured automations to the conversation or contact
Contact Notes
- Icon: Document/notepad
- Description: “Important notes”
- Content: Allows adding or reviewing important notes about the contact
- Usage: Record relevant information about the contact that may be useful in future interactions
Previous Conversations
- Icon: Chat bubble
- Description: “Conversation history”
- Content: Displays previous conversation history
- Usage: Review past interactions with the contact
Conversation Information
- Icon: Clock
- Description: “Technical details”
- Content: Displays technical conversation details
- Usage: View technical information such as timestamps, IDs, metadata
Conversation Attributes
- Icon: ‘i’ in a circle
- Description: “Editable custom attributes”
- Content: Allows editing custom conversation attributes
- Usage: Add or modify custom attributes specific to the conversation
Contact Attributes
- Icon: Tag
- Description: “Editable custom attributes”
- Content: Allows editing custom contact attributes
- Usage: Add or modify custom contact attributes
How to Use the Sections
- Click on the contact avatar in the conversation header
- The side panel will open on the right side
- Click on any section to expand and view more details
- Use the available actions in each section as needed
Available Actions (Detailed Summary)
Change Conversation Status
Manages the current state of the conversation:- Open: Active and ongoing conversation
- Pending: Waiting for response or action
- Resolved: Successfully completed conversation
- Closed: Archived conversation
- Unread: Conversation marked for later review
- Paused: Temporarily interrupted conversation
- Open the actions menu (three dots)
- Select the desired status action
- The status will be updated immediately
Set Priority
Organize conversations by urgency level:- Urgent: Requires immediate attention (red)
- High: Important and should be handled quickly (orange)
- Medium: Follows standard flow (blue)
- Low: Can be handled when available (blue)
- Open the actions menu
- Select the desired priority in the “Priority” section
- The conversation will be marked with the selected priority
Assign Agent or Team
Direct conversations to specific agents or teams: Assign Agent:- Open the actions menu
- Select “Assign Agent”
- Choose the desired agent from the list
- The conversation will be assigned to the selected agent
- Open the actions menu
- Select “Assign Team”
- Choose the desired team
- The conversation will be distributed among team members
Add Labels
Organize conversations using labels:- Open the actions menu
- Select “Assign Label”
- Choose existing labels or create new ones
- Labels help categorize and filter conversations
Manage Contact Information
Through the side panel:- Click on the contact avatar
- Expand the “Contact Information” section
- View or edit personal data and attributes
- Use “Contact Attributes” to add custom attributes
Manage Notes
Add important notes about the contact:- Open the side panel by clicking on the avatar
- Expand the “Contact Notes” section
- Add or review important notes
- Notes are available to all agents
View History
Review previous conversations:- Open the side panel
- Expand the “Previous Conversations” section
- Navigate through interaction history
- Use history to understand the complete context
Execute Macros
Apply pre-configured automations:- Open the side panel
- Expand the “Macros” section
- Select the desired automation
- The macro will be executed automatically
Manage Pipeline
Move the contact through the funnel:- Open the side panel
- Expand the “Pipeline” section
- Select the desired stage
- The contact will be moved to the new stage
Bulk Actions
Some actions can be applied to multiple conversations simultaneously:How to Use Bulk Actions
- In the conversation list, select the desired conversations using checkboxes
- A bulk actions menu will appear at the top of the list
- Choose the desired action
- Confirm the bulk action
Available Bulk Actions
- Assign to agent: Assigns multiple conversations to an agent
- Change status: Changes the status of several conversations at once
- Add/remove labels: Applies labels to multiple conversations
- Set priority: Sets the same priority for multiple conversations
- Archive: Moves multiple conversations to archive
- Bulk resolve (starting in v1.0.0-rc3): Marks selected conversations as
resolvedin a single operation (EVO-1011).
Per-item Result (rc3)
Starting inv1.0.0-rc3, bulk actions return per-item results — success_ids for processed conversations and failed_ids for the ones that failed (with reason). Previously the response was binary (all-or-nothing), masking partial failures.
In the UI, failed conversations are highlighted and the operator can retry the action only on those.
Final Considerations
- All actions are recorded in the conversation history
- Some actions may require specific permissions
- Bulk actions are useful for managing multiple conversations quickly
- The side panel provides quick access to related information and actions
- Priorities help organize workflow and ensure urgent issues are handled first
- Use labels to categorize conversations and facilitate search and filtering
- Conversation history helps maintain context in future interactions
- Macros can automate repetitive tasks and increase efficiency
- Check your account permissions to see which actions are available
- The delete conversation action is permanent and should be used with caution