

This guide describes all available options on the Agent Configuration screen, accessible when editing an existing agent.
Accessing Agent Configuration
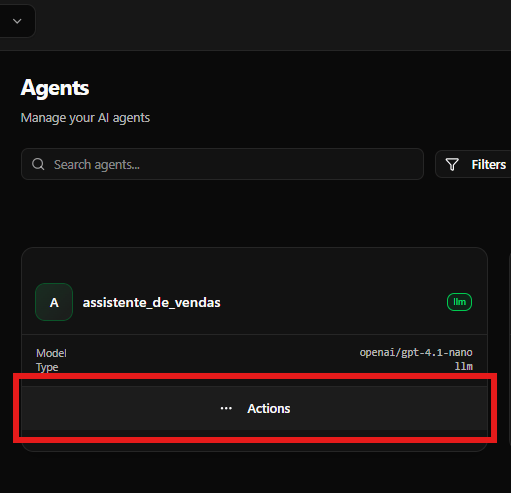
On the Agents screen, you can view all agents created in the workspace. Main elements:- Agents List: cards containing agent name, type (LLM), model, and status
- Actions menu (⋯ Actions): appears when hovering over the agent card
- Edit: opens the configuration screen for the selected agent
- Delete: permanently removes the agent
- Locate the desired agent
- Click ⋯ Actions
- Click Edit to configure
Profile – Agent Basic Information
The Profile section is responsible for defining who the agent is and how it behaves.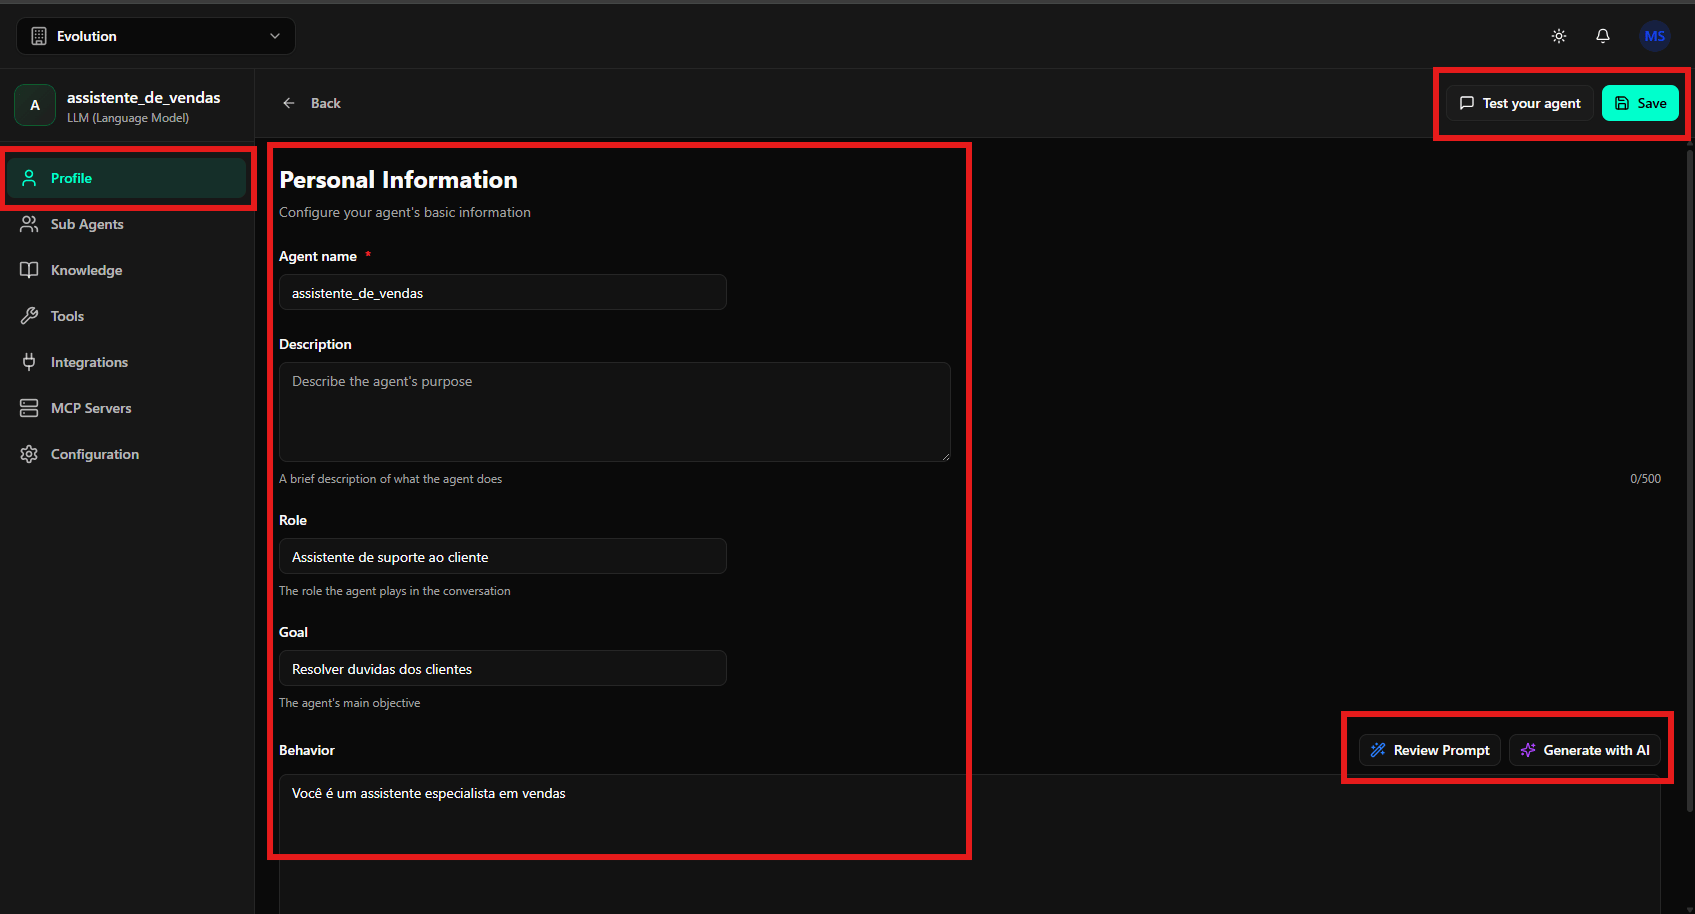
- Agent name: Internal name of the agent (e.g., sales_assistant)
- Description: Brief description of the agent’s purpose
- Role: Agent’s role in the conversation (e.g., Customer support assistant)
- Goal: Agent’s main objective (e.g., Resolve customer questions)
- Behavior: Defines the agent’s tone and personality (e.g., You are a sales specialist assistant)
- Review Prompt: allows reviewing the final generated prompt
- Generate with AI: automatically generates the behavior
- Test your agent: opens a test chat
- Save: saves all changes
Sub Agents – Agent Composition
The Sub Agents section allows an agent to execute other agents as part of the flow.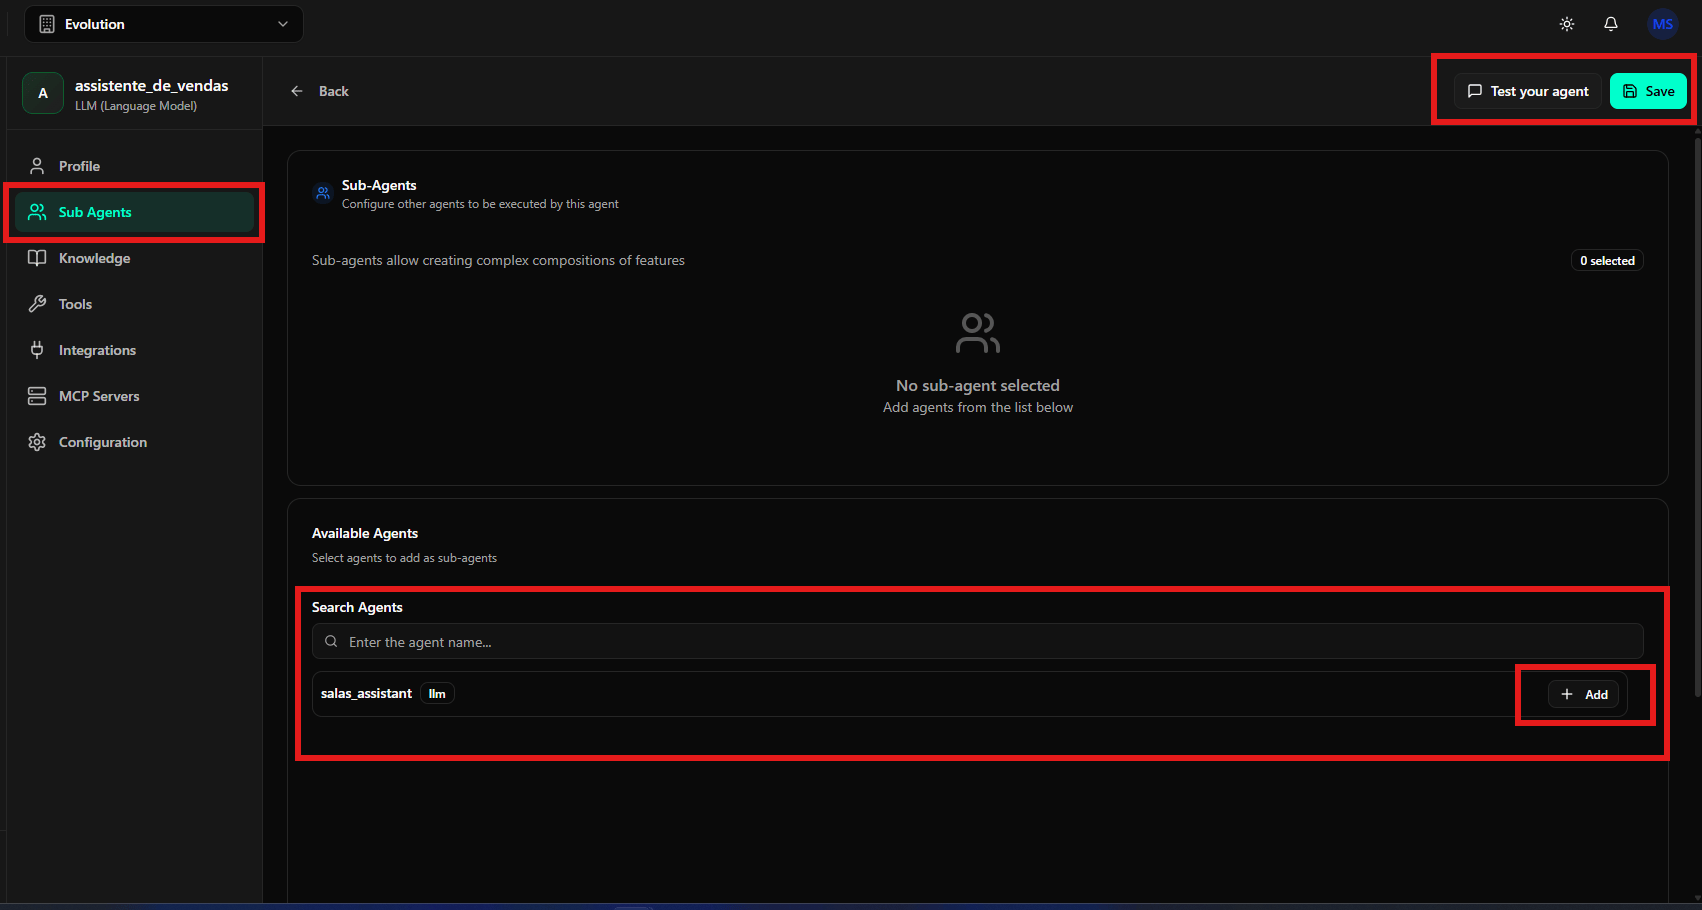
- No sub-agent selected: indicates that no subagent has been added
- Available Agents: list of available agents
- Search Agents: search field
- Add: adds the selected agent as a subagent
- Click Sub Agents in the sidebar menu
- Search for the desired agent
- Click Add
- Save changes
Knowledge – Knowledge Base and Memory
The Knowledge section allows the agent to access information stored in knowledge bases and use memory from previous conversations. This functionality is essential for the agent to provide contextualized and personalized responses.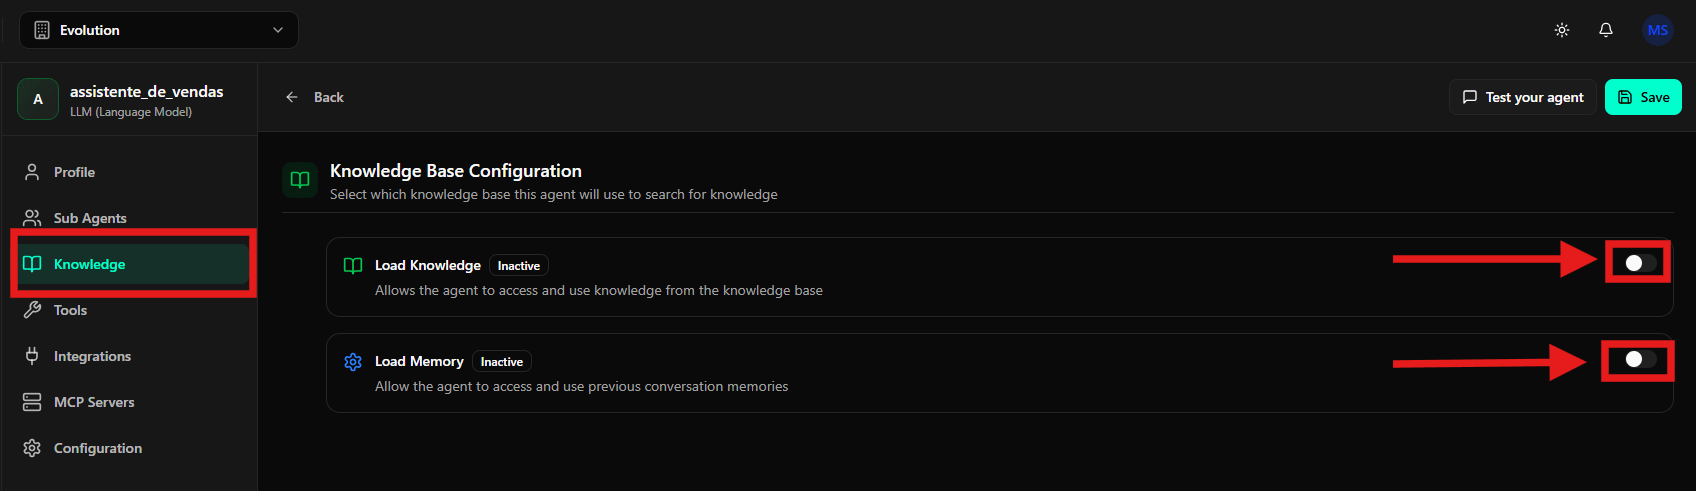
Load Knowledge – Loading Knowledge Base
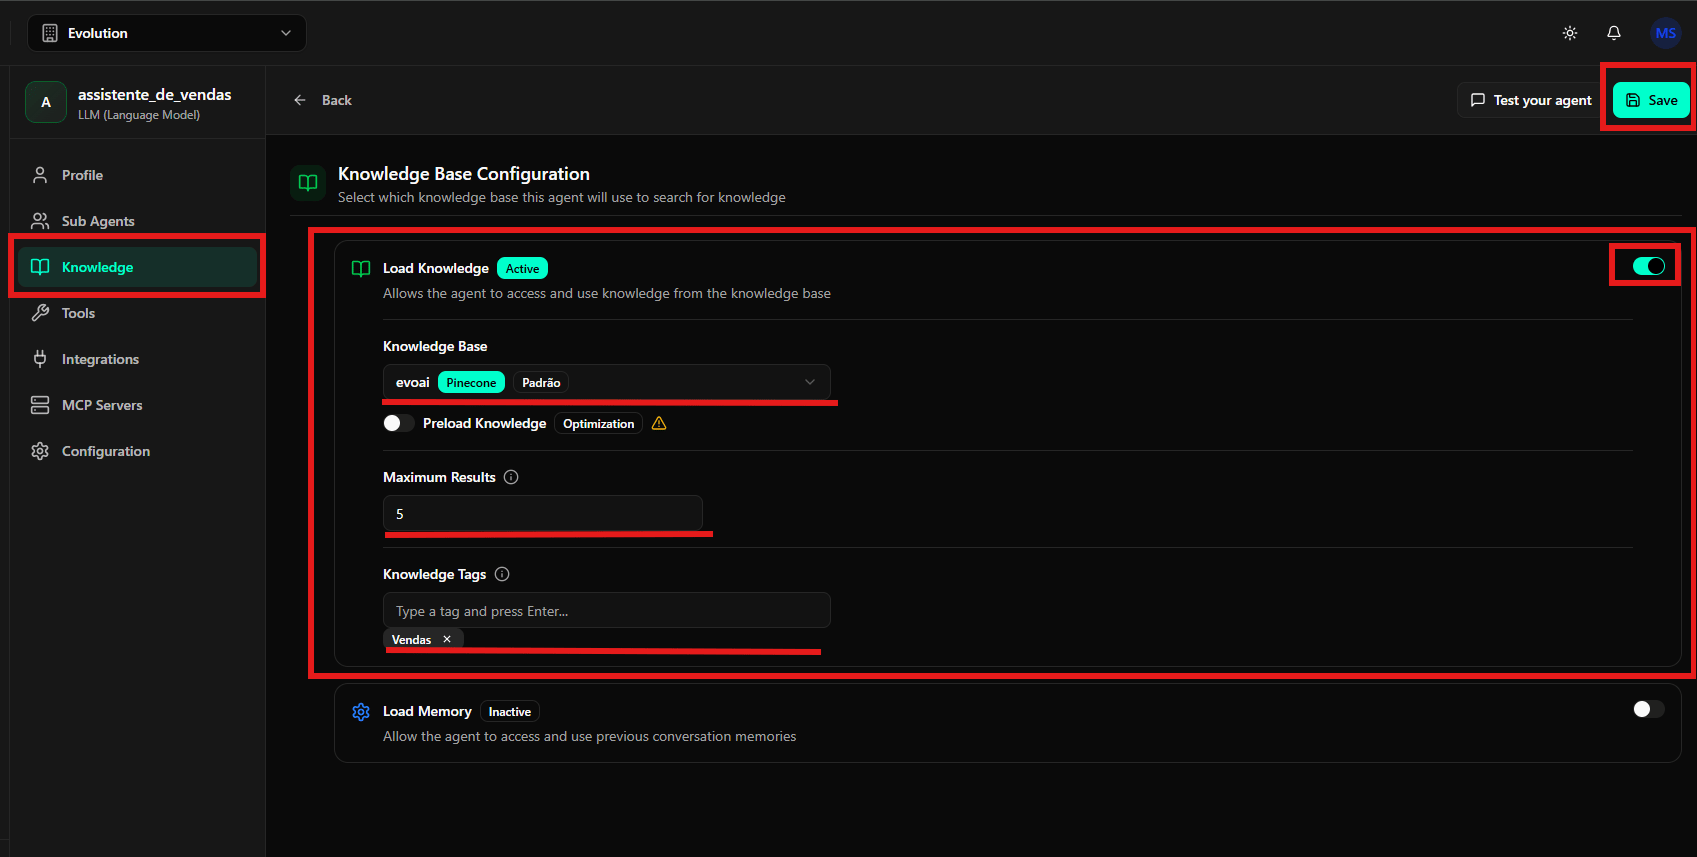
- Toggle Load Knowledge: Activates or deactivates the use of the knowledge base by the agent
- Knowledge Base: Selects which knowledge base will be used (e.g., evoai via Pinecone)
- Preload Knowledge: Optimization option that loads knowledge before the query
- Maximum Results: Defines the maximum number of results returned from the knowledge base
- Knowledge Tags: Allows filtering knowledge by specific tags (e.g., Sales, Support, Product)
Load Memory – Managing Conversation Memory
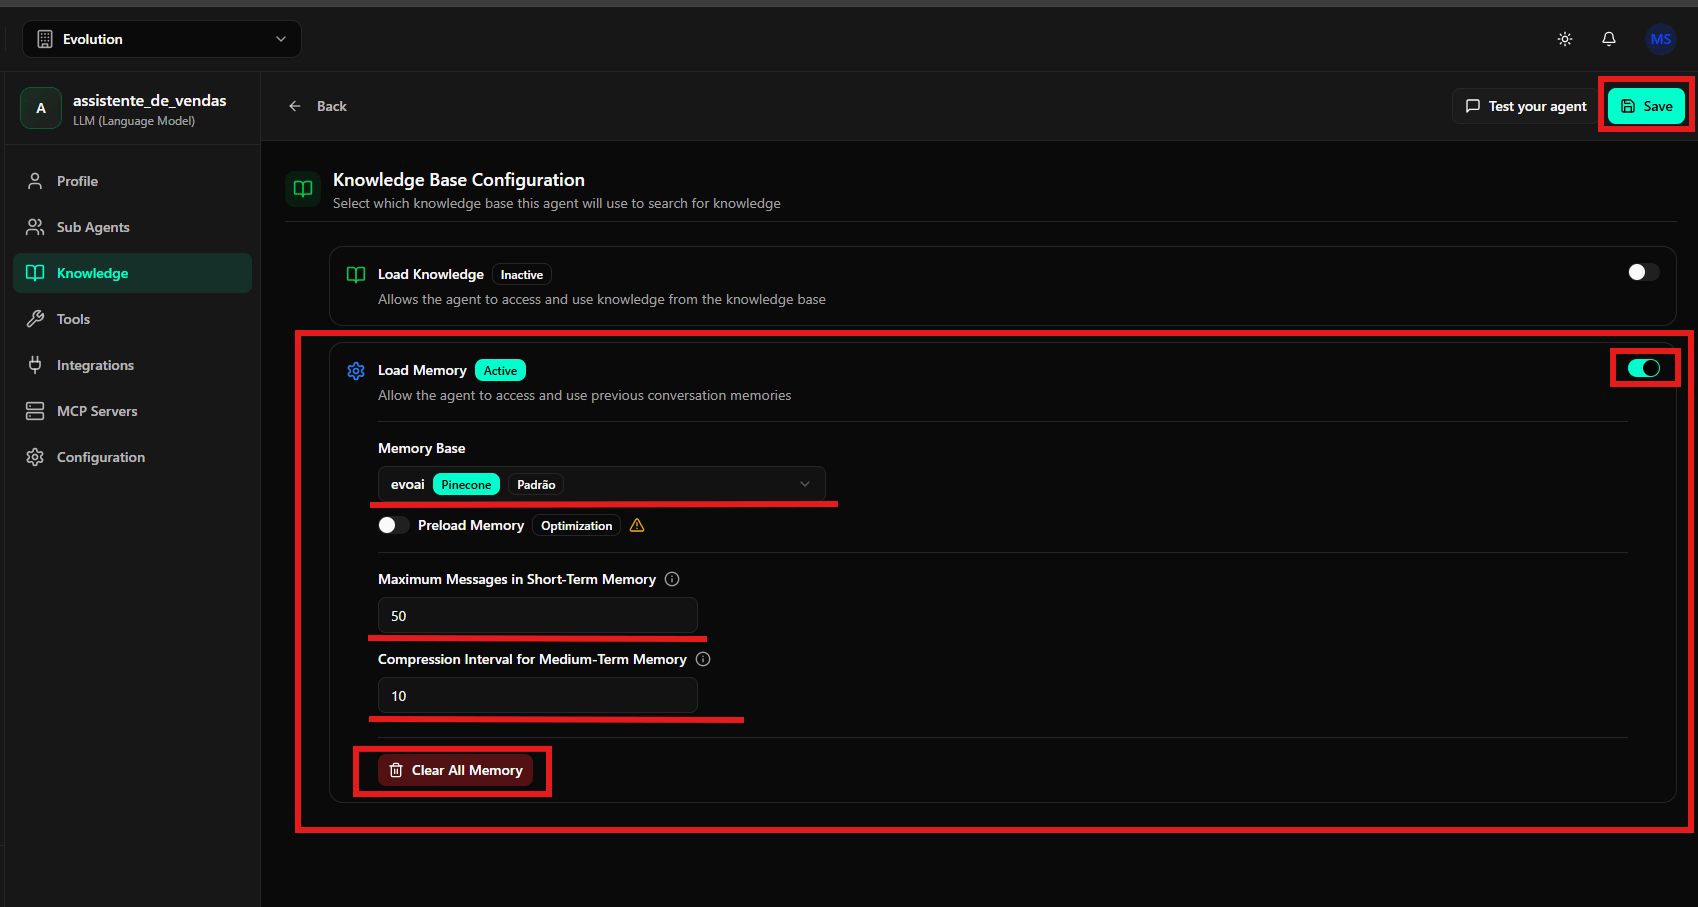
- Toggle Load Memory: Activates or deactivates memory use by the agent
- Memory Base: Selects where memory will be stored (e.g., evoai via Pinecone)
- Maximum Messages in Short-Term Memory: Defines how many recent messages the agent keeps in short-term memory
- Compression Interval for Medium-Term Memory: Defines after how many messages compression to medium-term memory occurs
- Short-Term Memory: Keeps the most recent messages complete for immediate context
- Medium-Term Memory: Compresses old messages into summaries, keeping important information without taking up much space
- Long-Term Memory: Stores relevant information that can be retrieved in future conversations
- Clear All Memory: Removes all stored memory from the agent. Use with caution, as this action is irreversible.
Tools – Agent Tools
The Tools section defines which tools the agent can use during conversations.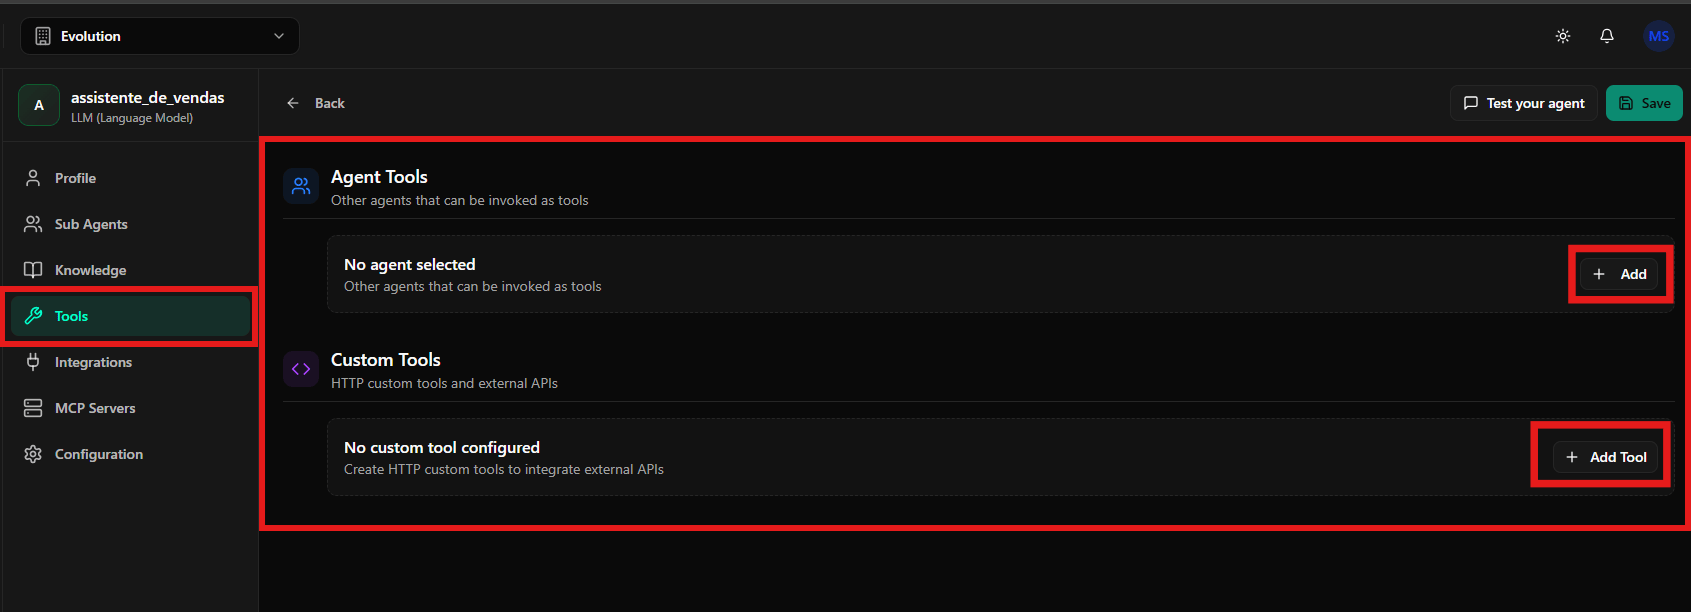
Agent Tools
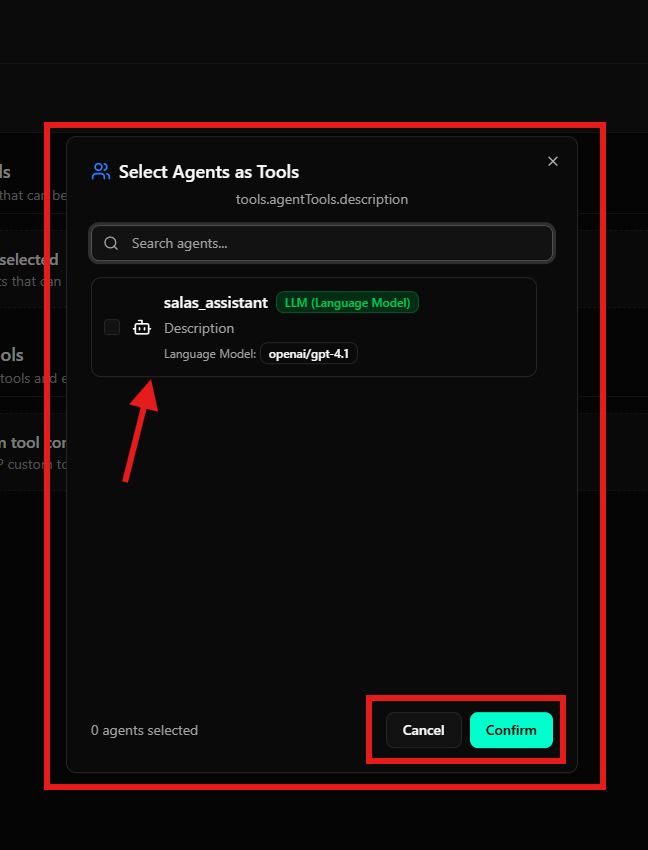
- Click Add in the Agent Tools section
- Select the desired agents from the list
- List of available agents with checkbox for selection
- Confirm: confirms the agent selection
- Cancel: closes without saving
Custom Tools
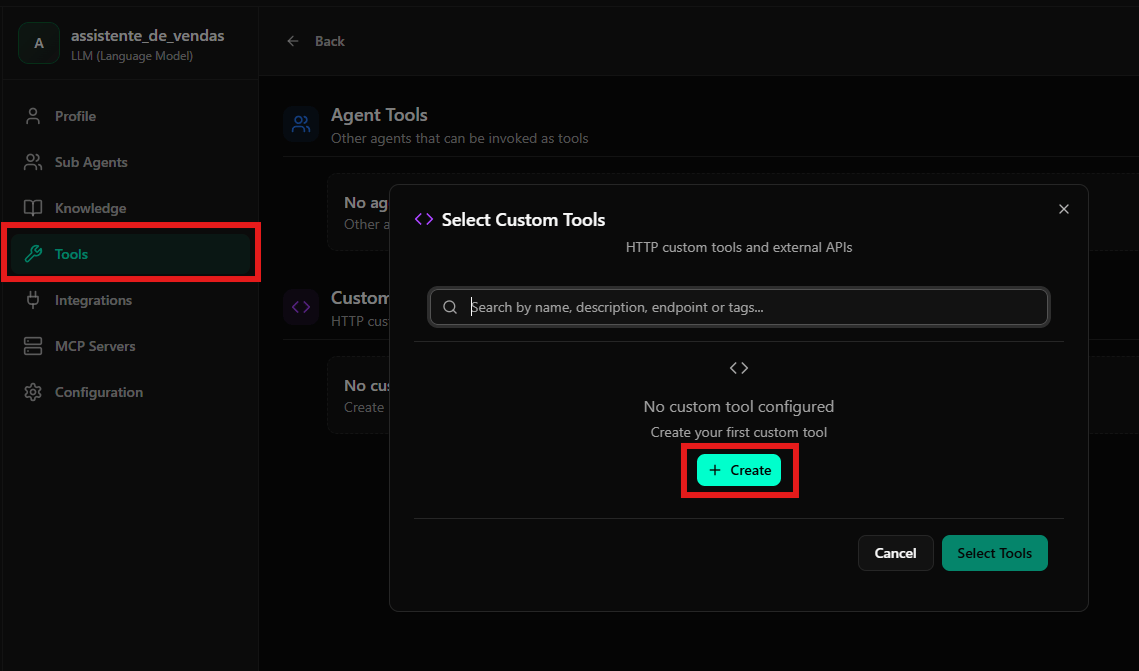
- Add Tool: Creates custom HTTP tools
- Create: Starts the process of creating a new tool
Native Tools (starting in v1.0.0-rc3)
Native tools embedded in the processor that become available without configuring custom HTTP. They appear automatically when the prerequisite is satisfied:
Pipeline manipulation and label management usage hints are automatically injected into the system prompt when these tools are active, guiding the LLM on when to call them.
”Allow Managing Labels” Toggle
Starting inv1.0.0-rc3, the agent configuration exposes the Allow managing labels toggle (allow_manage_labels). When active:
- The agent receives the
manage_conversation_labelstool. - The agent can add/remove labels during the conversation.
Products – Linked Catalog (starting in v1.0.0-rc3)
In the agent’s Products tab, select which catalog items the agent should know about. Linked products are injected into the agent’s context at runtime — changes in the catalog reflect in the next conversation without reconfiguring the prompt. Only products withactive status are available for linking. See Products Catalog.
Integrations – External Integrations
The Integrations section allows connecting the agent to external services.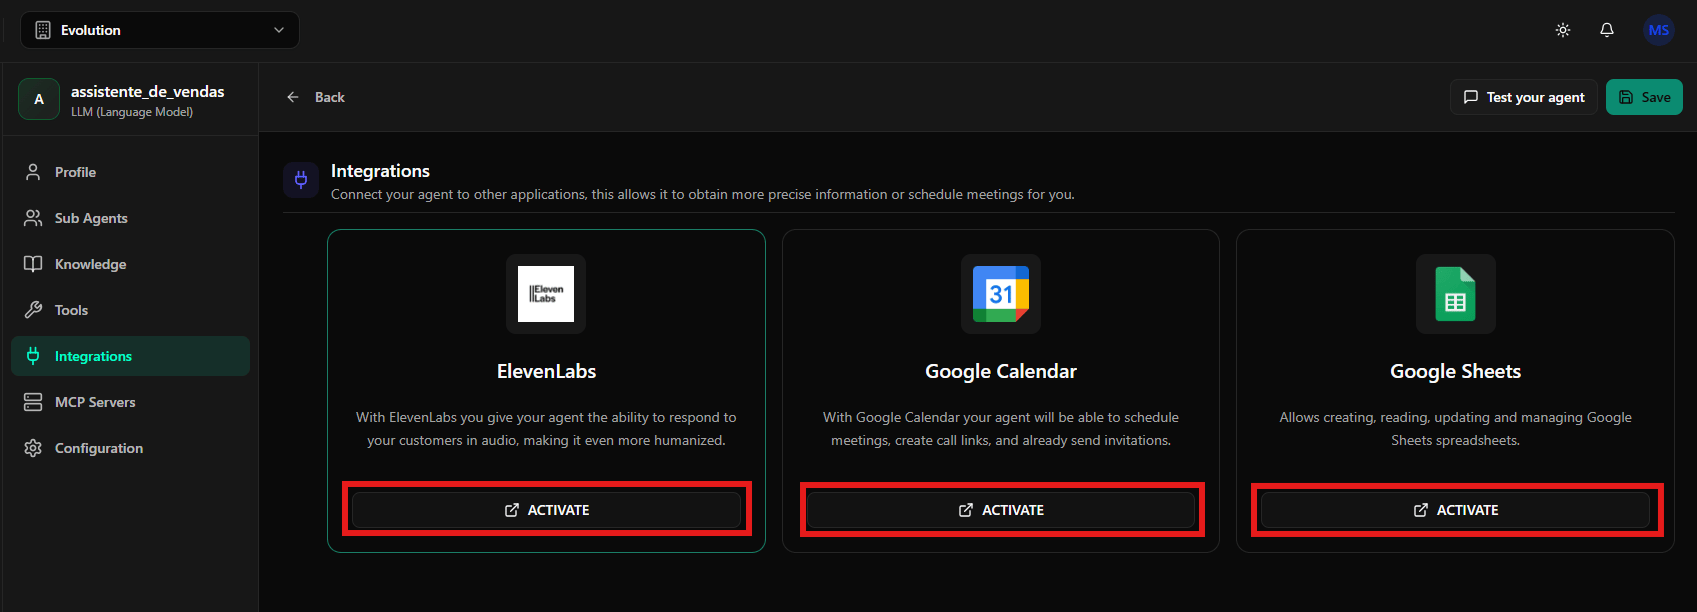
- ElevenLabs: Allows the agent to generate audio responses using voice synthesis. Button: ACTIVATE
- Google Calendar: Allows creating, viewing, and managing calendar events. Button: ACTIVATE
- Google Sheets: Allows creating, reading, and updating Google spreadsheets. Button: ACTIVATE
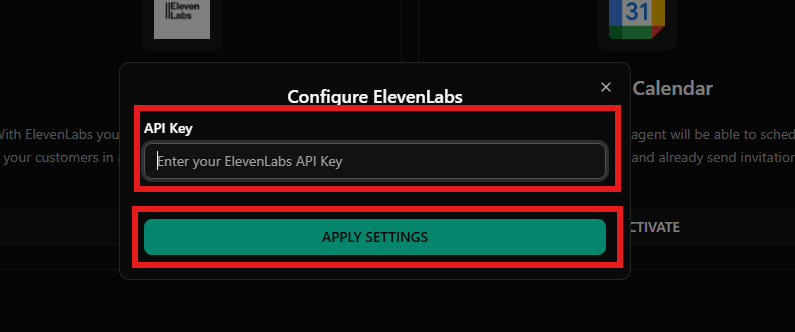
- API Key: Authentication key for the external service
- Apply Settings: Saves the integration configuration
MCP Servers – MCP Servers
The MCP Servers section allows connecting MCP (Model Context Protocol) servers, which expand the agent’s capabilities.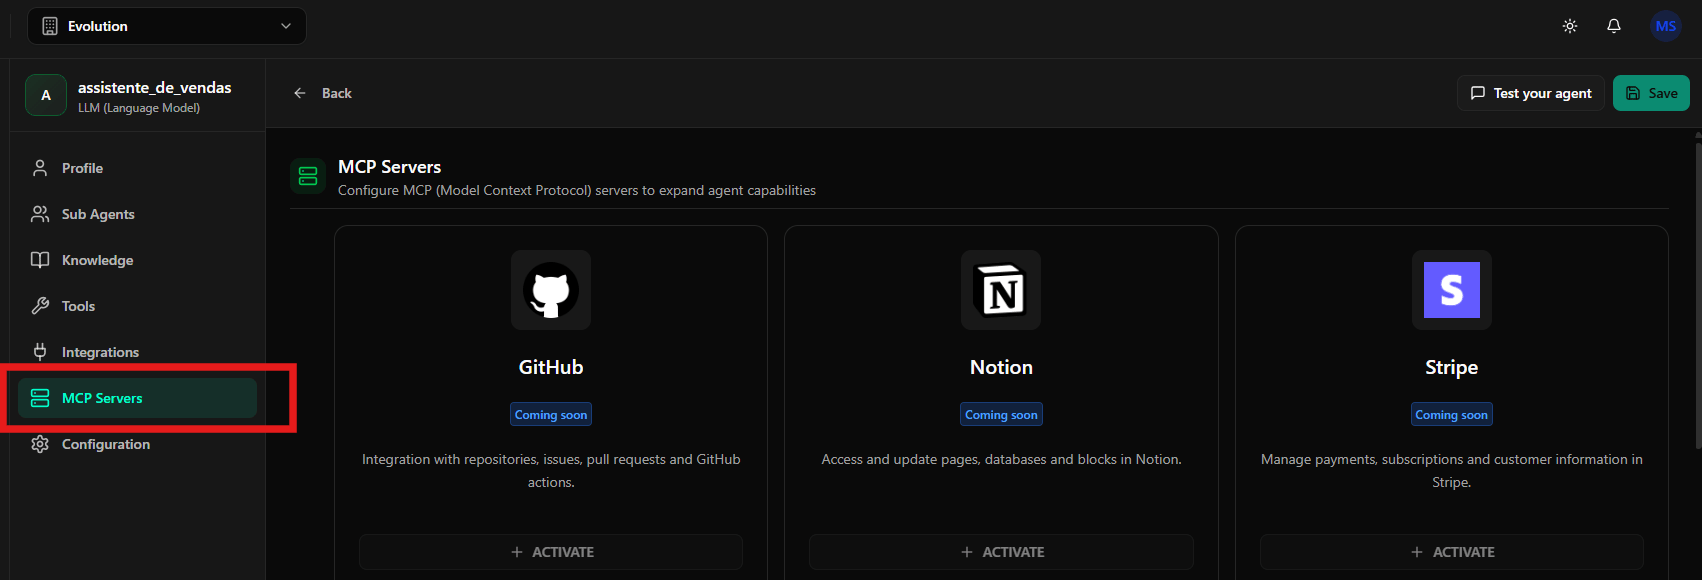
Current status: All displayed as Coming soon.
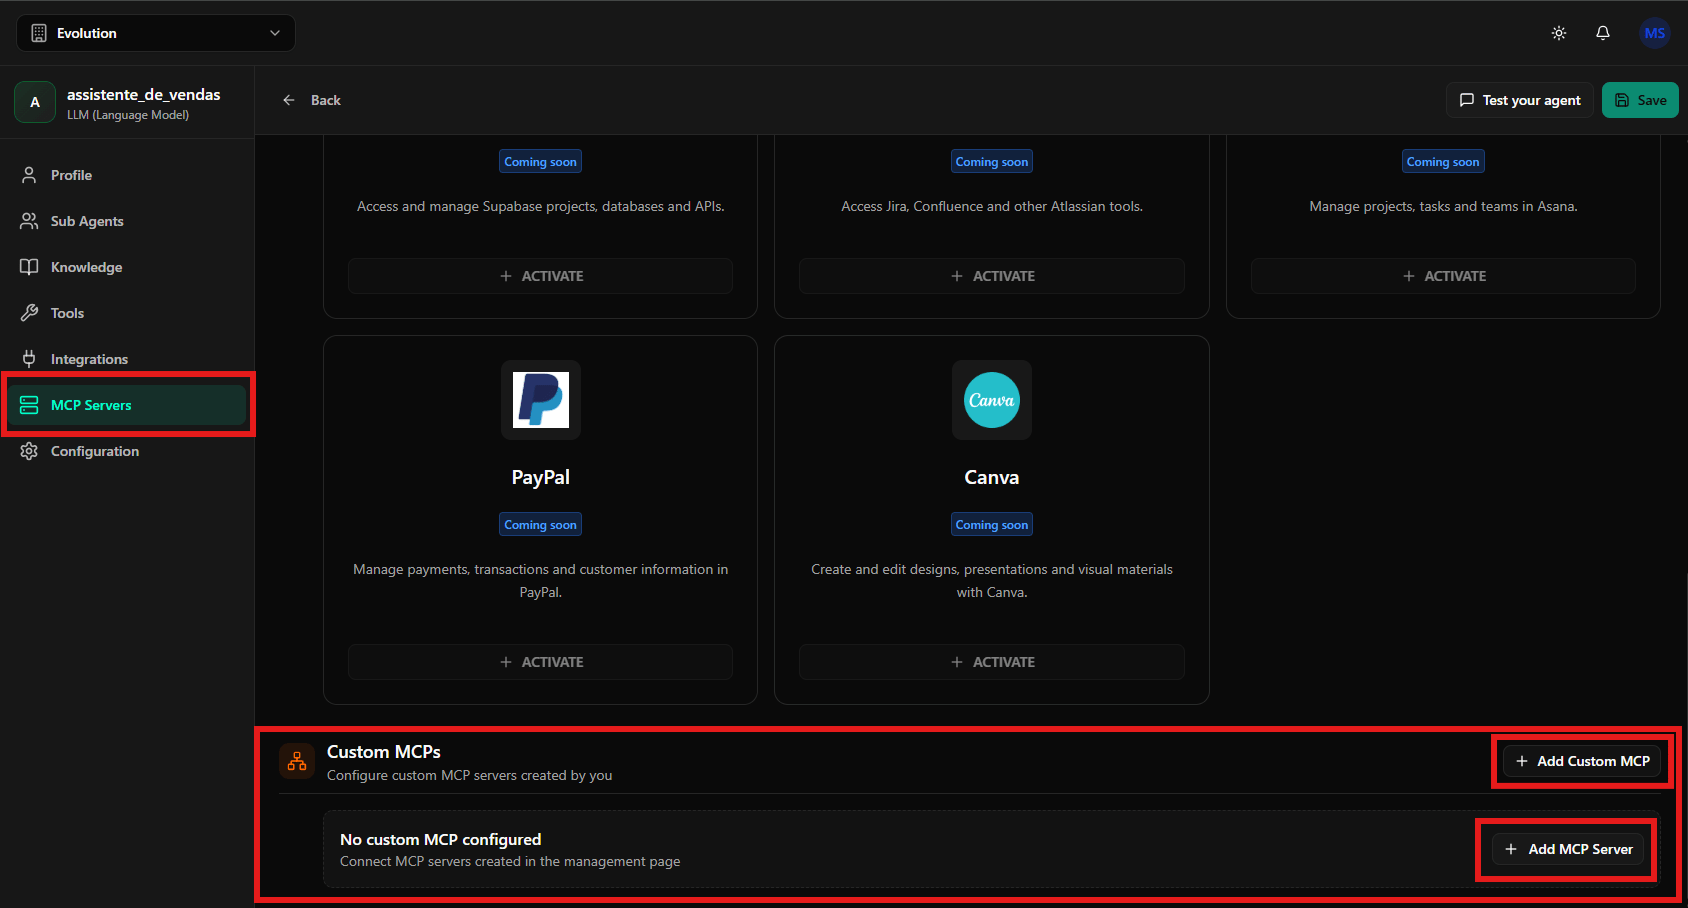
- Add Custom MCP: Adds a previously created MCP server
- Add MCP Server: Creates a new custom MCP server
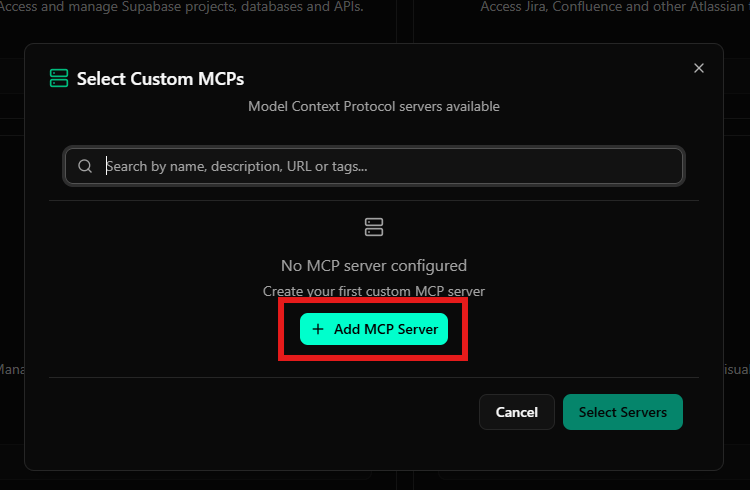
- Search field to filter MCPs
- No MCP server configured message when no MCPs are configured
- Add MCP Server button to add a new server
Configuration – Advanced Agent Settings
The Configuration section is where you define the agent’s technical and behavioral adjustments. This section is divided into four main tabs: General, System, Message Handling, and Inactivity Actions.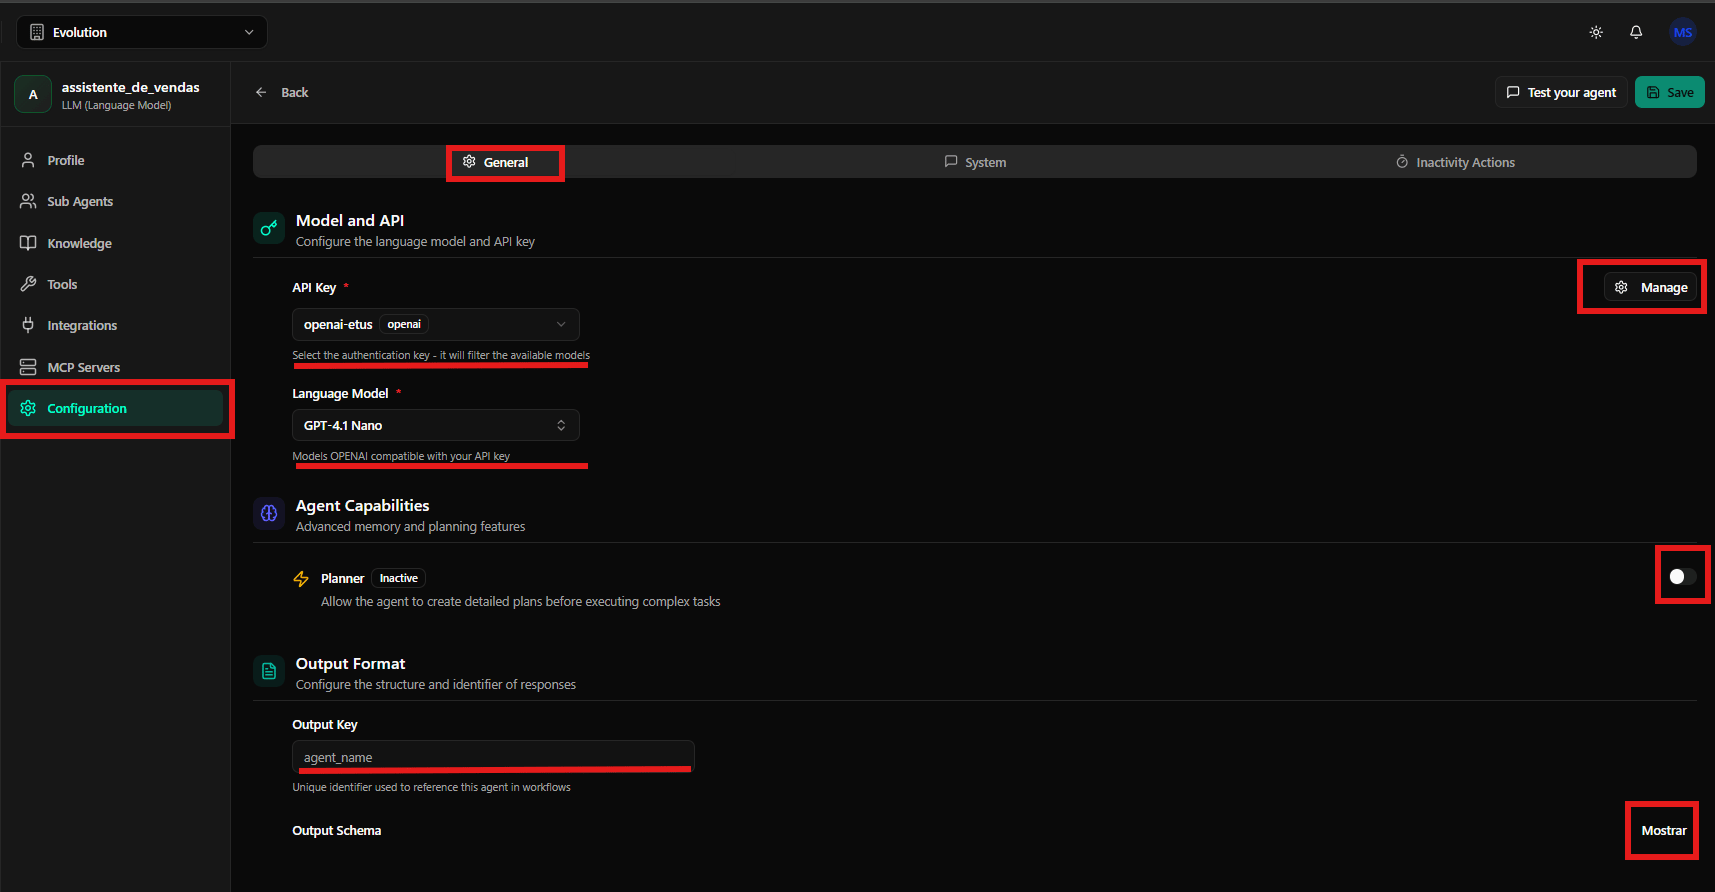
General Tab – General Settings
The General tab contains the fundamental settings that define how the agent processes and responds to requests.Model and API – AI Model and API Key
- API Key: Select the API key that the agent will use to connect to the AI provider. The selected key determines which models will be available for selection
- Language Model: Choose the specific language model (examples: GPT-4.1 Nano, GPT-4, Claude 3.5 Sonnet, etc.). Each model has different characteristics of speed, cost, and capability
- Manage: Button that opens the API key manager, allowing you to add, edit, or remove keys
Agent Capabilities – Advanced Capabilities
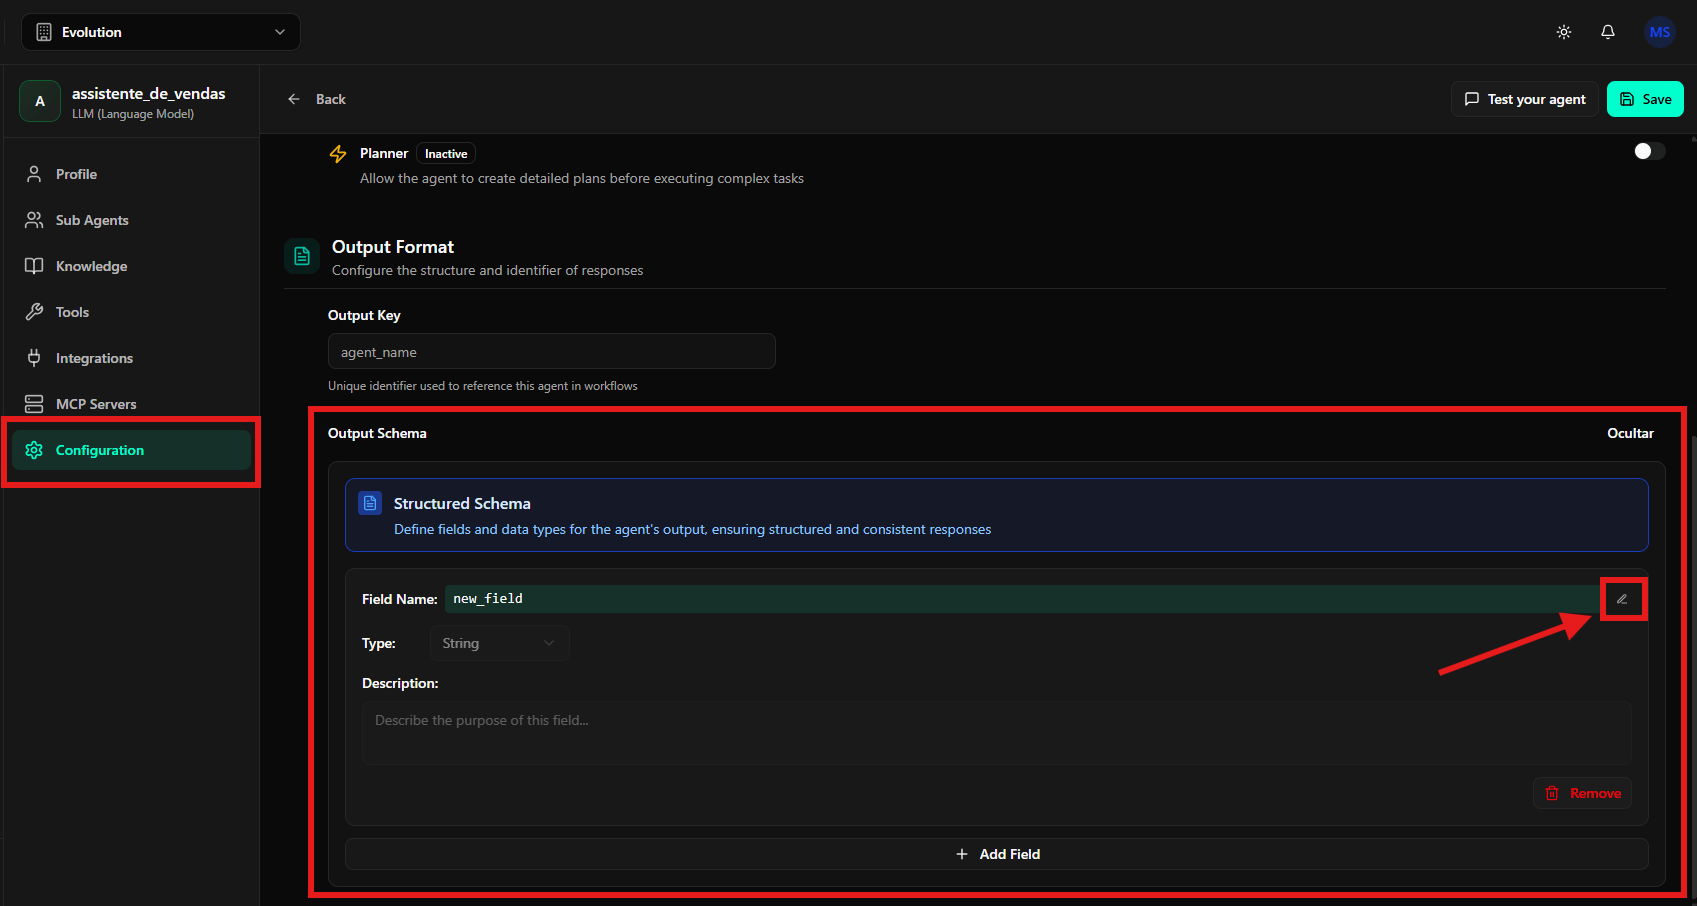
- Planner (toggle): When activated, the agent executes a planning process before responding. This means it first analyzes the request, creates an action plan, and then executes that plan step by step. This capability significantly improves response quality in complex tasks that require multiple steps or structured reasoning.
- Tasks that require multiple steps
- Complex analyses that need structuring
- Situations where it’s important for the agent to “think” before acting
Output Format – Structured Output Format
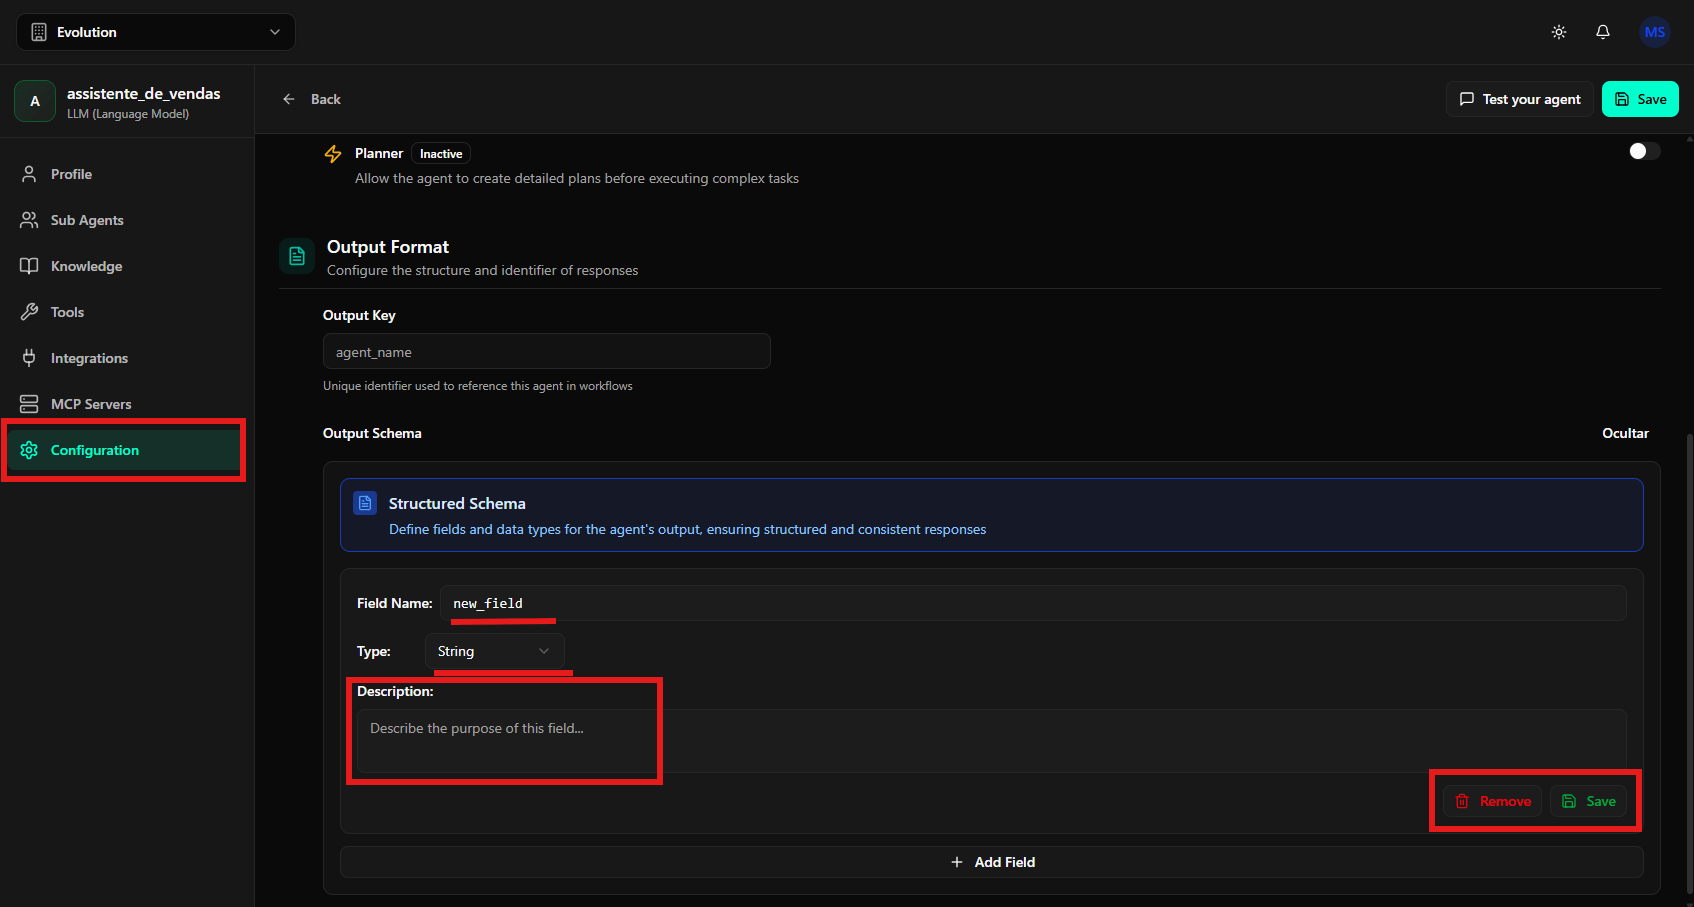
- Output Key: Unique identifier that will be used to reference this agent’s output. Useful when you have multiple agents and need to identify which one is returning the data
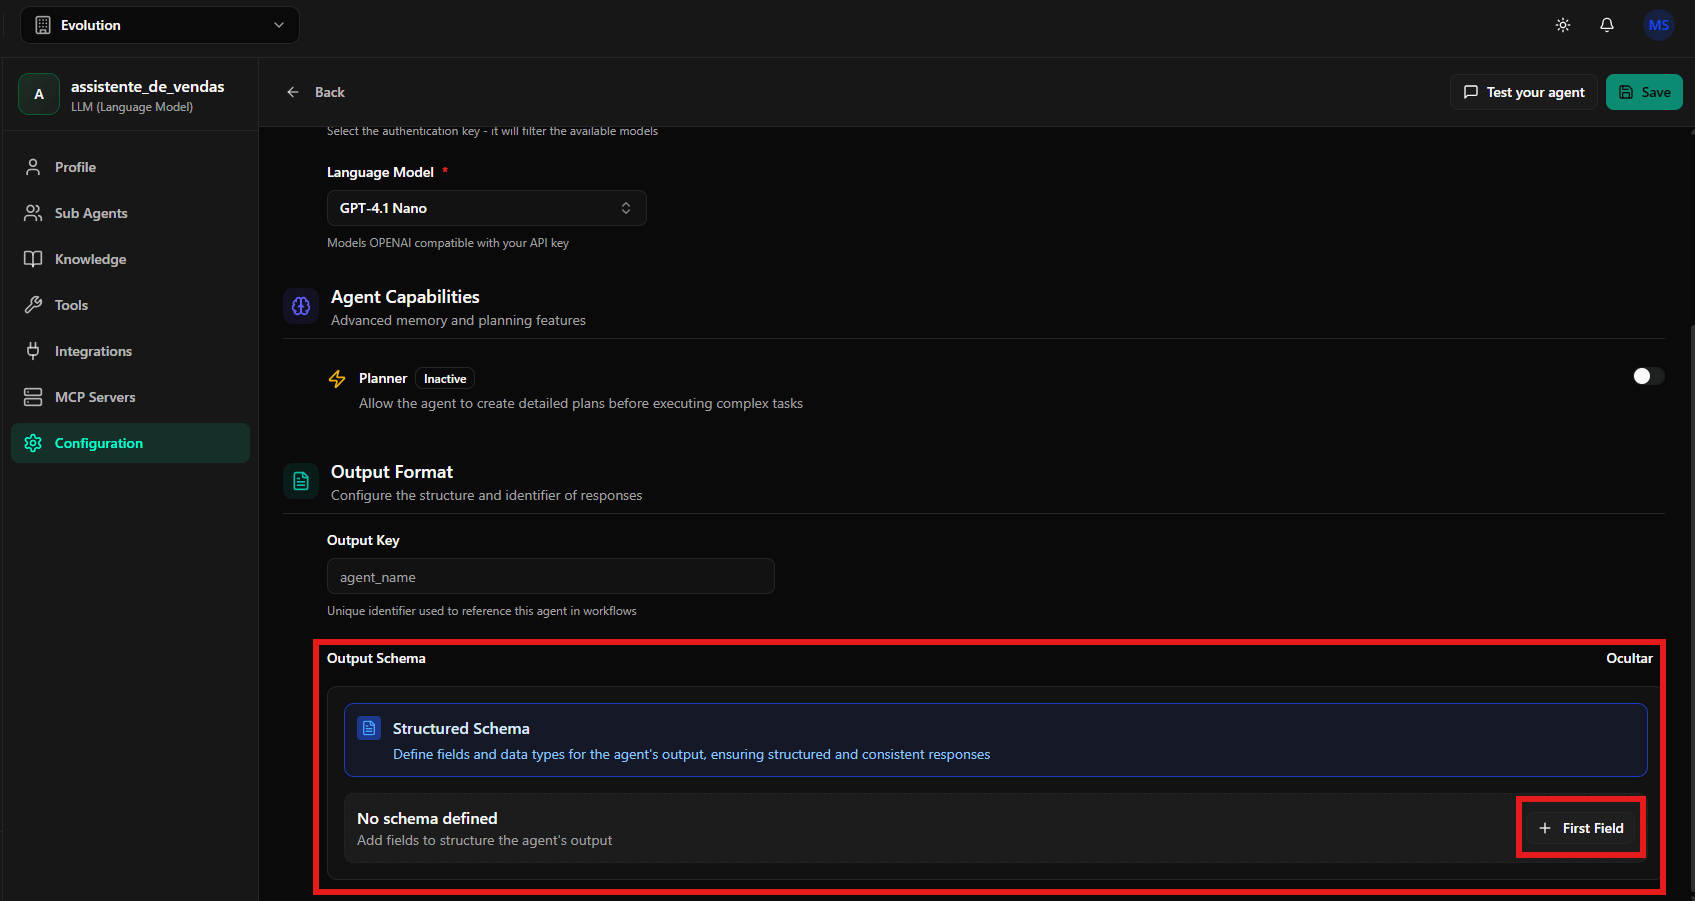
- Output Schema: Defines the data structure that the agent must return
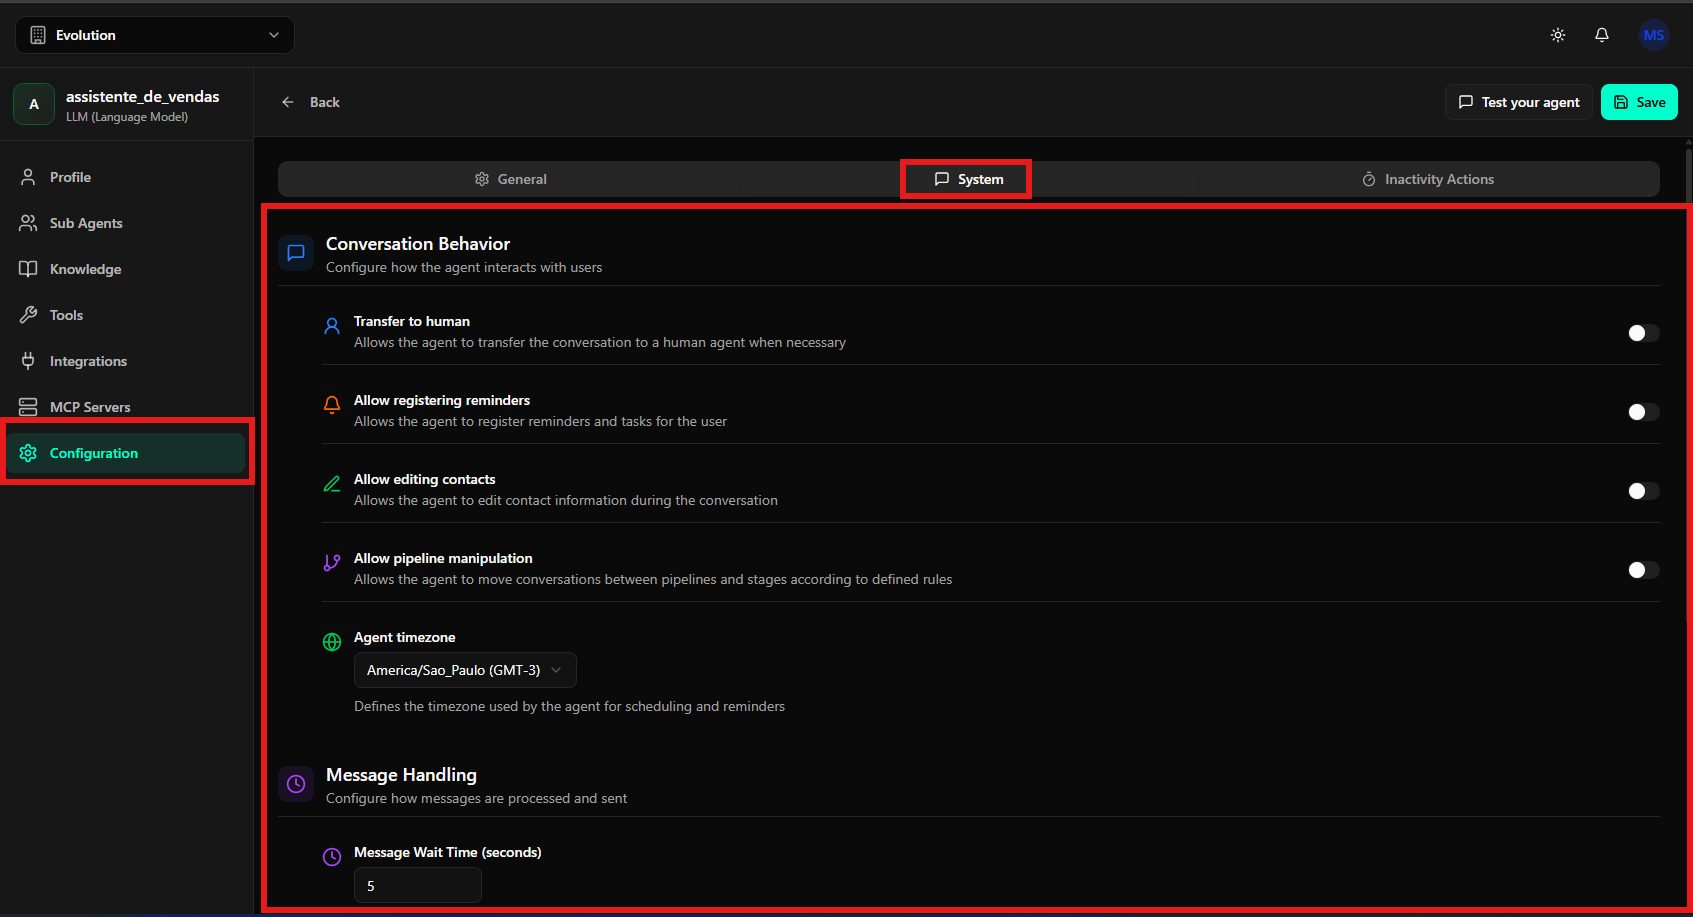
- Click First Field or Add Field to add a new field to the schema
- For each field, define:
- Field Name: Field name (e.g., “customer_name”, “total_value”, “status”)
- Type: Field data type:
- String: Text (e.g., “John Silva”, “Approved”)
- Number: Number (e.g., 150.50, 42)
- Boolean: True or false (e.g., true, false)
- Array: List of values (e.g., [“item1”, “item2”, “item3”])
- Object: Complex structure with multiple fields
- Description: Describe the field’s purpose so the agent understands what to include there
- Use the Edit, Remove, or Save buttons to manage created fields
- customer_name (String): Customer’s full name
- email (String): Contact email
- quote_value (Number): Total quote value
- products_interest (Array): List of products the customer showed interest in
- negotiation_status (String): Current negotiation status
- System integration: Facilitates agent integration with CRMs, ERPs, and other systems
- Consistency: Ensures data always comes in the same format
- Automation: Allows automating processes based on structured agent responses
- Data analysis: Facilitates analysis and reports on interactions
System Tab – Behavior and Permissions
The System tab controls the agent’s permissions and behavior within the system during conversations.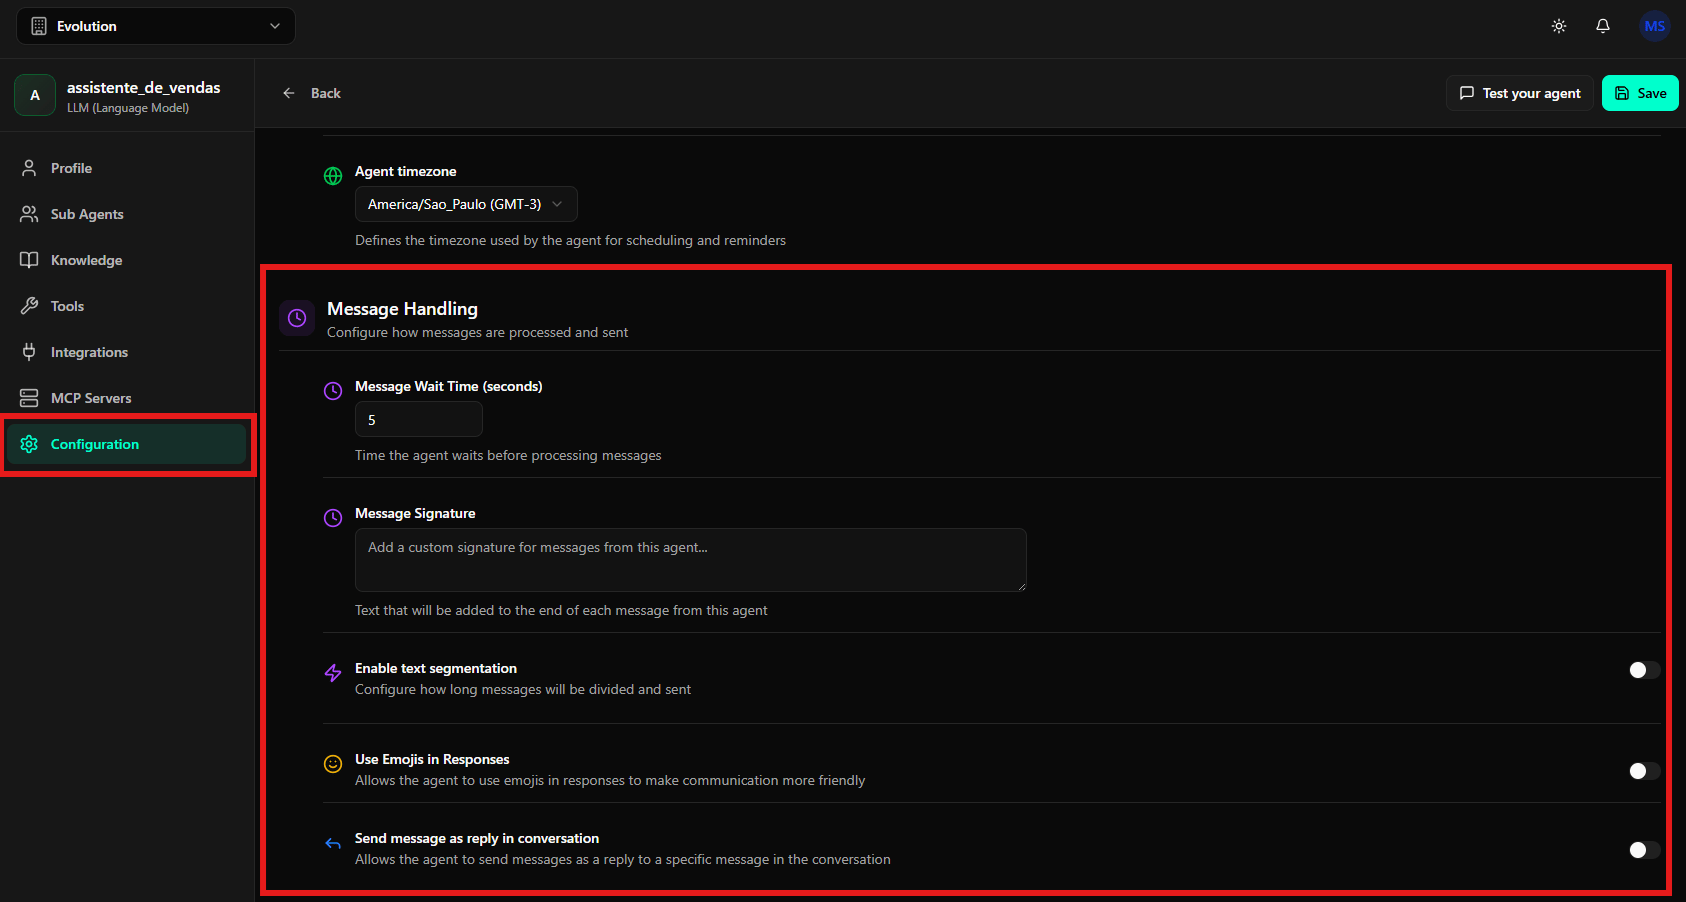
Conversation Behavior – Conversation Behavior
Defines what the agent can or cannot do during interactions with users. Available permissions:- Transfer to human: When activated, allows the agent to identify situations where it’s necessary to transfer the conversation to a human agent. The agent can do this automatically when it detects customer frustration, complex requests it cannot resolve, or when the user explicitly asks to speak with a person.
- Allow registering reminders: Allows the agent to create reminders and appointments. For example, if a customer asks to be reminded about a promotion next month, the agent can register this reminder automatically.
- Allow editing contacts: Grants the agent permission to modify contact information, such as updating phone numbers, emails, addresses, or other registration information when the user provides new data.
- Allow pipeline manipulation: Allows the agent to move contacts between different stages of the sales or service pipeline. For example, moving a lead from “First Contact” to “Negotiation” or from “Qualification” to “Proposal Sent”.
Agent Timezone – Agent Timezone
Defines the timezone that the agent will use for all date and time calculations. Configuration:- Select the appropriate timezone for your operation
- Example: America/Sao_Paulo (GMT-3) for Brasília time
- Reminders are sent at the right time
- Reports show times correctly
- Appointments are made considering the business’s local time
Message Handling Tab – Message Processing
The Message Handling tab defines how the agent processes, formats, and sends its messages.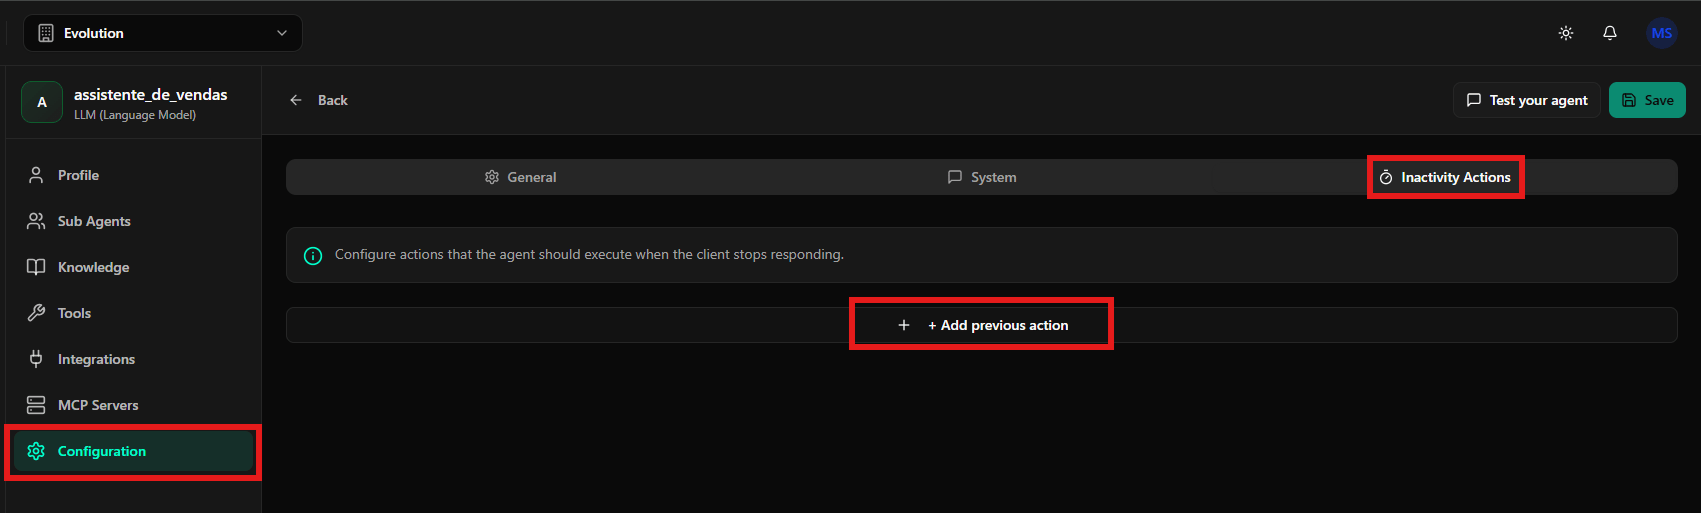
Processing and Sending Settings
Message Wait Time (seconds) – Wait Time: Defines how many seconds the agent should wait before processing and responding to a message.- When to use: Useful when users usually send multiple consecutive messages. Instead of responding to each message individually, the agent waits for the configured time and responds considering all messages sent in the period.
- Example: If configured for 3 seconds and the user sends “I want”, “to buy”, “a notebook”, the agent waits 3 seconds and processes the three messages together, understanding the complete request.
- Common use: Add contact information, service hours, or disclaimers
- Example: “This is an automatic message. To speak with an agent, type ‘speak with human’.”
- Advantage: Improves readability, especially on mobile devices
- Behavior: A long response is divided into separate paragraphs or topics
- When to activate: Informal channels like WhatsApp, Instagram
- When to deactivate: Formal corporate communications, professional emails
- Advantage: Keeps context clear, especially in conversations with multiple questions
- Example: If the user asks three different questions, the agent can answer each one by quoting the specific question
Inactivity Actions Tab – Inactivity Actions
The Inactivity Actions tab allows configuring automatic actions that the agent will execute when a user becomes inactive (doesn’t respond) for a certain period.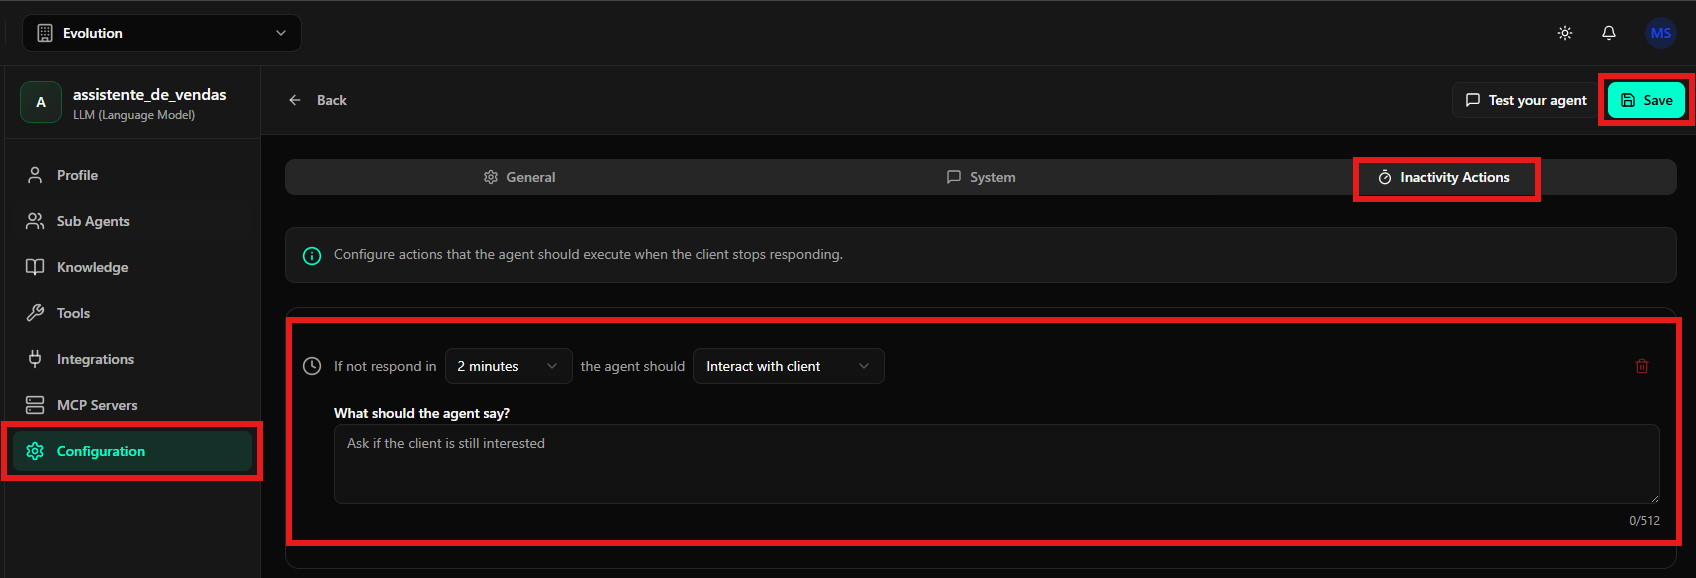
How It Works
This functionality is essential for maintaining user engagement and preventing important conversations from being forgotten. Screen structure:- View of all configured inactivity rules
- + Add previous action button to create new rules
Creating an Inactivity Action
Step by step:- Click + Add previous action
- Configure the following fields:
- Options: Minutes, hours, or days
- Example: 2 minutes, 1 hour, 1 day, 3 days
- Interact with client: Send a re-engagement message
- Send reminder: Send a reminder about something pending
- Close conversation: Automatically close the conversation
- Transfer to human: Transfer to human agent
- Move in pipeline: Move to another funnel stage
- For re-engagement: “Hello! I saw you were interested in our products. Can I help with anything else?”
- For reminders: “Hi! Remember that our promotion ends tomorrow. Would you like to continue with your purchase?”
- For qualification: “I noticed you didn’t respond. Are you still interested in learning about our solution?”
- Click Save to save the rule
Creating Multiple Cascading Rules
You can create multiple inactivity rules with different times to create a re-engagement sequence. Strategy example:- 2 minutes of inactivity: “Are you still there? Can I clarify any questions?”
- 1 hour of inactivity: “Hi! I saw we talked earlier. If you need help, I’m here!”
- 1 day of inactivity: “Hello! I noticed you showed interest in [product]. Would you like to resume our conversation?”
- 3 days of inactivity: “This is my last contact attempt. If you wish, we can talk in the future. See you soon!”
Best Practices
- Don’t be invasive: Avoid sending many messages in short periods
- Be relevant: Reference the context of the previous conversation
- Offer value: Each message should offer something useful to the user
- Respect limits: If the user doesn’t respond after several attempts, stop sending messages
Final Considerations
The Agent Configuration screen is the complete control center for customizing behavior, connecting external resources, and defining how the agent operates in different scenarios. Important recommendations:- Always click Save in the upper right corner after making changes
- Use Test your agent to validate behavior before putting the agent into production
- Configure the knowledge base and memory for more contextualized conversations
- Adjust system permissions according to the desired level of autonomy for the agent
- Define inactivity actions to maintain user engagement