

Accessing Channel Settings
To access a channel’s settings, go to the channel list and click the Configure button for the desired channel.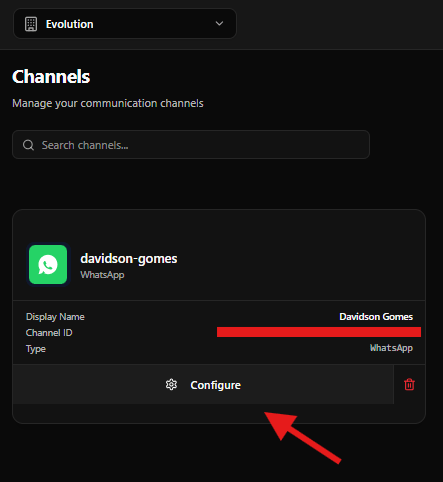
Settings Screen Structure
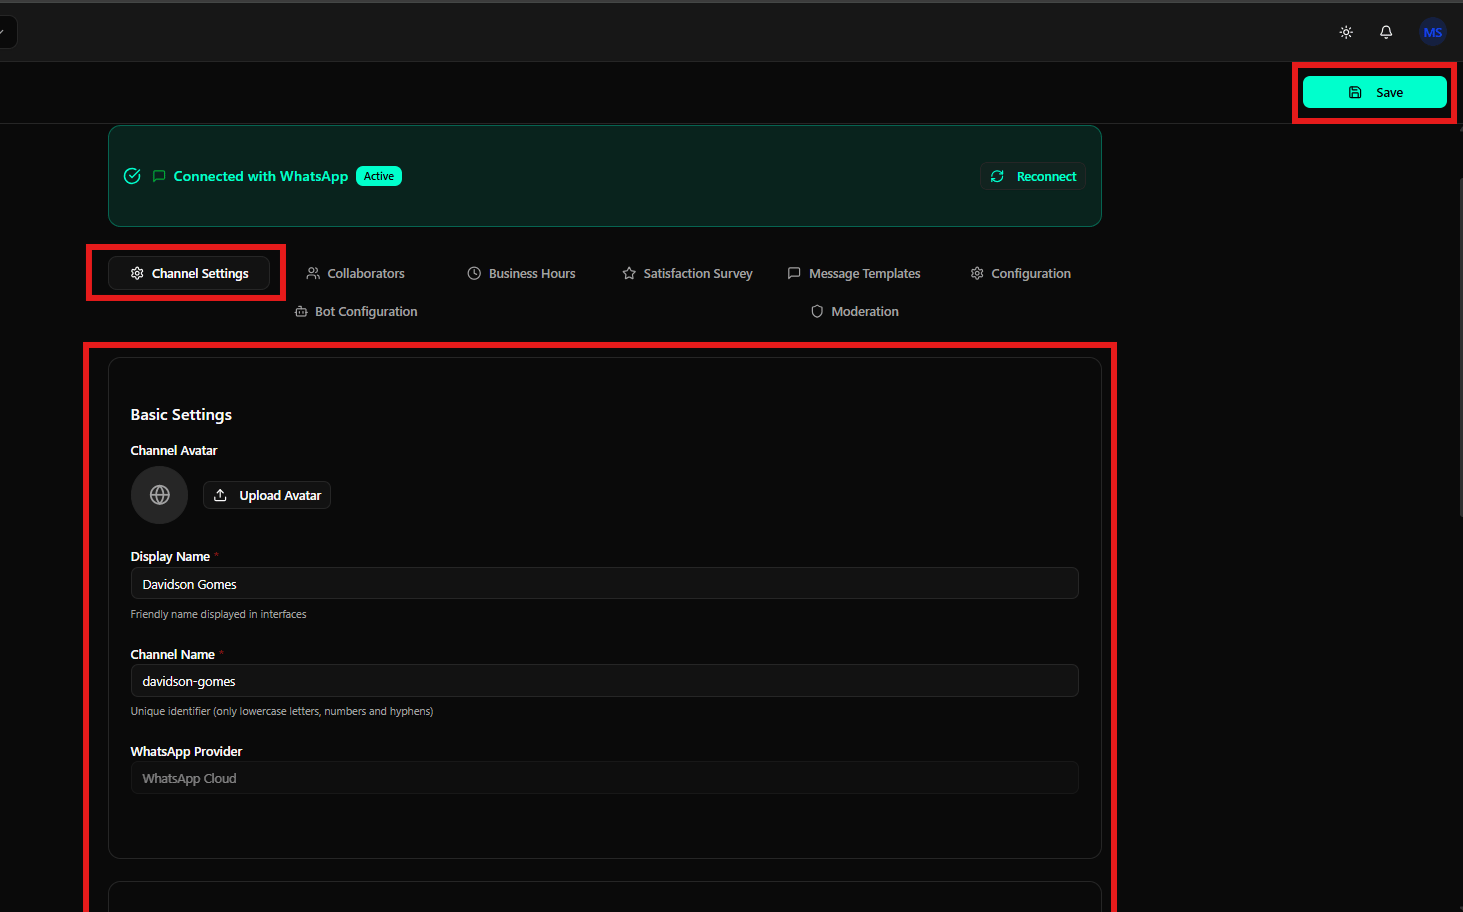
The settings screen is divided into several tabs, each focused on a specific aspect of the channel:- Channel Settings - General channel settings
- Collaborators - Agent management
- Business Hours - Business hours
- Satisfaction Survey - Satisfaction survey
- Message Templates - Message templates
- Configuration - Advanced settings
- Bot Configuration - Bot configuration
- Moderation - Comment moderation
Channel Settings (General Settings)
The Channel Settings tab contains the main channel settings. This tab has multiple configuration sections.Basic Settings
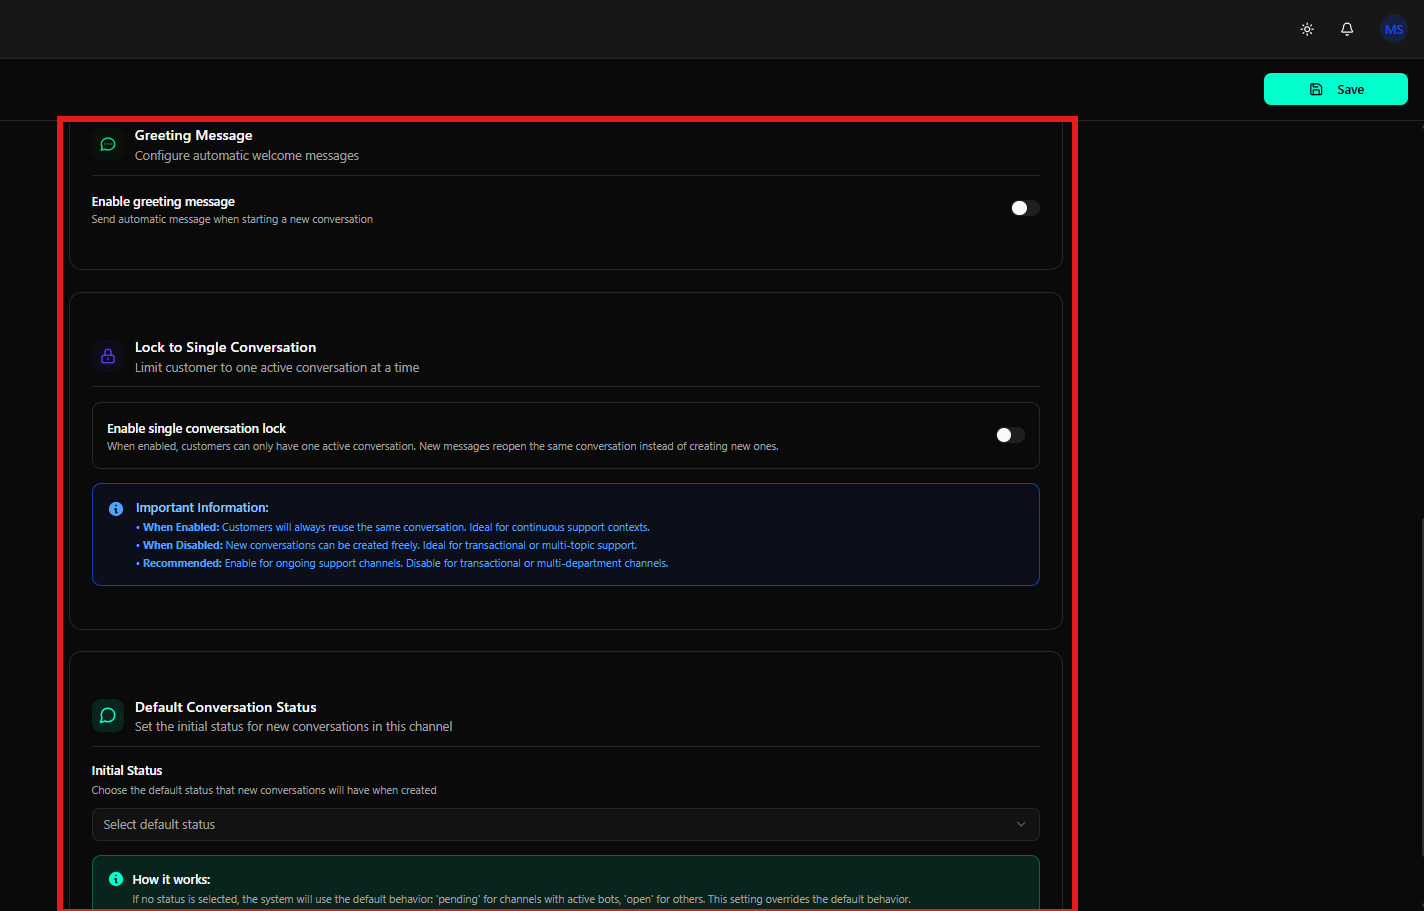
Greeting Message
- Enable greeting message
- Sends automatic message when starting a new conversation
- Toggle to enable/disable
- Description: “Send automatic message when starting a new conversation.”
Lock to Single Conversation
- Enable single conversation lock
- Limits the customer to one active conversation at a time
- When enabled, new messages reopen the same conversation instead of creating new ones
- Description: “When enabled, customers can only have one active conversation. New messages reopen the same conversation instead of creating new ones.”
- When Enabled: Customers always reuse the same conversation. Ideal for continuous support.
- When Disabled: New conversations can be created freely. Ideal for transactional support or multi-department.
- Recommended: Enable for continuous support channels. Disable for transactional or multi-department channels.
Default Conversation Status
- Initial Status
- Defines the initial status for new conversations on this channel
- Dropdown to select the default status
- Description: “Choose the default status that new conversations will have when created.”
- If no status is selected, the system uses default behavior: ‘pending’ for channels with active bots, ‘open’ for others
- This setting overrides the default behavior
WhatsApp Settings
Update API Key
- Update API Key
- Allows updating the WhatsApp API key
- Description: “Paste your new WhatsApp API Key here.”
- Field to paste the new API Key
- Update button to save
Mark as Read
- Mark messages as read
- Automatically marks messages as read on WhatsApp
- Description: “Automatically mark messages as read on WhatsApp.”
- Toggle to enable/disable
Collaborators (Collaborators)
The Collaborators tab allows you to manage which agents can handle conversations on this channel.Agent Selection
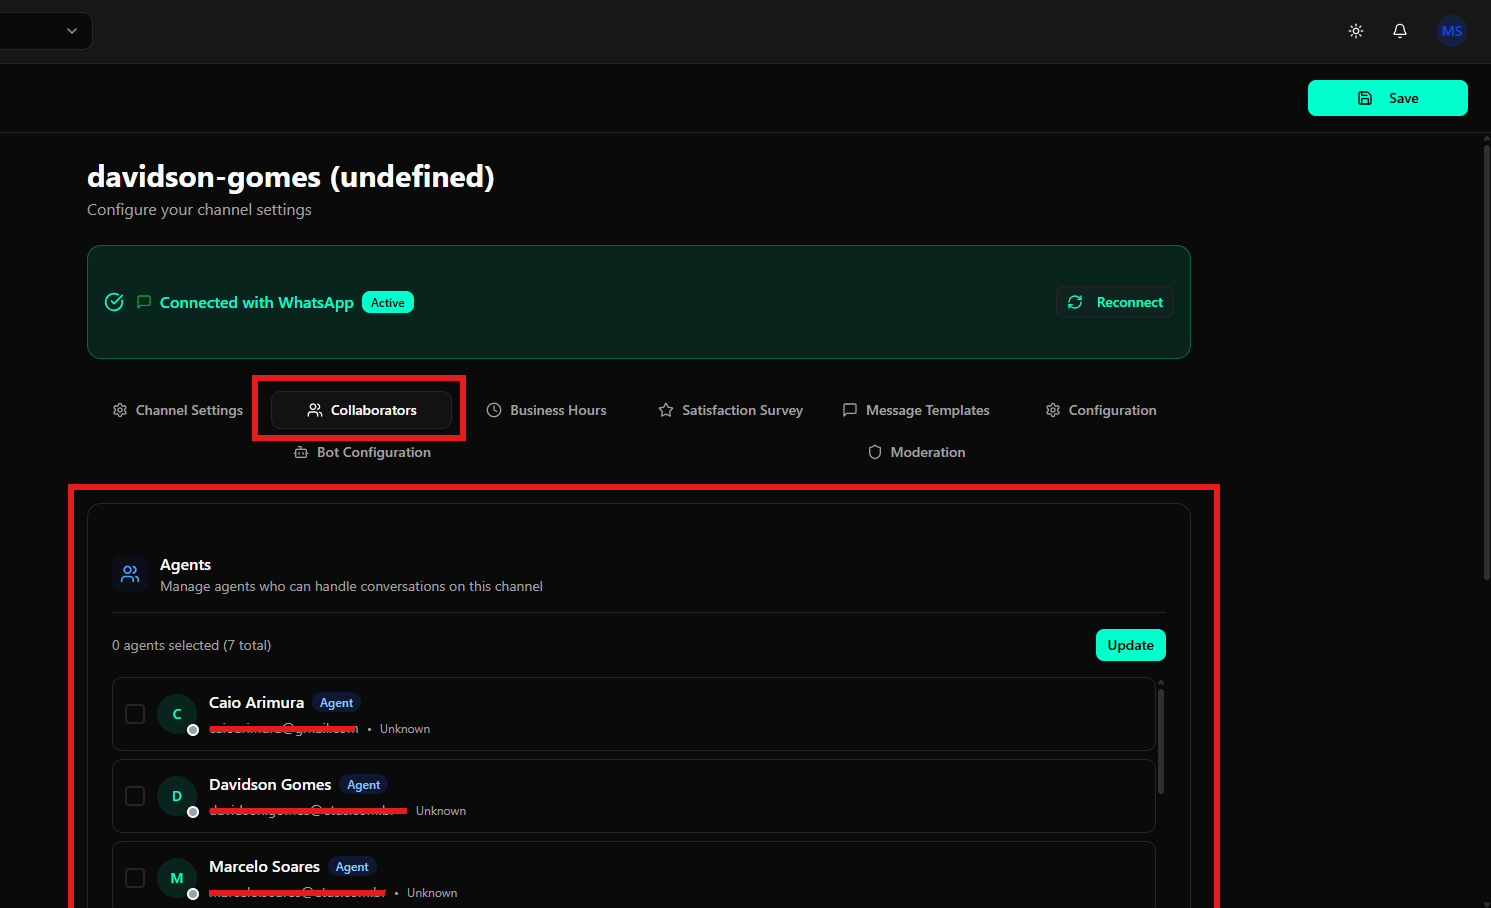
Agent List
- Displays all agents available in the system
- Allows selecting which agents will have access to the channel through checkboxes
- Shows information for each agent:
- Avatar with name initial
- Full name
- Status (e.g., “Unknown”)
- Type (Agent)
- Displays summary: “X agents selected (Y total)”
- Update button to save changes after selecting agents
Automatic Assignment
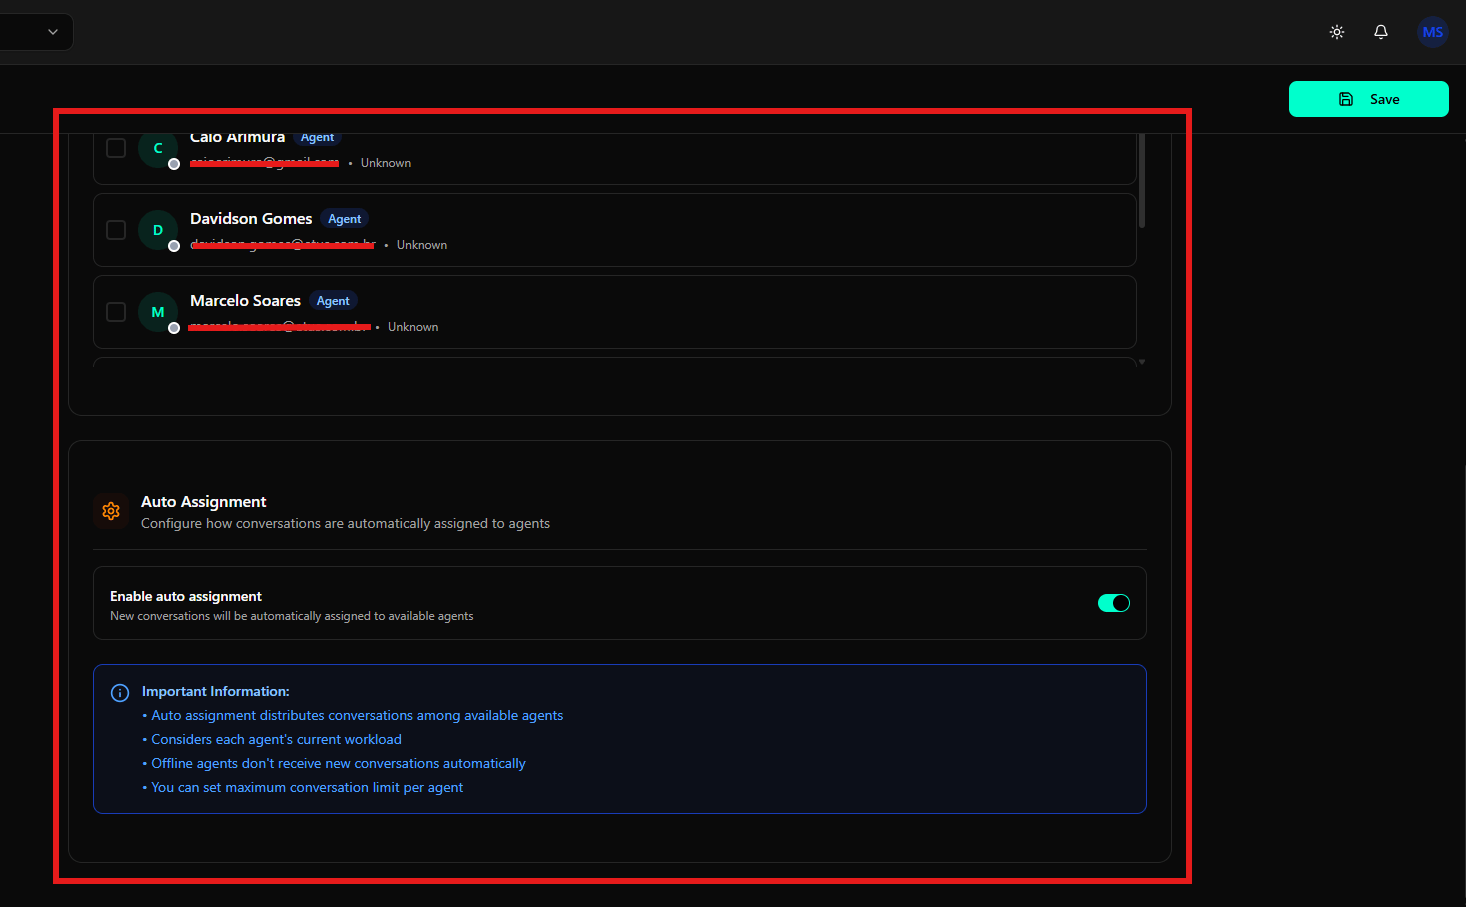
Enable Auto Assignment
- Enable auto assignment
- Configures how conversations are automatically assigned to agents
- When enabled, new conversations are automatically assigned to available agents
- Description: “New conversations will be automatically assigned to available agents”
- Toggle to enable/disable
Important Information
- Automatic assignment distributes conversations among available agents
- Considers each agent’s current workload
- Offline agents do not automatically receive new conversations
- You can set a maximum limit of conversations per agent
Business Hours (Business Hours)
The Business Hours tab allows you to configure the hours when your team is available.Business Hours Disabled
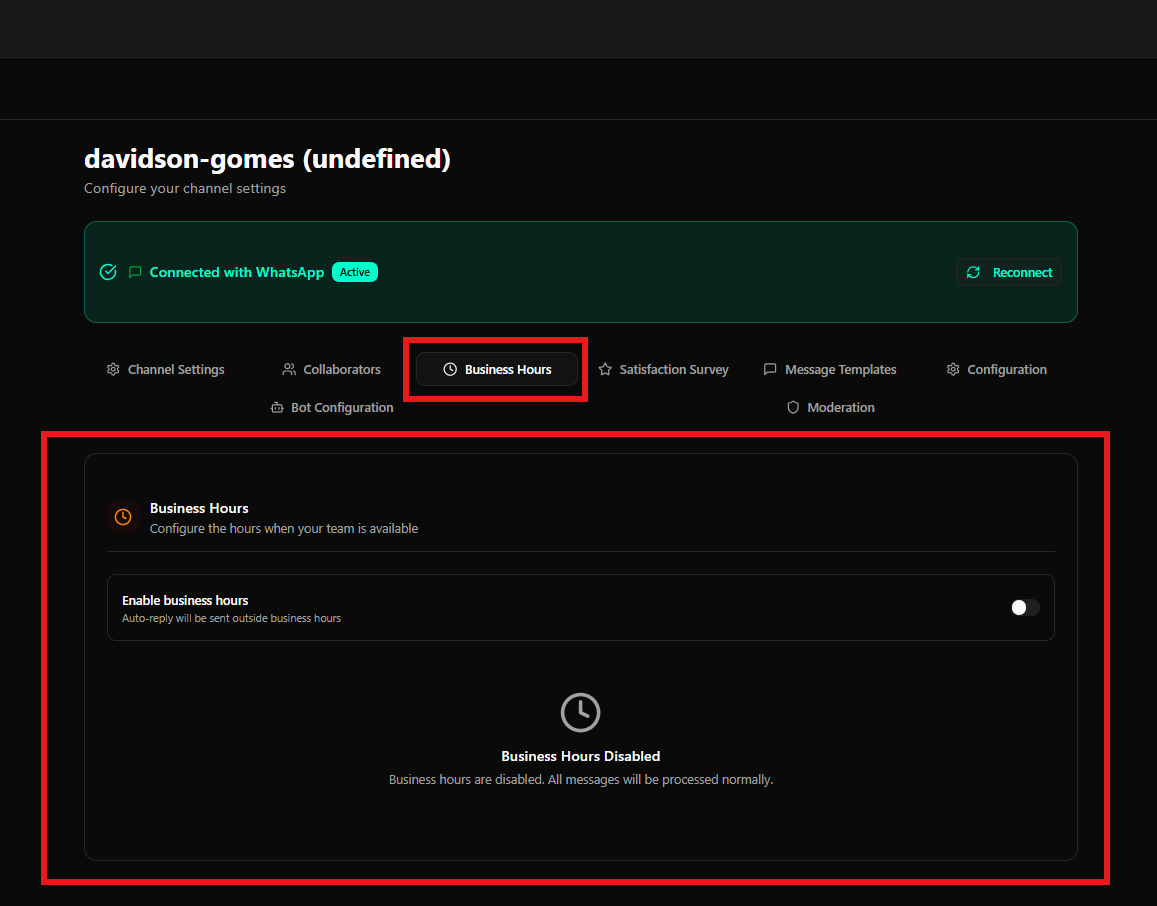
- Displays message: “Business Hours Disabled”
- Description: “Business hours are disabled. All messages will be processed normally.”
- All messages are processed normally, without time restrictions
Business Hours Configuration
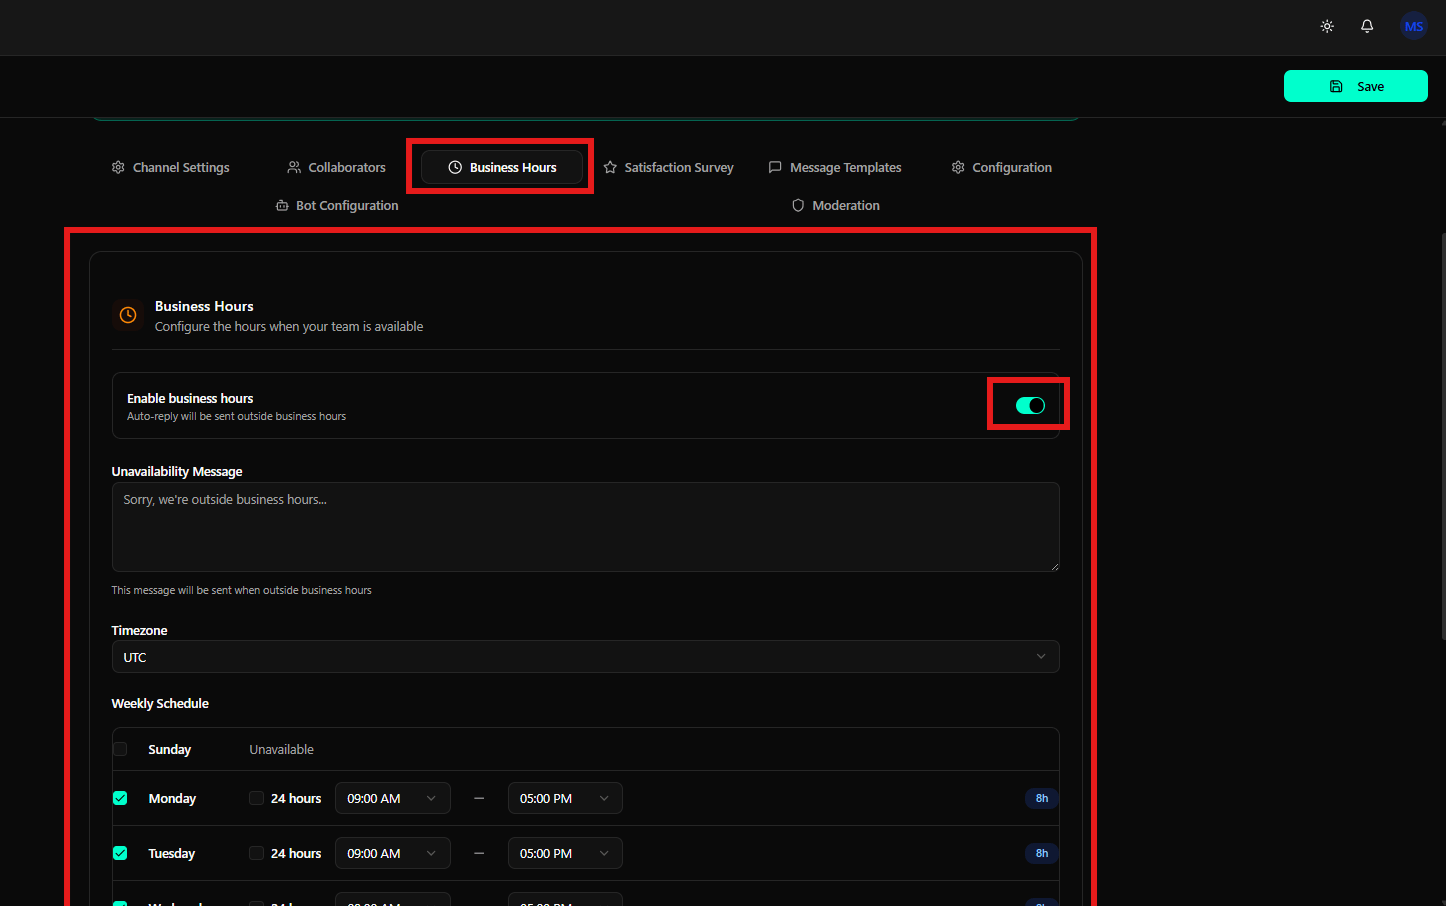
Enable Business Hours
- Enable business hours
- Toggle to activate/deactivate business hours
- When activated, automatic messages are sent outside business hours
- Description: “Auto-reply will be sent outside business hours.”
Unavailability Message
- Unavailability Message
- Custom message sent when the team is outside business hours
- Text field to customize the message
- Example: “Sorry, we’re outside business hours…”
- Description: “This message will be sent when outside business hours”
Timezone
- Timezone
- Timezone selector for business hours
- Example: UTC
Weekly Schedule
- Weekly Schedule
- Configure specific hours for each day of the week
- For each day:
- Checkbox to enable/disable the day
- Start and end time (AM/PM format)
- “24 hours” option for full availability
- Display of business day duration (e.g., “8h”)
- Example configuration:
- Sunday: Unavailable (checkbox unchecked)
- Monday: 09:00 AM - 05:00 PM (8h)
- Tuesday: 09:00 AM - 05:00 PM (8h)
- And so on for the remaining days
Satisfaction Survey (Satisfaction Survey)
The Satisfaction Survey tab allows you to configure customer satisfaction surveys (CSAT).CSAT Disabled
When the CSAT survey is disabled:- Displays star icon and message: “CSAT Disabled”
- Description: “Customer satisfaction survey is disabled for this channel.”
- The survey is not sent to customers
Complete CSAT Configuration
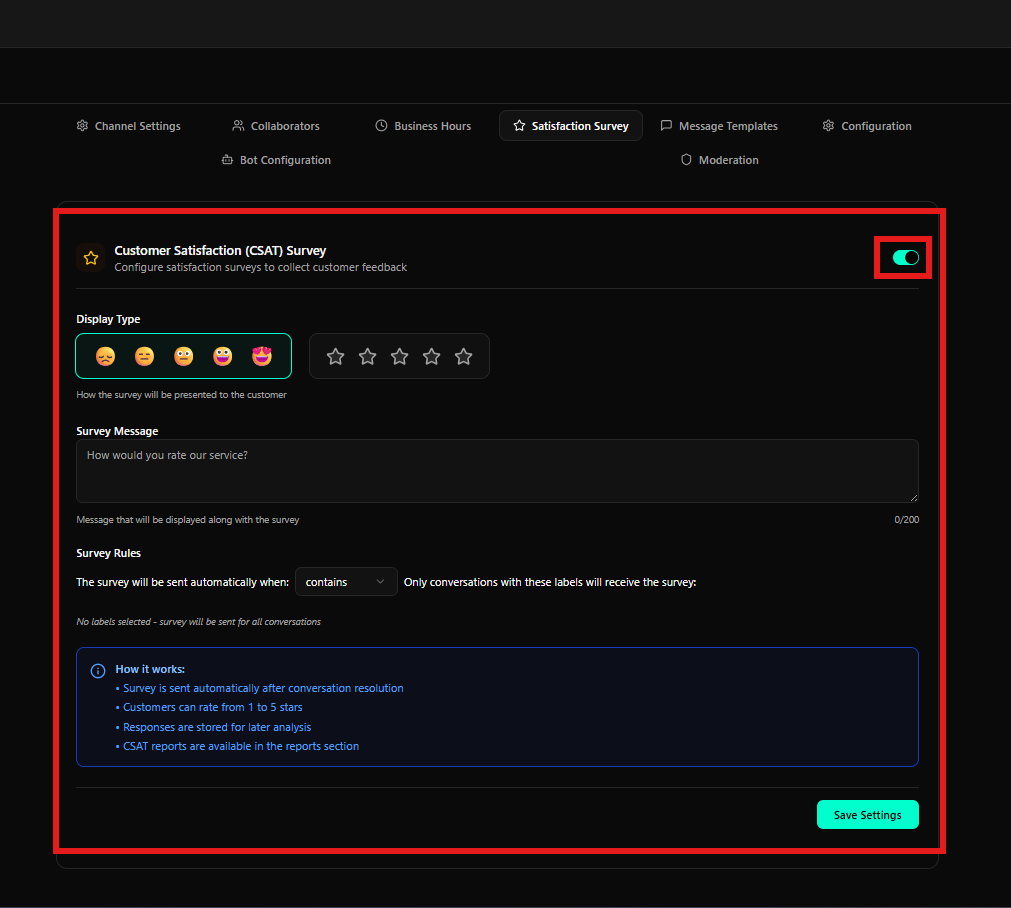
Enable CSAT Survey
- Customer Satisfaction (CSAT) Survey
- Toggle to activate/deactivate satisfaction surveys
- Description: “Configure satisfaction surveys to collect customer feedback”
- When enabled, all configuration options become available
Display Type
- Display Type
- Defines how the survey will be presented to the customer
- Description: “How the survey will be presented to the customer”
- Options:
- Facial expression emojis (very sad, sad, neutral, happy, very happy) - selected option
- Star icons (1 to 5 stars)
Survey Message
- Survey Message
- Message that will be displayed along with the survey
- Multiline text field
- Example: “How would you rate our service?”
- Description: “Message that will be displayed along with the survey”
- 200 character limit (displayed as “0/200”)
Survey Rules
- Survey Rules
- Condition: The survey will be sent automatically when:
- Dropdown to select condition (e.g., “contains”)
- Labels: Only conversations with these labels will receive the survey
- If no label is selected, the survey will be sent for all conversations
- Message: “No labels selected - survey will be sent for all conversations”
- Condition: The survey will be sent automatically when:
How It Works
- The survey is sent automatically after conversation resolution
- Customers can rate from 1 to 5 stars
- Responses are stored for later analysis
- CSAT reports are available in the reports section
Message Templates (Message Templates)
The Message Templates tab allows you to manage message templates for the channel.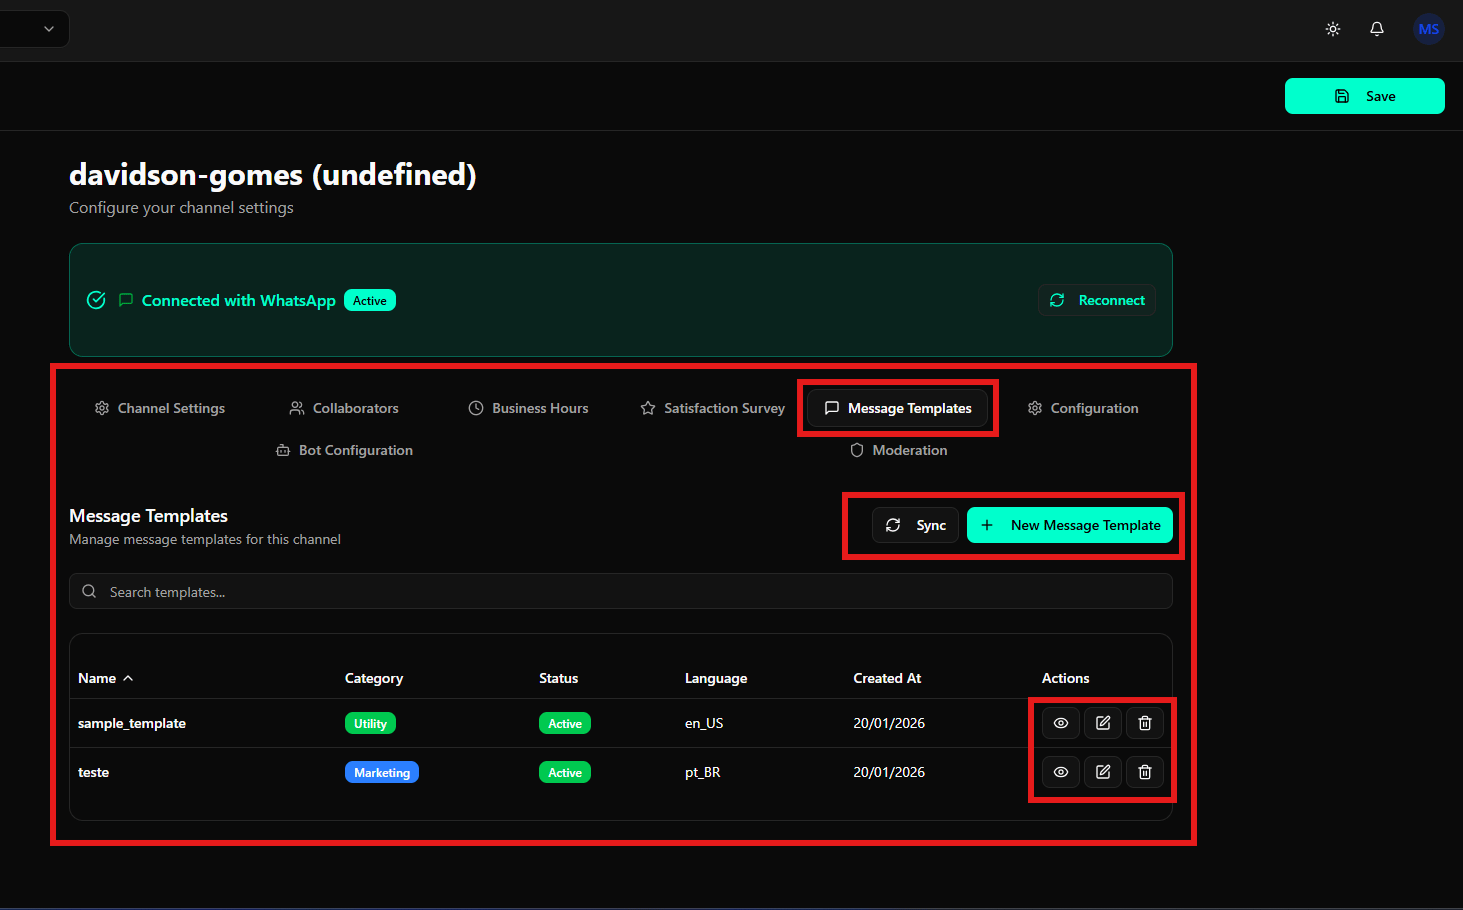
Features
- Search templates: Search field with placeholder “Search templates…” to find specific templates
- Sync: Sync button with refresh icon to sync templates with the provider
- Create new template: Green + New Message Template button to create new templates
Template List
The table displays existing templates with the following columns:- Name: Template name (e.g., “sample_template”, “teste”)
- Category: Template category with colored badge (e.g., “Utility” in green, “Marketing” in blue)
- Status: Template status with badge (e.g., “Active” in green)
- Language: Template language (e.g., “en_US”, “pt_BR”)
- Created At: Creation date (e.g., “20/01/2026”)
- Actions: Column with actions for each template:
- View: Eye icon
- Edit: Pencil icon
- Delete: Trash icon
Create New Message Template
When clicking + New Message Template, a creation screen is displayed.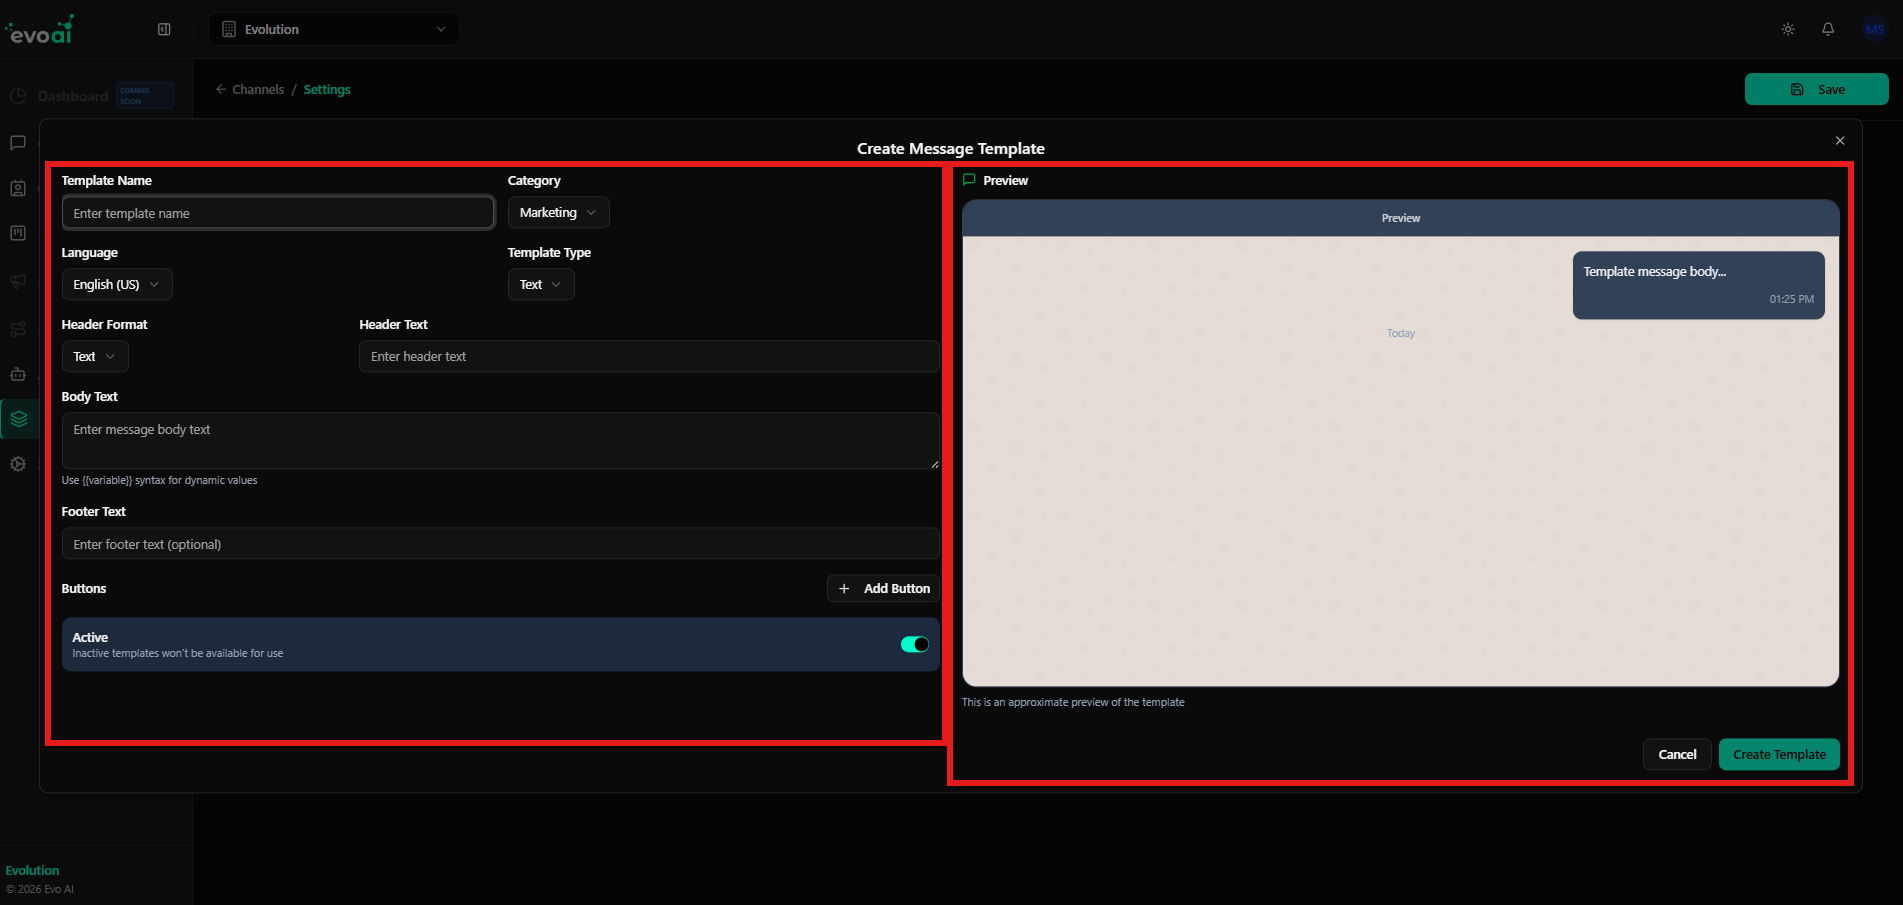
Configuration (Configuration)
The Configuration tab contains advanced channel settings.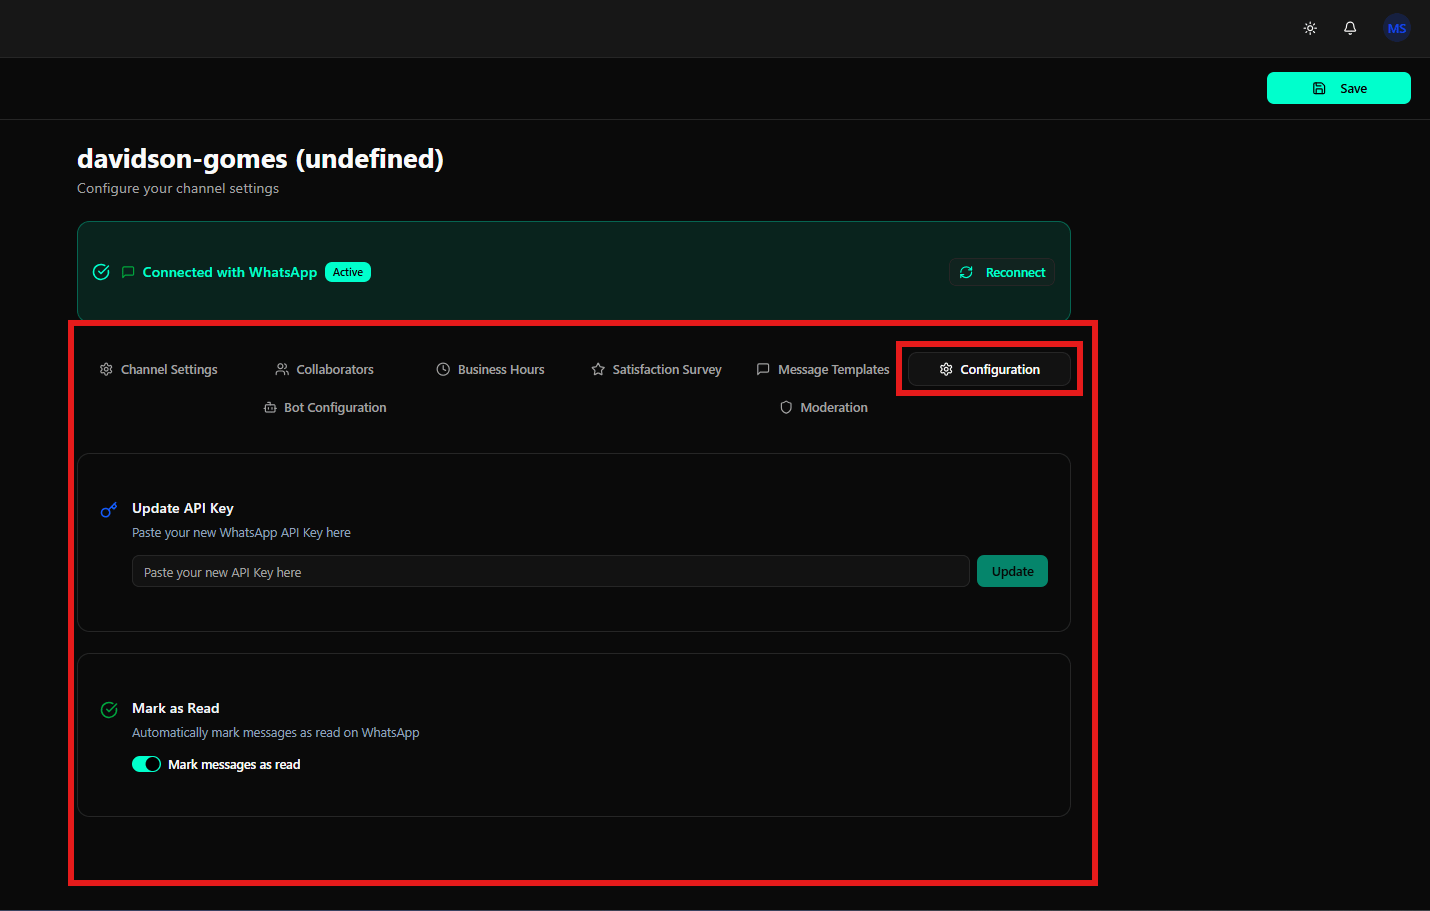
Bot Configuration (Bot Configuration)
The Bot Configuration tab allows you to configure support bots to automate responses.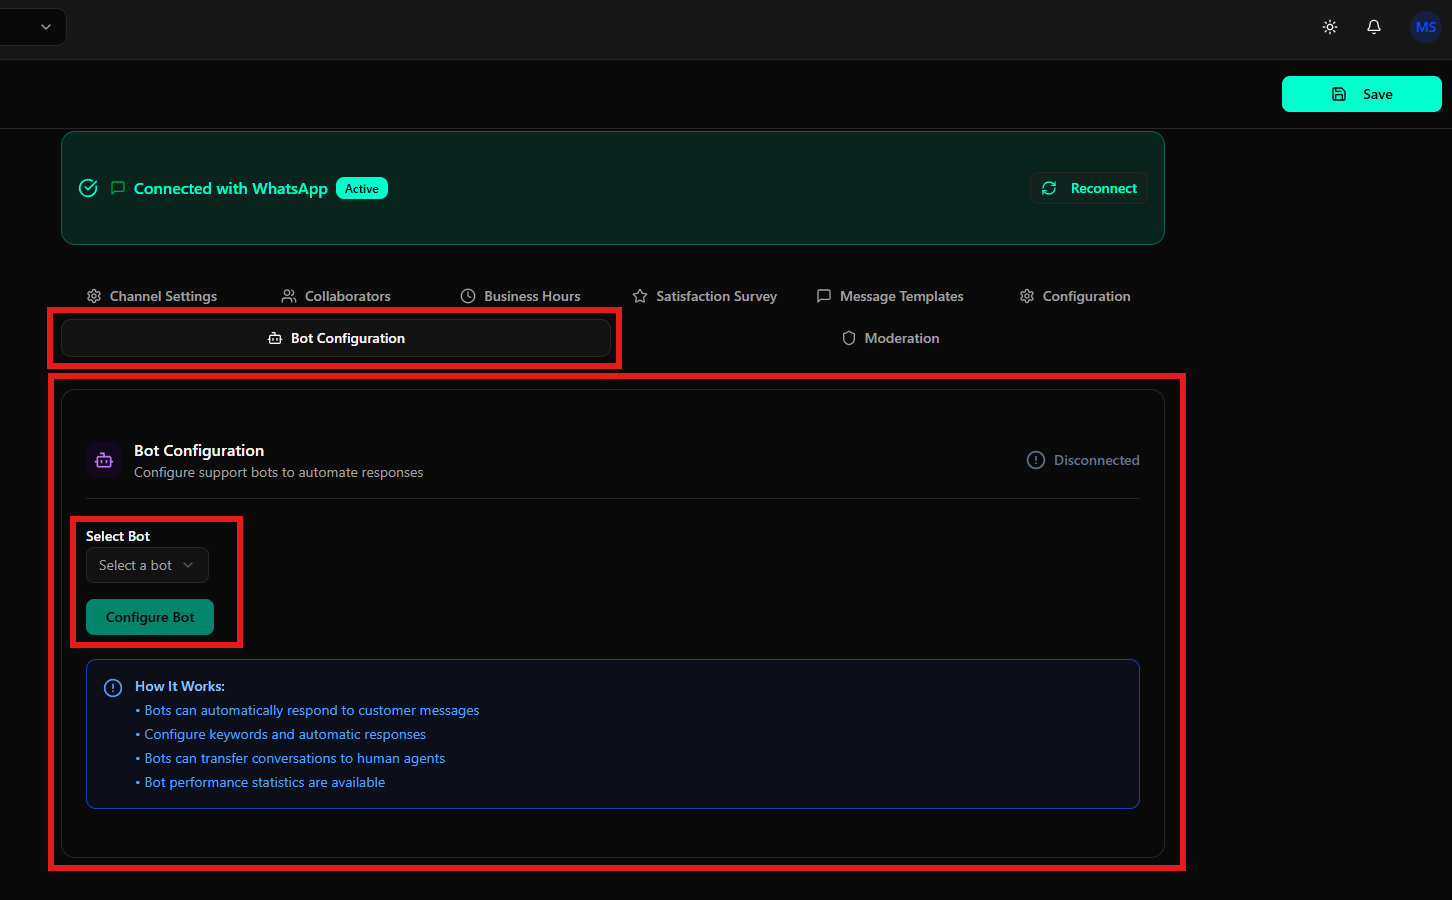
Title and Description
- Bot Configuration
- Description: “Configure support bots to automate responses”
- Status: Displays the current bot connection status (e.g., “Disconnected” with alert icon)
Select Bot
- Select Bot
- Dropdown with placeholder “Select a bot” to select an existing bot
- Green Configure Bot button to configure the selected bot
How It Works
Information box explaining bot features:- Bots can automatically respond to customer messages
- Configure keywords and automatic responses
- Bots can transfer conversations to human agents
- Bot performance statistics are available
Moderation (Moderation)
The Moderation tab allows you to review and moderate Facebook comments that require approval.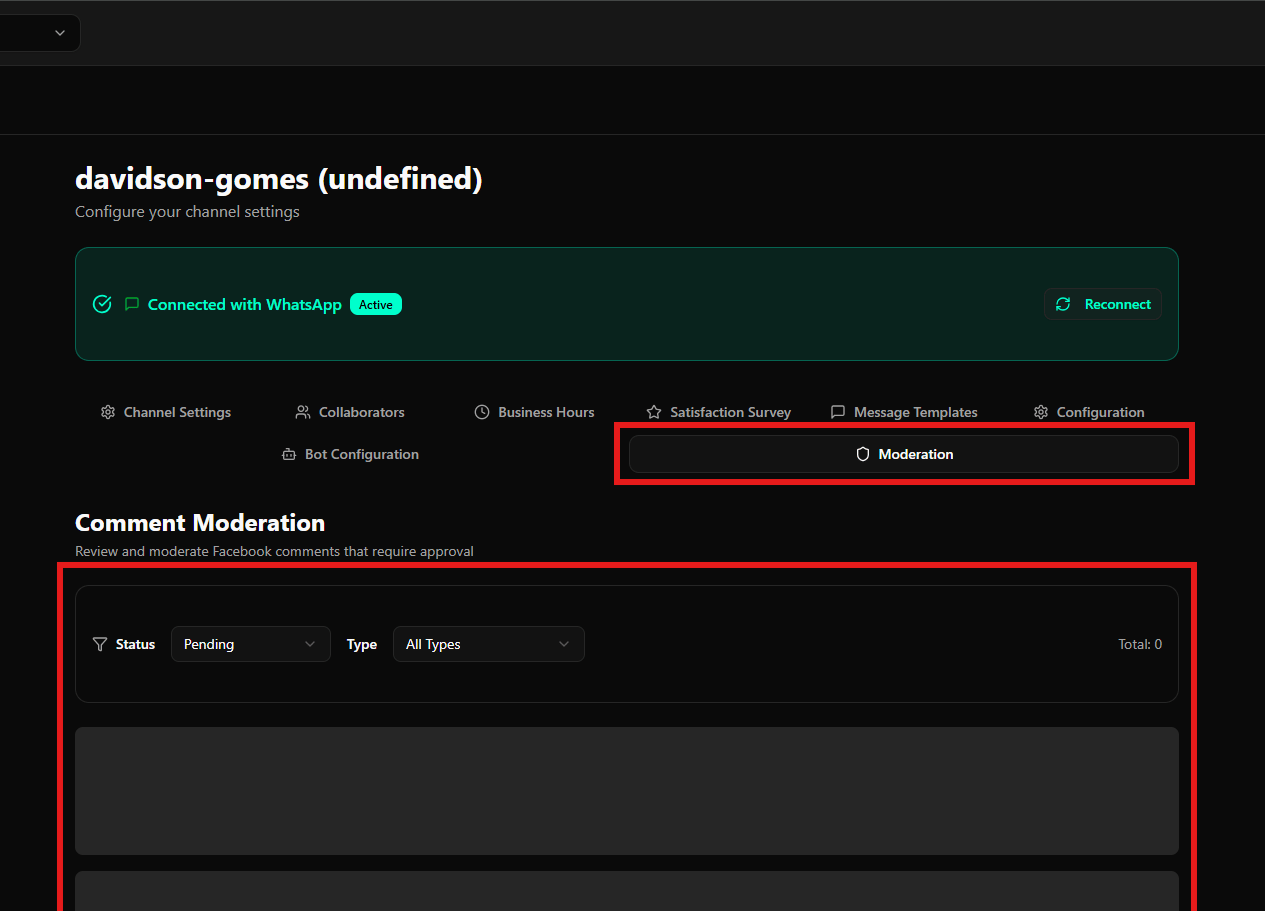
Comment Moderation
- Comment Moderation
- Title: “Comment Moderation”
- Description: “Review and moderate Facebook comments that require approval”
Filters
Filter bar with:- Status: Status filter with funnel icon (e.g., “Pending”)
- Type: Type filter (e.g., “All Types”)
- Total: Pending comments counter (e.g., “Total: 0”)
Comments Area
- Displays Facebook comments awaiting moderation
- When there are no pending comments, shows empty areas indicating there are no items to moderate
- Allows approving or rejecting comments when available
Final Considerations
- All settings changes must be saved using the Save button at the top of the screen
- Settings are specific to each channel
- Some settings may vary depending on the channel type (WhatsApp, Email, etc.)
- It is recommended to review all configuration tabs to optimize channel operation
- The Save button is always available in the upper right corner to save all changes at once