

Flow overview
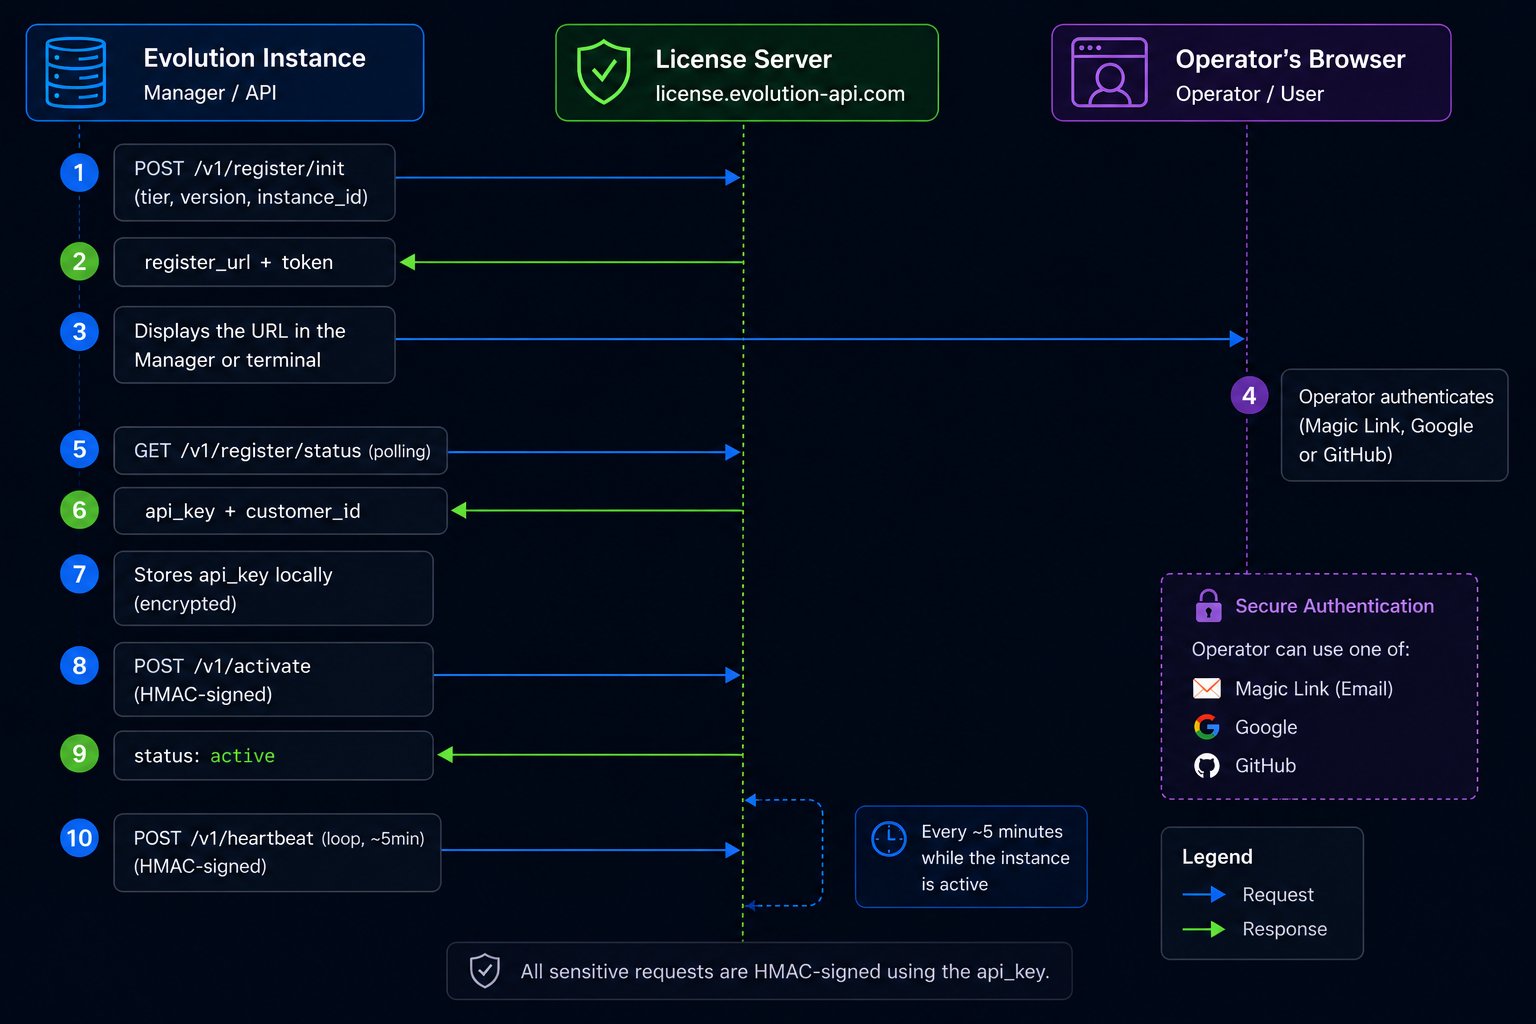
LICENSE_BASE_URL env var in the product .env (default: https://license.evolutionfoundation.com.br).
Step 1 — Initiate registration
When the instance detects noapi_key is saved locally, it calls:
Response (200):
Step 2 — Show URL to operator
The instance displaysregister_url to the operator. Accepted patterns:
- Web UI / Manager — “Activate License” button opens the link in a browser
- Terminal / CLI — print the URL and wait
- QR Code — in headless deployments, generate a QR for scanning
Step 3 — What happens in the browser
The license server renders the registration page with Evolution’s visual identity. The operator picks one of:- Magic Link — provides name + email, receives a confirmation link by email
- Google OAuth — Google account login
- GitHub OAuth — GitHub account login
authorization_code. This flow is transparent to the instance — it only needs to poll.
Step 4 — Status polling
While the operator handles login, the instance polls:- Polling interval between 3 and 5 seconds (not faster)
- Total timeout of 30 minutes
- On
completed, persistapi_keyin a secure location (encrypted config, secret manager, etc.)
Step 5 — Activate the instance
With theapi_key in hand, the instance calls the activation endpoint:
Geolocation (
operator_country, operator_city) is detected automatically from the request IP. The instance does not send that info.Step 6 — Periodic heartbeat
After activation, the instance sends heartbeats every 5 minutes:telemetry_bundle field is free-form JSON. Fields extracted automatically by the server are detailed in Telemetry.
Step 7 — Deactivation (optional)
On graceful shutdown (uninstall, intentional container stop), recommended:HMAC authentication
All calls to/v1/activate, /v1/heartbeat and /v1/deactivate require the X-Signature header with HMAC-SHA256 of the body.
Algorithm:
- Serialize the body as JSON
- Compute
HMAC-SHA256(body, api_key) - Convert to hexadecimal
- Send in the
X-Signatureheader
Python example
Node.js example
Go example
Error codes
Integration checklist
For those implementing activation in a fork or derivative product:- Generate and persist
instance_id(UUID v4) on first run - Implement
POST /v1/register/initwhen noapi_keyexists - Display
register_urlto operator (UI, terminal or QR) - Poll
GET /v1/register/statusevery 3–5s - Persist
api_keyin a secure location (no plain text) - Implement HMAC-SHA256 for all signed calls
-
POST /v1/activateon service startup -
POST /v1/heartbeatevery 5min withmessages_sent+features -
POST /v1/deactivateon graceful shutdown - Handle errors (expired token, suspended key, instance limit)
- Exponential backoff on transient network failures
Offline mode and degradation
If the license server is unreachable:- The instance keeps working normally
- Heartbeats fail silently (no application crash)
- After reconnection, the next heartbeat resumes the cycle